Sunday, July 30, 2023

Curried Creamed Spinach with Saffron


I looked at my recipe for palak paneer and decided I wasn't in the mood for something that complex or that many dishes to wash.  So I threw a bunch of similar flavors in a pan, microwaved a box of frozen spinach, and stirred in some sour cream at the end.

I wish I had made a double batch.  This has tons of flavor from the spices and tomato paste, but it isn't "spicy".  It's flavorful, with a touch of saffron aroma at the end.

And yes, I did realize that the color combinations were going to turn this brown, or at least a muddy orange.  If you're expecting it, it isn't unappetizing.  Might be a harder sell to kids, though.

The next time you need a twist on the traditional creamed spinach, I recommend trying this one out.

1 Tb olive oil
1/2 C diced onion
1/2 tsp paprika
1/2 tsp curry powder
1/4 tsp salt
*1 clove garlic, minced
*1/2 tsp grated ginger
2 Tb tomato paste
1 10 oz box frozen chopped spinach
*1 Tb lemon juice
1 pinch saffron
*1/4 C sour cream

1.  Heat oil over medium in a large skillet.  Add diced onion and cook, stirring occasionally, until softened, about 5 minutes.

2.  While the onions are cooking, open box of spinach and set the box on a microwave-safe plate.  Add a tablespoon of water and microwave for 2 minutes.  Let it camp out in the microwave until ready to use.  Crush saffron strands into a small cup and add 1 Tb boiling water, so it can bloom while everything is cooking.

3.  Once onions are softened, add minced garlic, tomato paste, grated ginger, and dry spices.  Cook until fragrant and it makes a thick paste, about 2 minutes.

4.  Add box of spinach.  It will have a lot of water in it.  Use that water to help you break up any remaining frozen sections and stir until uniform in the pan.  Continue to cook until extra water boils off, then remove from heat.

5.  Finish with lemon juice, the saffron in water, and sour cream.  Serve hot.

Difficulty rating  π

Thursday, July 27, 2023

Sweet Potato and Lentil Salad

I'm trying very hard to make my carbohydrate dishes count as genuine nutrition.  This main dish salad is packed with protein, iron, and fiber, plus plenty of vitamins and minerals.  I decided to have this with a side of creamed spinach instead of jasmine rice.  Same carb count, but a much better choice.  In the good old days, I would have had both, plus the avocado chapati that I did have as a side because it's whole wheat.  I would have counted the salad as my protein and ignored that it's also carbohydrates.

Boring nutrition rant over.  I also liked that this recipe from Plant Based School leans Moroccan in flavor.  It isn't a specific international recipe, so I'm not giving it that designation.  I'm scaling it down to 4 generous servings and changing up the herbs a little to skew even more Moroccan.  I highly recommend you make a sprig of mint part of your herb mix.  It brightened up the salad so much!

If serving cold, this dish is a great do-ahead.  It will take about an hour if you're cooking the lentils, about 45 minutes from a can and only roasting the potatoes.  Then you would chill it at least 2 hours.  For hot, it's still going to take you that cooking time.

2/3 C green or brown lentils, or one 15 oz can
1 lb orange (red) sweet potatoes
1/4 olive oil, divided
2 Tb lemon juice
2 cloves garlic, minced
1/2 tsp each cumin and paprika
3/4 C chopped fresh herbs like parsley, mint, cilantro, basil, oregano, etc
salt and pepper to taste
feta and chopped nuts for serving, optional

1.  If starting lentils from dry, sort and rinse.  In a saucepan, bring to a boil with water to cover by at least one inch.  Lower heat to a simmer and cook until tender, about 40 minutes.  Drain.  For canned, drain and rinse.

2.  Preheat oven to 400º and line a baking sheet with parchment for easy clean up.  Peel sweet potatoes and dice into 1" chunks.

3.  Toss diced potatoes in 1 Tb olive oil and a little salt and pepper, less than 1/2 tsp of each.  Spread in an even layer on baking sheet.

4.  Roast potatoes until soft and a little browned, about 20-25 minutes.  Set aside, since the lentils still won't be done.

5.  For the dressing, whisk together 3 Tb olive oil, lemon juice, garlic, cumin, paprika, and a dash of salt and pepper.  Taste and adjust seasonings, keeping in mind that lentils can taste a little muddy.

6.  Toss together potatoes, lentils, dressing, and about half the chopped herbs.  Transfer to serving dish. If  serving warm, top with remaining herbs, feta, and nuts and serve immediately.  For chilled, refrigerate at least 2 hours, then top with garnishes.

Serves 4-6

Difficulty rating  :)

Monday, July 24, 2023

Mystery Gourd

Generally, you should mark where you plant what seeds.  I put one of my nice, metal markers where I planted the first pumpkin seeds, then got lazy after that and decided not to mark up any more until something sprouted.  In the moment, you think "Oh, I'm never going to forget where I put something as big as a pumpkin/watermelon/squash."

Yep, I forgot.  For the heck of it, I planted a stray spaghetti squash seed between my kale, even though I had roasted the squash and did not expect it to sprout.  Something came up in that spot.  Now I don't remember if I had seeded pumpkin or watermelon in that same spot.  Probably.  I think so.  Maybe.

I'm going to have to wait until the plant blooms to figure it out.  Even then, the watermelon and spaghetti squash ovaries may look similar.  I don't remember what watermelon flowers look like, and this is a different variety than I grew before anyway.

It's probably a pumpkin.

The moral of the story is, mark your seed beds.

Friday, July 21, 2023

Blueberry Cheesecake Bites

Let's get one thing straight: cheesecake is not my favorite dessert.  However, it is the number one dessert I know how to make that can be done reduced carb and low fat without sacrificing taste.

Wait, what, low fat cheesecake?  Absolutely.  Reduced fat cream cheese, egg whites, and nonfat yogurt are the primary ingredients here.  The crust is nut based, which does have fat, but it's a "good fat".  I'm adding as little sugar as I can get away with and still consider this a treat, relying on the blueberries to bring their "free" carbs that don't count against me.  Plus, I'm trying erythritol, a no-carb sweetener.  It's derived from sugar alcohols and tastes like sugar.  It's expensive, so I don't seeing it as being a permanent part of my diet, but one bag on clearance was worth a try.  Aside from all that, it's just the blender cheesecake recipe.

In the interest of portion control, I made cupcake-sized mini cheesecakes.  The first 1/3 recipe cake I made, I cut it into 6 portions.  While the math on that works, I felt like the slices were too big.  These cupcakes were smaller, and easier to freeze.  Out of sight, out of mouth.

When most people hear something-berry cheesecake, they think of pie filling over a regular vanilla cake.  I'm throwing most of them into the blender with the batter.  Yes, it turns the pie purple.  I feel like that's a nice contrast to the topping, and makes the flavor uniform.  You aren't biting into one sweet berry and one that wasn't quite right.

I'm using frozen blueberries.  Fruit has gotten expensive, like everything else.  I could get a pound frozen for the same price as 6 ounces fresh.  Easy math.

Crust

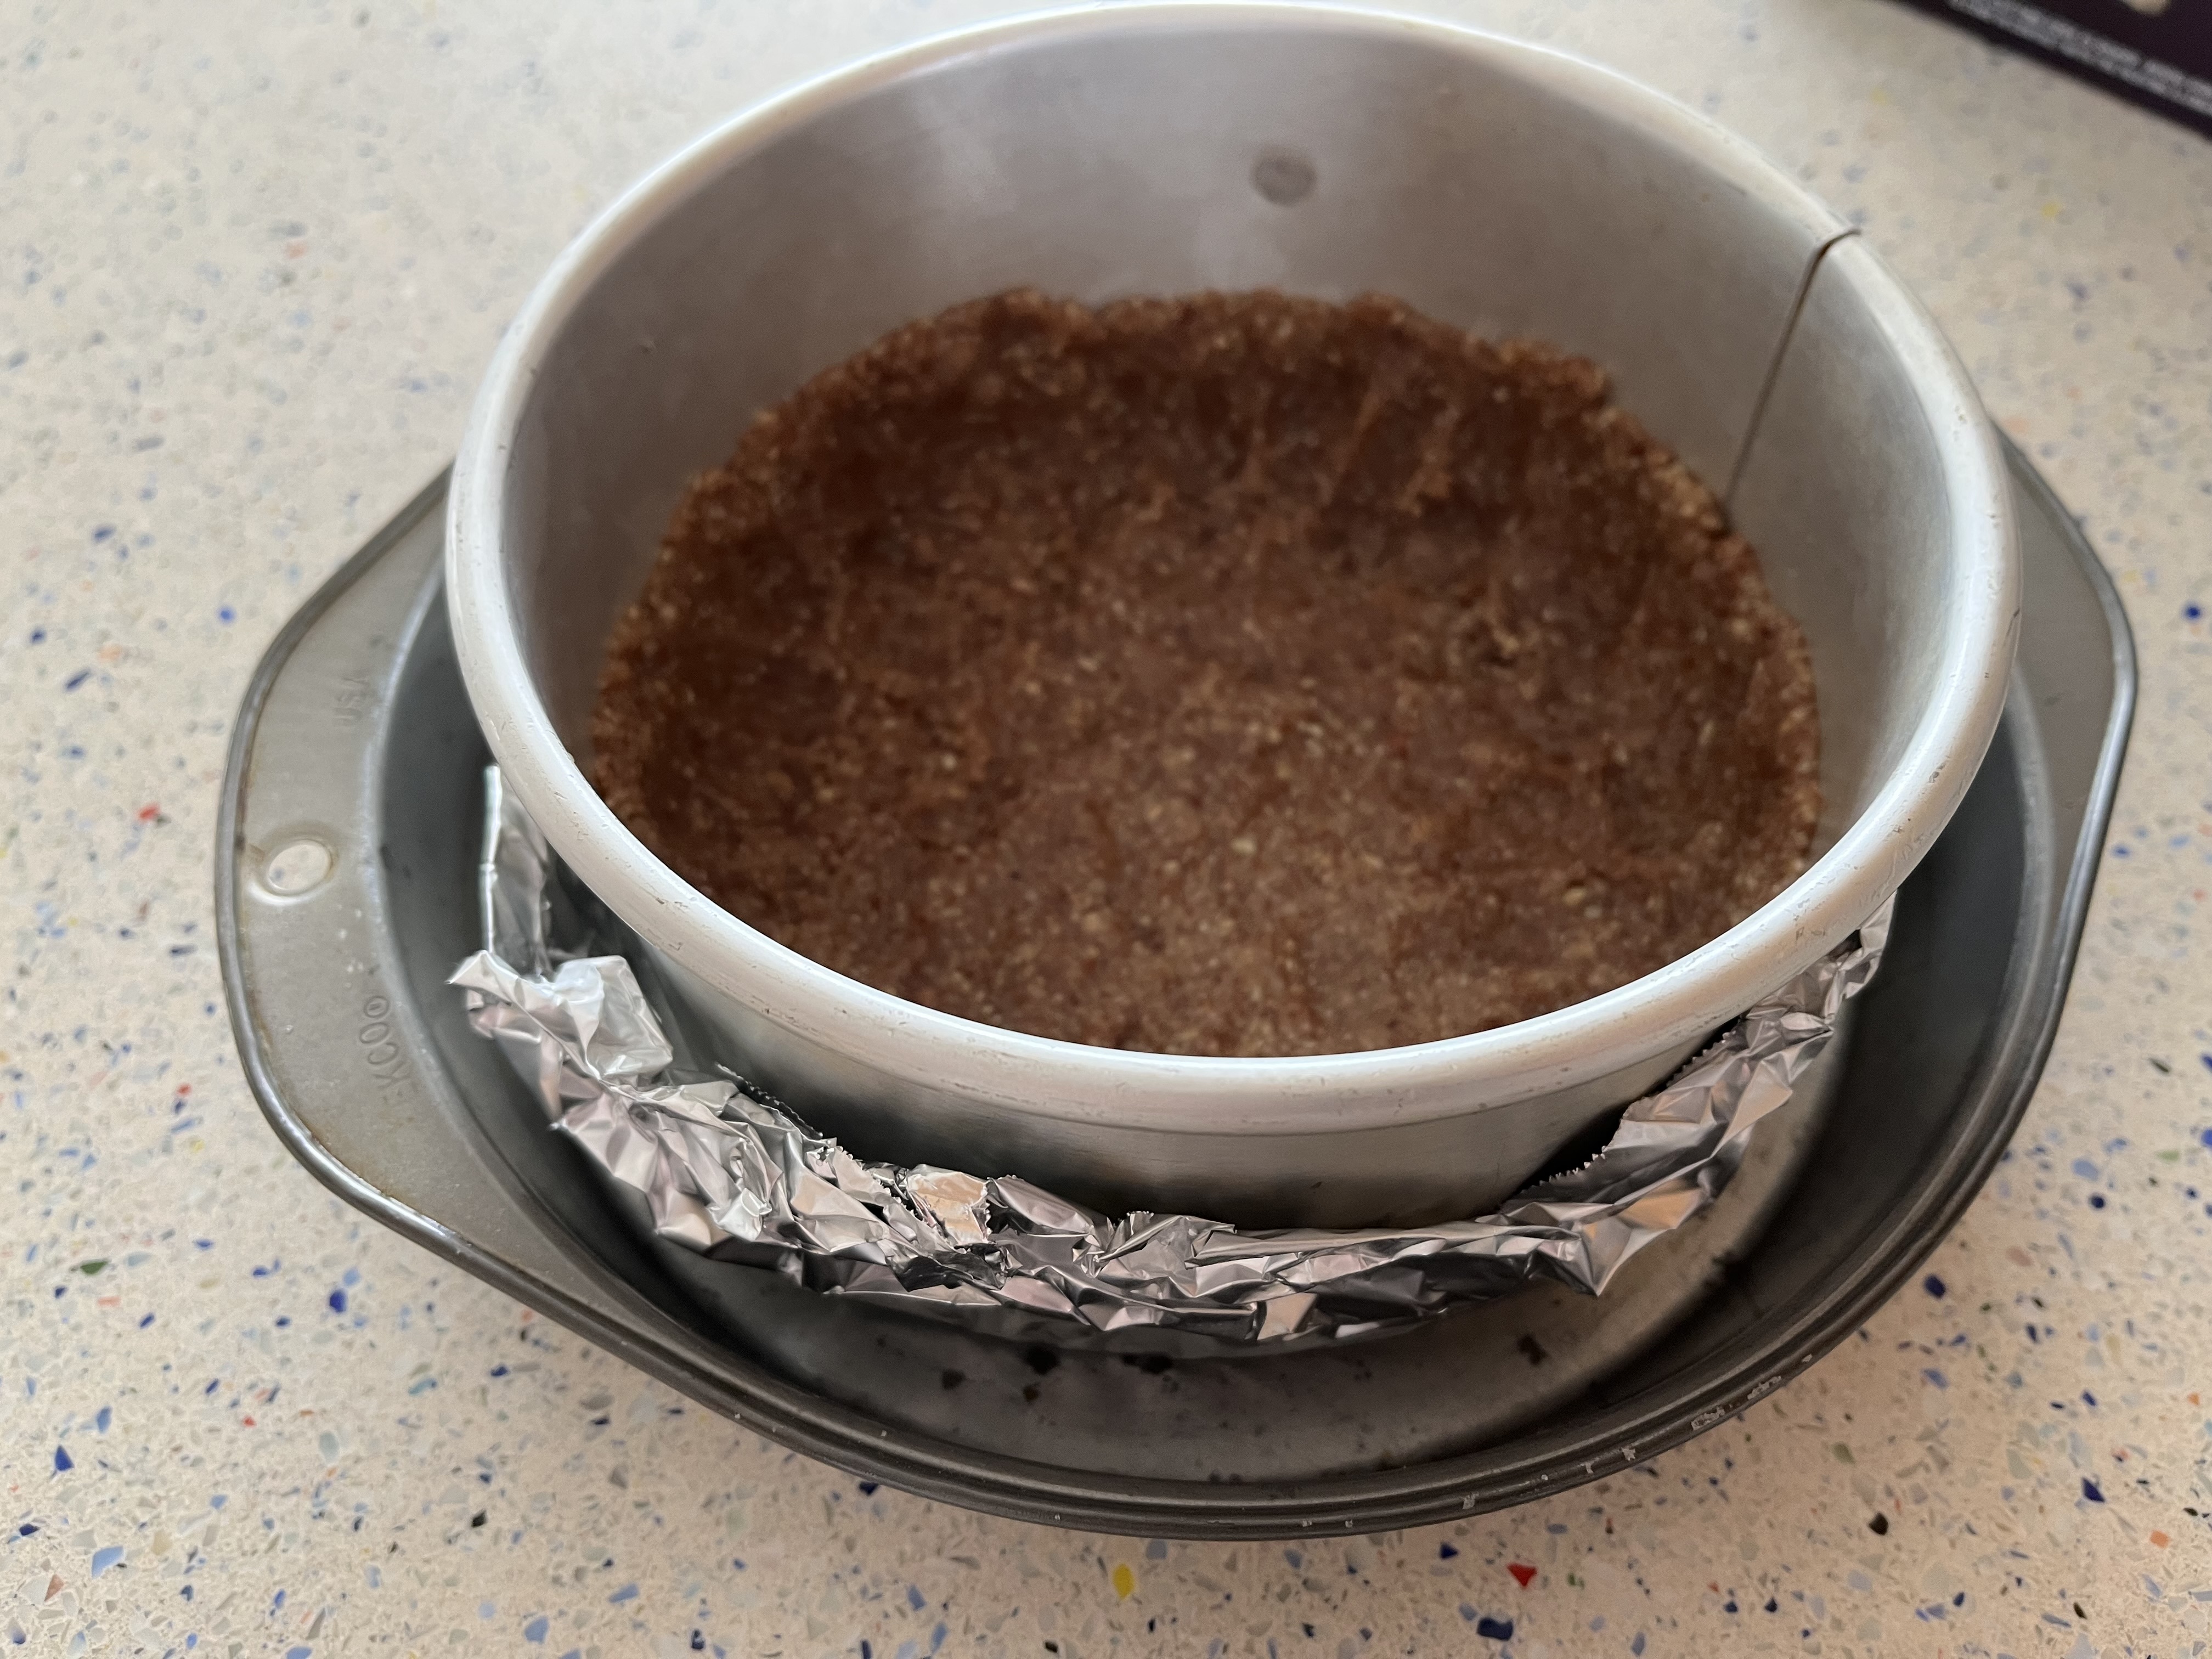
*3/4 C ground almonds (can be almond flour or running sliced through the processor)
1 Tb sugar (or erythritol)
1 Tb butter, melted


1.  Stir together all ingredients.  If starting with sliced almonds, pulse nuts with sugar in the processor to desired consistency, then pulse in butter.

2.  Pat 1 Tb into each of 12 lined muffin cups.  This was when I found out I had bought "jumbo" muffin liners instead of regular.  Must remember to pick up more regulars.  Actually, this recipe would likely work better with silicone cups, so maybe I should invest in those.  Also, I had been guessing a yield of 8-10 out of the batter, and this makes 12, so the photos won't exactly match.

3.  Set aside while you make the batter.  Can also be refrigerated for up to 3 days.

Batter

8oz block Neufchatel (reduced-fat) cream cheese
5 oz fat free plain Greek yogurt (one single-serve container)
1/3 C egg whites or 2 eggs
1/3 C sugar (or erythritol)
1/2 C blueberries
2 tsp cornstarch
1/2 tsp lemon zest
1/2 tsp vanilla or 1 tsp rosewater

1.  Preheat oven to 350º.

2.  Everybody in the blender or food processor.  Run until smooth.

3.  Pour into prepared muffin cups.  Bake 20 minutes, or until lightly set in the middle.  They're going to deflate.  Turn off oven and allow to cool slowly for 1 hour, to minimize the sagging.

4.  Remove from baking tray and refrigerate until ready to serve, 4 to 24 hours.  I recommend leaving them in the paper.  If you really must remove them, wait until they are chilled and they will tear less.

Toppings

1/2 C low-fat sour cream
2 Tb sugar (or erythritol), divided
3/4 C blueberries

1.  In a small saucepan, stir together blueberries and 1 Tb sugar.  I also added 1 Tb water to help things along.  Warm over medium heat until you get a low boil.  Stir frequently while blueberries soften and make a sauce.  Remove from heat and allow to cool.

2.  Stir together sour cream and other tablespoon of sugar.  Spread over cheesecake bites.  Serve with blueberry sauce, either on top or as a side to spoon on.

Makes one dozen

Difficulty rating  :)

Tuesday, July 18, 2023

Meal Prepping Chicken

I'm not a big fan of boneless/skinless chicken.  The skin, aka fat, is where the flavor is.  It keeps the meat moist and juicy.  I generally take the skin off after baking, unless I'm snacky and eat it.  But the B/S was on sale for $2.99/lb, which is half what it usually costs these days, so I bought a four-pound pack.

I got out the Food Saver for a couple of the pieces and to break down a 2 pound chub of 85% lean ground beef that was also at a good sale price.  The rest went into the oven so I could have pre-cooked chicken slices to take to work.

I always assume there's enough salt pumped into the meat and only add salt to chicken when I'm crisping the skin.  No skin, no salt.  I seasoned these with a light amount of pepper, and that's it.  The concept I was shooting for was neutral chicken that I can make up however I want on the day.  Like canned, but roasted instead because I don't can meats.

I did have some reserved chicken fat from a previously roasted chicken to rub on the breasts instead of oil.  That's the little jar on the left.  My "recipe" for this is to roast at 350º until a thermometer reaches 165º in the thickest part of the breast, about 40 minutes.  Let rest 10 minutes, until cool enough to handle, then slice or shred.

So what do you do with roasted slices of chicken?  Add to salads or pasta, make chicken salad, drop into soup at the last minute, really anything you would use leftover chicken for.  I packed it with kimchi and a faint drizzle of teriyaki sauce one day (yes, I know it's loaded with sugar) and leftover garlic green beans and broccoli another.  One day, I did have some rice with it, but I kept the portion small.  Another day, I had some leftover bean soup and added the chicken slices to it.  It tastes great with balsamic vinaigrette and any vegetables in the fridge.

I'm trying here.  Two weeks until my recheck, when I find out if what I'm doing has helped at all.

Saturday, July 15, 2023

All-Day Chili

Ok, I'm not going to get into any arguments about the "real" chili, or if there should be beans in it, or if tomatoes belong in chili in the first place.  If you want an in-depth discussion of the history of chili, I recommend Max Miller's Tasting History.  That's not what I'm making today.

What I'm making here started with Natasha's Kitchen, since it was listed as a proper slow cooker chili.  It's also almost identical to the one in the low-carb nutrition book I bought.  Then I changed it to accommodate my own preferences and tiny Crockpot.  Because that's really what chili is.  Chili is the sauce, however you like it.  The solids are there to give you an excuse to eat the sauce.

The nice part about this recipe is that it's about 10 minutes of work in the morning and you get a hot dinner in the evening.  While I used the slow cooker, this post will also give stovetop and oven instructions.  I've only had the Crockpot for a few months, and still think in other modes of cooking.

A special note, only use canned beans in this recipe.  You will not be cooking above the boiling point, so they won't get done.  Especially if you use red beans, which must be boiled at least 20 minutes of their cooking time to eliminate a toxin.  It's also why I'm having you rinse the kidney beans instead of dumping in the can.  Just in case.

*1 lb ground beef, 80/20 or leaner
1/2 onion, diced
*1 clove garlic, minced
1 tsp cumin
1 Tb chili powder
1/2 tsp garlic powder
1/2 tsp dried oregano
1/2 tsp kosher salt, or to taste
1/4 tsp pepper, or to taste
1 15oz can kidney (or other favorite bean), rinsed
1 15oz can diced tomatoes
*1 Tb tomato paste
water as needed
toppings for serving, like shredded cheese, avocado, jalapeños, sour cream, cilantro, etc

1.  If using, place liner in slow cooker.  You'll thank me later.  Actually, if you're using the oven, it couldn't hurt to place a roasting liner in a 2-3 qt casserole.  If using oven, preheat to 175º, or the lowest setting you can.  The meat needs to cook to 165º, and hold above 135º.  Everything else in this dish is either cooked already after step 2 or doesn't need to be.

2.  In a medium skillet over medium-high heat, brown the beef and break into crumbles.  I have a hack for draining off the excess fat.  When about 75% of it has been rendered, hold a mesh strainer over the trash and pour off the liquids into it.  Then, any meat that falls will be caught.  Return to skillet and add onion, garlic, and spices, which will cook in any last-minute fat that renders off the meat.  Cook until meat is browned and onion is softened, another 5 minutes.

3.  Add meat mixture to prepared casserole (or 4 qt saucepan).  Stir in drained kidney beans, tomatoes in their juice, and tomato paste.  If necessary, add water to about 1/2" below ingredients.  Stir together.  For stovetop, cover and set at lowest heat for 4-6 hours (also for slow cooker on high setting).  For low oven or slow cooker on low setting, cook 6-8 hours.  If you're around, stir and check water level every few hours.  If you are going to be gone all day, maybe start with more water to allow for evaporation.

4.  When ready to serve, stir thoroughly and have plenty of garnishes available.

Difficulty rating  π

Wednesday, July 12, 2023

Squash Frittata


I am eating sooo many eggs now.  Good thing the price is "normal" again.  I've gone from a couple a week to nearly one every day.  I do use boxed egg whites when possible, but they aren't always available the days I'm looking for them.  I bought a quart of the whites with additives to make them seem like whole eggs when they were in stock, instead of just the pint.  It's what I use for egg washes.  They're usually good for a month to six weeks.

Generally speaking, frittatas are quick and easy dinners.  They're crustless quiches with less milk.  This one requires a little more work because you have to pre-cook the squash.  This can be done the day before, or even up to three days before.  Since I didn't need the whole squash, part of it went into the freezer for another recipe.  You could use defrosted squash for this, as long as you drain it first.  I have been freezing so much lately, I already needed to order more rolls for the Food Saver.

I chose to roast a spaghetti squash, primarily because that was the leftovers I wanted.  Acorn squash, butternut, or even pumpkin work equally well here.  I didn't check before buying to see if winter squashes were compatible with a reduced-carb diet, but it turns out they are highly recommended for their nutritional value.  One cup counts as a carb serving, and that's more than I normally have.  Whew.

1 squash of choice, minimum 2 lbs
1/2 C diced onion
*3 eggs
3 egg whites (1/2 C)
1/2 C milk
1/2 tsp dried sage
1/2 tsp kosher salt
1/4 tsp white pepper
olive oil

1.  Preheat oven to 400º.  Line a baking sheet with foil or parchment for easier cleaning.  Wash squash.  Spaghetti squash is best roasted whole.  Other kinds can be cut in halves or quarters first and de-seeded prior to cooking.  Roast until flesh is tender, anywhere from 30 to 90 minutes, depending on the variety and size of squash.

2.  Once squash has had a chance to cool, peel and remove any lingering seeds.  For spaghetti squash, cut, de-seed, and pull the flesh fibers.  Chop firmer varieties into smaller pieces, or even mash to get the consistency you would like.  Measure out 3 cups of squash, and find something else to do with the rest.  Either refrigerate for later or continue the recipe.

3.  Start preheating oven to 350º.  Heat a 10", oven-safe skillet with about a tablespoon of oil over medium heat.  Cook onion until softened, about 5-8 minutes, while you prepare the custard.

4.  In a bowl, whisk together eggs, egg whites, milk, sage, salt, and pepper until well mixed.  Stir in the 3 cups of squash.  Once onion is cooked and slightly cooled, add to mixture.

5.  Add enough oil to the same skillet to lightly coat the bottom and swirl up the sides a bit.  Pour custard into the warm skillet and push it around to distribute solids evenly.  Bake 20-30 minutes, until firm and lightly browned around the edges.

6.  Using oven mitts, remove skillet from oven.  Gently loosen frittata from pan and slide onto a cutting board.  Cut into wedges and serve.  Can be served hot, warm, or room temperature, but remember that it's eggs.  Don't let it sit out a long time, and be sure to finish leftovers within a couple of days.

Difficulty rating  :)

Sunday, July 9, 2023

Rosewater-Pomegranate Cheesecake

Cheesecake reminded me that there is such a thing as a reduced-carb dessert.  And this one is Passover-friendly if you sub potato starch instead of cornstarch.

I had a coupon to get two free single-serve Greek yogurt cups.  No problem, I could get two plain yogurts, like I always do, and they would both be free.  They only had one.  What?  Then I looked at the nutrition information on the vanilla cup and decided I could use that instead of adding sugar to the cake.  Yes, there's that much sugar in yogurt, which is why I buy plain.

Once again, I made a one-third recipe in the 6" springform.  I'm guessing you can't get this whole recipe in the food processor.  It's the blender cheesecake recipe, but I had already gotten the Cuisinart dirty making the crust and figured I would just rinse it out and do the filling in it.  The one-third version was kind of pushing it.  One half is likely the maximum for a standard food processor.

Crust

2 C pecans, walnuts, or almonds
3 Tb sugar
 1/4 C butter, melted

1.  Run nuts and sugar in a food processor until finely ground.  Add melted butter and pulse until a damp mixture forms.

2.  Press crust paste into the bottom of a 9" springform, then up the sides as far as it will go.  Wrap bottom of springform in aluminum foil and place in a roasting pan.  (Or larger cake pan)


Filling

3 8 oz bricks cream cheese (low fat ok), room temperature
6 eggs, room temperature
*2-1/4 C vanilla yogurt (Greek ok)
2 Tb cornstarch or potato starch
1/4 C sugar if not making low carb
*1/4 C heavy cream
*1 Tb rosewater
1/2 C pomegranate arils, divided

1.  Preheat oven to 350º.   Add all ingredients except pomegranate to a large blender.  You may have to work in batches.  If that's the case, have a bowl ready for stirring the batches together.

2.  Pulse the blender at first, to break up the cream cheese, then run until smooth.  You will probably have to scrape down the sides.

3.  Pour filling into crust.  Sprinkle with half of the pomegranate.  I expected them to sink.  Maybe it was because I was working with frozen arils.  If necessary, stir a little to distribute them.

4.  Place roasting pan with cake pan inside on oven rack.  Pour 1" of boiling water into the roasting pan.  This is your bain marie.  Bake for 1 hour before checking for set.  You want the cake to jiggle a little, but not have a liquid center.  This may take an extra 10 to 20 minutes.

5.  When cake has set, turn off oven and keep the door shut for 30 minutes.  Then crack it open and let the cake continue to cool until you can take it out without oven mitts, another hour or so.  Refrigerate in the springform until ready to serve, 4 hours or the next day.


Topping

1 C plain yogurt or sour cream
2 Tb sugar
1 tsp rosewater
remaining pomegranate from filling section

1.  Beat together yogurt, sugar, and rosewater.  Spread on top of cheesecake.

2.  Carefully remove springform ring and transfer cake to serving plate.  Decorate with remaining pomegranate arils.


Serves 12-16

Difficulty rating  :)

Thursday, July 6, 2023

Lemon and Pepper Baked Swai

I'm trying to make good choices with the types of meats I eat, now that I'm having more of them.  That has resulted in adding fish on some "vegetarian" days.  I actually considered this the side dish to the socca instead of the main.

I decided to bake this with the same method as the salmon with date syrup, and was thrilled with the result.  The salmon wasn't an accident.  This is a really fantastic way to bake fish.  A little oil, seasonings, and cover the roasting pan with foil.  It steams in its own juices, but still develops the baked flavor.  It also does not dry out at all.

I used a preserved lemon to make this, but I'm giving alternate instructions for fresh lemon.  This is a very simple recipe that should be accessible to all.

4 swai filets (I used frozen)
1 Tb olive oil
*1 lemon, fresh or preserved
salt to taste (omit if using preserved lemon)
1/2 tsp cracked black pepper
*1/4 tsp dried dill

1.  Arrange filets in a casserole and preheat the oven to 325º.  I chose to line the pan with parchment for easy cleaning.  Drizzle oil on top, then sprinkle with pepper and dill.  Also sprinkle with salt if using a fresh lemon.

2.  If using a fresh lemon, thinly slice and lay on top of fish.  For preserved, rinse well and scrape off pulp.  Slice rind into thin strips and scatter over fish.  Cover casserole tightly with foil.

3.  Bake until fish is opaque through and easily flaked, at least 20 minutes.  Actual time will depend on fish thickness and size of pan.  Mine were overlapping and half frozen when I put them in, so they took 50 minutes.  I had expected closer to 30, presuming they were completely defrosted.  Serve with extra lemon if desired.

Difficulty rating  π

Monday, July 3, 2023

Roasted Vegetable Socca


I forgot to restock on chickpea flour after Passover until I decided to make a socca.  Bean-based flours are allowed, and especially when they're used in a Mediterranean-style recipe.

The doctor also wants me to have plenty of vegetables on the plate.  The easiest way to do that is to roast up a sheet pan full of them, all cut to a manageable size.  Then they're less intimidating.  Plus, they develop a wonderful flavor.

This ended up being an easy after-work dinner because I roasted the veggies the day before.  I was already looking at having the oven at two different temperatures that day, and did not want to introduce a third.  Since roasted vegetables aren't crisp anyway, no one will know they were reheated.  Just the same, I'm designing this recipe to be done all at once.

1 C chickpea flour
1 C water
1/4 C chopped assorted fresh herbs
2 large carrots
1 red onion
1 lb red potatoes
4 oz fresh green beans
2 Tb olive oil
salt, pepper, and paprika to taste

1.  At least 4 hours before, or early in the day, stir together chickpea flour, water, chopped herbs (I used chives, parsley, basil, and young kale), and a touch of salt and pepper.  Allow batter to sit and hydrate.

2.  An hour before serving, prepare vegetables.  Preheat oven to 375º.  Wash carrots, potatoes, red onion, and green beans.  Peel carrots and chop into 2" sticks.  Potatoes can keep their skins, and get cut into wedges about the same size as the carrots.  Peel onion and cut in Frenched slices (the "wrong" way).  Beans just need the caps cut off.

3.  Toss vegetables with 1 Tb oil, some salt, pepper, and paprika, and spread out in an even layer on a baking sheet.  I've really gotten into using parchment to avoid having to scrub baking dishes.  Foil does work, but roasted onion will stick to it.

4.  Roast vegetables until potatoes are done.  Everything else on the sheet can be eaten raw, but potatoes have to be cooked or they're toxic.  Set aside to cool and place a 10" oven-proof skillet in the oven.  Turn up heat to 450º.

5.  Stir the chickpea batter, which will probably have separated.  When the oven is up to temp, put on oven mitts and take the pan out.  Swirl 1 Tb of oil in the bottom, then pour batter on top.  Swirl again to distribute the batter, then return pan to the oven.  Bake until browned and completely set, about 20 minutes.

6.  Gently loosen socca from the pan and slide onto a cutting board.  Cut into wedges and serve with roasted vegetables.  Vegan as written, but you could top with sour cream or cheese for a creamy finished product.

Difficulty rating  :)