Tuesday, November 29, 2022

Cilantro Ghannouj with Chickpeas

Cilantro was out of stock when I wanted it for three recipes, so by the time I found some there were only two recipes left for it.  I tried another hack of putting the bunch in a glass of water to prolong its life, but even that only gave it about five extra days.  So I decided to fancy up some baba ghannouj with cilantro and a chickpea garnish.

This turned out to be a do-ahead type recipe.  I baked the eggplant and cooked up the chickpeas the day before.  That actually helped because the eggplant was cooled when I put it in the food processor.  It gave me a more accurate finished texture.

The rest of the cilantro was preserved as mixed herb pesto, along with my parsley that is trying to bolt and some basil.  I got on a big preserving trend and roasted up my home-grown pumpkin to freeze, some cinnamon pepitas from its seeds, and a batch of granola.  Which has nothing to do with this dip, but it all happened on the same day.


1 large eggplant
1/2 bunch cilantro, large stems removed
1/4 C tahini paste
1/2 tsp kosher salt
3 cloves garlic
1 Tb lemon juice
2 Tb olive oil, or to taste
1 C cooked chickpeas

1.  Preheat oven to 400º.  Wash eggplant and prick in several places with a knife to prevent explosions.  Place in a roasting pan and bake until mushy inside, about one hour.  Allow to cool until you can handle it, then scrape out the insides.

2.  Place eggplant guts, cilantro, tahini, salt, garlic, and lemon juice in bowl of food processor.  Pulse at first, then run into dip consistency.  Taste and adjust seasonings.  Drizzle in olive oil if it needs a little body.

3.  Transfer dip to a serving bowl.  Stir in half of the chickpeas.  Garnish the top with the rest.  Chill until ready to serve.


Difficulty rating  π

Saturday, November 26, 2022

Meal Planning Cheat Days

Meal planning isn't only about having groceries for home-cooked meals.  It's about knowing when you're going to be eating out, when you're going to have leftovers, and when it's time to pull a can of something out of the pantry because you won't feel like cooking.

This week in particular, no one really feels like cooking.  We've just had what is in many families the biggest feast of the year, and the biggest home-cooking day of the year.  If you're not eating leftovers, you're probably picking up takeout.

So I planned ahead with some easy to make, storebought canned meals that only need a little heating.  Technically, I raided my power-outage stash, in case of earthquake or something else reducing me to sterno heat or the grill for several days.  Yes, they're loaded with salt and I'll probably end up with a migraine.  I'll drink more water and hope for the best.  Anyway, it's good to taste test emergency food to make sure it's something you'll actually eat in an emergency.

What I have set out for the photo could be dinner (for me) for two weeks.  This doesn't include peanut-butter based lunches or my stash of Chef Boyardee.  Most of it does require some cooking, like the pasta and the dehydrated mashed potatoes that you can't see under the can of beef stew.  My stove is gas, which I can light manually in a power outage, but the oven is electric.  My chest freezer would not thaw above 40ºF for four days, and I've used it as a fridge before in long power outages.

I'm not using all of this.  I'm going to make the Knorr shells with canned fish and the Indian pouch with some rice.  Trying new stuff to see if it's something I want to keep on hand.  The rest goes back in the pantry until the next time I don't want to cook.

Get creative and look through your pantry for ideas, rather than ordering a pizza.  It's cheaper and probably healthier than takeout, even if it comes from a can.  Once you present a meal in a thoughtful manner, no one cares that you opened a box fifteen minutes before.

Wednesday, November 23, 2022

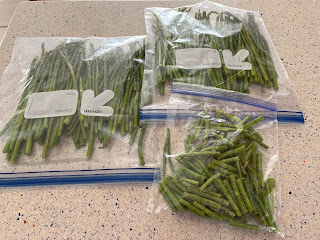
Freezing Asparagus


I listened to a podcast that encouraged freezing or preserving vegetables because harvests were going to be so horrible due to this summer's drought.  Even if I liked canned veggies, I don't pressure can, so anything I choose to preserve is going to have to be frozen.

I looked at frozen asparagus in the grocery store, and it was $3.59 for half a pound.  Ouch.  A few weeks later, Ralphs (Kroger) had a coupon for $1.79/lb.  That was a perfect price for this experiment.  I picked up two bunches, which at the rate I cook with asparagus is six months.

The frozen veggies you buy at the market have been blanched and flash frozen in industrial freezers.  They do not have the texture of fresh, especially leafy greens like spinach.  I'm explaining this because you have to understand that you are not coming out of this with crisp spears of asparagus.  I happen to like my asparagus overdone and a little mushy, which is why it's one of the few vegetables I like canned.  (They were out of canned.)

The process is very simple and only takes a few minutes of active time.  The resulting bags of frozen asparagus are best used in soups, stews, and similar dishes where you won't notice the texture.  I don't mind putting blanched asparagus in salads or stir frys.  You can roast them from frozen, but again, they won't be quite the same.

The advantage to this process is having a product you want out of season.  You can buy something at a good price, blanch and freeze it, and have it when it is not available in the market.  As produce becomes more scarce and of poorer quality, this is a skill we all should learn.  That and gardening.

1.  Set a pot of water to boil.  If you're doing full spears, it should be a wide pot.  If you're cutting them into 2" lengths, any width will do.  Separately, set up a large bowl of water and ice.

2.  Trim off the woody bottoms of the asparagus.  Ralphs only had very thin ones, which are actually my favorites.  Thickness depends on the age of the asparagus crown.  These were probably from the first usable year, about the third.  Those very thick stems you have to peel are 10+ years old.

3.  Drop the asparagus in the boiling water.  For these super-thin spears, I only left them in one minute.  For finger-thick ones, you need up to four.

4.  Drop the asparagus in the ice water bath and allow to cool, about 5 minutes.  Set out an absorbent towel or two.

5.  Remove the asparagus from the ice water and set on the towels.  Allow to dry completely, or the moisture will form ice crystals in the freezer.

6.  For spears, arrange in a thin layer in a freezer bag and squeeze out as much air as possible.  For cuts, line up on a parchment-lined sheet.  Freeze either method flat, then put the cut ones in their own freezer bag, again squeezing out the excess air.

7.  Store 3-6 months in the freezer and use as any pre-cooked asparagus item.

Difficulty rating  π

Sunday, November 20, 2022

Ground Beef Stir Fry


This was going to be a teriyaki meatball post.  Then the computer at work crashed just as I was about to clock out, plus it was the last very hot day of the year, and I did not want to turn on the oven and spend an hour on a recipe.  As it turns out, throwing odds and ends into a skillet was very good.

I'm used to making beef stir-fry with some kind of steak cut, like flank steak or even a proper roast.  But beef is beef.  You're just getting a different texture, and I've been loading up on ground beef at decent prices.  It didn't take much to turn this into a proper skillet meal.

*1 lb 80/20 ground beef
*1 large carrot
*2 green onions
*1/2 red onion
*1 bag brussels sprouts (or another frozen veggie)
*2 Tb black bean paste
*1 Tb hoisin sauce
*2 Tb soy sauce
*2 cloves garlic, minced
*1 tsp grated ginger
*cilantro for garnish, optional

1.  If you're having this with rice, get that started.

2.  In a large skillet, brown the ground beef over medium heat.  When it is about half cooked (still some pink bits showing) pour off the fat.  You will use the remaining fat instead of adding oil.

3.  Thinly slice the red onion and add to the pan once there's enough fat.  Add garlic and ginger and cook until onions are softened.

4.  While they're cooking, cut green onions into 2" lengths.  Peel the carrots and cut into 2" sticks.  Add to the pan with the frozen sprouts and stir everything together.

5.  Add black bean paste, hoisin, and soy sauce.  Stir everything together and continue cooking until sprouts are done, up to 10 minutes.  Garnish with cilantro, if desired, and serve with rice.

Difficulty rating  :)

Thursday, November 17, 2022

Overnight Pizza Dough

I put pizza on my meal plan when I used to have every other Saturday off.  Then schedules changed.  The other vegetarian options I had took even longer, so I decided to experiment with a slow-rise dough.

Slow-rise, or retarded, dough is not the same thing as sourdough.  It is not left out to sour and develop tang, but kept refrigerated for no longer than 36 hours, preferably 18-24.  It uses less yeast than a regular dough, less than half.  The advantage is more time for the glutens to form in a relaxed location, without frequent pounding and reshaping.  The active work time does not change; you just get to stretch it out to fit your schedule.

For the most part, this recipe is going to look familiar.  Same basic ingredients, in almost the usual proportions.  Same general way to mix and knead.  It's from when you start the first rise that it gets a little hinky.  I admit, I was crossing my fingers these didn't turn into giant slabs of hardtack with pizza toppings on them.

The taste was fine and the texture was what you would expect out of a pizza.  Total time savings on the day was about 20 minutes.  Sure, that's 20 minutes earlier than I would have eaten if I had done it all in one go, but it wasn't the 45 minute dinner I had hoped to make.

1 C 100ºF water
3/4 tsp yeast
1 tsp honey or sugar
2 tsp olive oil
about 3 C flour
1 tsp kosher salt

1.  Stir yeast, honey, and oil into the water and let sit until foamy.  Since the first rise is going to be in the fridge, it is very important that the yeast be activated first.

2.  In stand mixer with the paddle, beat water into 1 C flour.  I was making this with part wheat flour, and started with that.  There are also chia seeds in the dough.  You could add dried herbs if you'd like.  Beat into a batter, about 2 minutes.  Add another cup of flour and the salt and beat another 2 minutes, into a thick, stringy batter.

3.  Pour dough onto a floured work surface and knead until smooth, about 5 minutes, adding in just enough flour to prevent sticking.  Form into a ball and turn over in a greased bowl to coat all sides.  Cover bowl with plastic wrap to prevent drying and refrigerate overnight, 12-24 hours.

4.  When ready to make the pizza, let the bowl sit on the counter first for an hour to come partway up to room temperature.  This was when I realized I wasn't saving any time by doing it this way.  The dough had almost doubled in the fridge over about 20 hours.

5.  Punch down dough and turn out onto a lightly floured work surface.  Divide into however many pizzas you plan to make, from 4 individual to 1 extra large, and round up into balls.  Allow dough to rest 10-15 minutes.

6.  Press out dough balls into rounds, and use a rolling pin if necessary to achieve desired thickness.  Place on parchment or cornmeal lined baking sheet, or a baking stone.  Spread sauce on the pizzas, then let rise about 30 minutes in a warm place.  Preheat oven to 375º.

7.  Top pizzas and bake about 20 minutes, until crust is baked.   Allow to cool 5 minutes so no one burns their mouths, then cut and serve.

Difficulty rating  :-0

Monday, November 14, 2022

Battered Fried Tilapia

I've been working longer hours in general, and don't feel like spending as long making dinner if cooking falls on a work day.  But I still like to sit down to a tasty dinner.  This one happened even faster than I was expecting.  Without constantly washing my hands to take pictures, it would have been less than fifteen minutes.

This recipe is getting a Passover designation because I like to batter things with matzoh cake meal.  It's like finely powdered breadcrumbs, or pre-cooked flour.  It resists oil and crisps up nicely.  Kind of expensive, and a seasonal item, but here we are more than halfway to the next Passover and I still have a lot, so I'm using it.  Fine breadcrumbs and flour are acceptable alternatives.

I had this with leftover cholent, which is not kosher for Passover, and the last bit of apple challah, which definitely is not a Passover item, but this was my Sukkot dinner, so no worries there.

*4 tilapia filets
*2 C matzoh cake meal (or 1 C each flour and breadcrumbs)
1 egg
1/2 tsp salt
*1 tsp dried parsley flakes
vegetable oil for frying

1.  Set up a dredge station of 3 pans: flour (or 1 C matzoh meal), egg beaten with 1 Tb water, and breadcrumbs or remaining matzoh meal stirred with salt and parsley.  Start heating a large skillet over medium high with about 1/2 C oil, enough to coat the bottom easily.

2.  Once the oil is hot, dredge each filet in plain meal/flour, then egg, then seasoned meal/breadcrumbs.

3.  Lay filets in oil and allow to fry until well browned and crispy, about 5 minutes.  Flip and fry other side another 5 minutes.  Tilapia is too thin to use a thermometer, but you can err on the side of overdone because the oil will keep it moist.  A cooked filet will flake with a fork, even if you need a knife to cut through the coating.

4.  Serve hot with lemon slices or, if you're me, horseradish.

Difficulty rating  π

Friday, November 11, 2022

Vegan Cholent


Cholent, or dafina if you're Moroccan, is a traditional Jewish dish for Shabbat.  Because it uses meat that needs to be cooked for hours, it is left on low in a crock pot overnight and served for lunch the next day.  I don't like the idea of leaving something cooking while I'm asleep, so this is the under two hour version.

The result is a lot like Stoo, so I decided to go a different direction and make it vegan.  In this version, umami is achieved through mushrooms and caramelized tomato paste.  I know, two vegetarian main dishes in a row with mushrooms.  It is not going to become a thing.

I have to say, there was more fiber in this than I was expecting.  After the first day, I had to cut down my serving size.  Just a warning not to eat a full bowl unless your system is accustomed to significant fiber.

The taste does improve after the first day, as you would expect from something designed to be slow cooked or reheated.  You could also make a pot of it and freeze portions for a hearty meal at some later date.  Part of meal planning is having a few things set aside for when you would rather not cook.

*1/2 C pearl barley
1 Tb olive oil
*1/2 yellow onion, diced
2 cloves garlic, minced
2 Tb tomato paste
1 lb gold or Yukon potatoes, cut in chunks
2 carrots, peeled and cut in large rounds
*8 oz assorted mushrooms (I used crimini and portobello, which are the same thing in different sizes)
2 C vegetable broth
1 15 oz can red kidney beans, drained and rinsed
1/4 C red wine (optional)
salt and pepper to taste

1.  Sort and rinse barley.  In a small saucepan, combine with water to cover by 1 inch and a pinch of salt.  Bring to a boil.  Lower heat to a simmer, cover, and cook half an hour.  It's fine if it isn't fully cooked.  Drain off any remaining water and set aside until needed.

2.  In a soup pot, heat oil over medium heat.  Add onions and garlic and cook until softened.  Add tomato paste and cook until it starts to brown, about 2-3 minutes.  Add potatoes and carrots and cook 2 minutes, to crisp them up a little.

3.  Wash mushrooms and cut into bite-sized pieces.  For smaller mushrooms, that might be in half.  I sliced the portobello, then cut the slices in half.  Add to the pot with the rinsed beans.  It won't look like soup because it isn't, it's a stew.  Stir in wine, if using.  Bring to a low boil.  Lower heat to medium-low and cover.

4.  Cook until vegetables are easily pierced by a fork, at least 45 minutes, then add barley and cook another 15 minutes.  If doing this as a slow-cooker overnight, add extra water to protect against scorching.

5.  Before serving, taste and add salt and pepper as needed.

Serves 4-6 as a main, 8 as a side

Difficulty rating  :)

Tuesday, November 8, 2022

Rainbow Chard and Bulgur Salad


Somehow, my random throw-together of stuff into a side dish turned into a post.

I've never bought rainbow chard.  I don't think I've bought or cooked any chard.  It was not something we had growing up.  I had to google how to cook it.  I thought it came out pretty good, so here you go.  It's nice to use a new ingredient every so often.

I'm calling this a salad for the post, but it can be served either hot or cold.  Hot, it could qualify as a casserole.

*1/2 C dry coarse bulgur
1 bunch (about 1 lb) rainbow chard
2 cloves garlic, minced
2 Tb olive oil
salt and pepper to taste
1 tsp lemon zest

1.  In a small saucepan, bring bulgur and 3/4 C water to a low boil.  Reduce heat, cover, and simmer until water is absorbed, about 20 minutes.

2.  Remove thicker stems from the chard.  Chop into smaller lengths, about 2 to 3 inches.  Slice leaves into thin strips.
3.  Heat oil in a large skillet with a lid over medium heat.  Add chard stems and garlic and cook until stems begin to soften, about 8 minutes.  Add chiffonade leaves and sprinkle lightly with salt and pepper.  Lower heat to medium low, top with lid, and allow to cook until greens have wilted, moving them around occasionally.

4.  Toss together chard and bulgur, adding the lemon zest along the way.  If serving as a hot side, plate immediately.  For a salad, chill until ready to use.

Difficulty rating  :)

Saturday, November 5, 2022

Honey Mustard Chicken


I used to make this a lot in college.  It was from one of those sauce packets that you just add water and milk.  Since I graduated from mixes to scratch, I don't think I've had honey mustard chicken.  Time to put it back in the repertoire.

For the mustard, you can use whatever is your favorite, even if that's basic French's.  I happened to use bourbon mustard because that was what was open.  Dijon would be especially nice, or you could add a touch of white wine to the pot.

I had three ginormous chicken thighs in the freezer baggie, so I'm scaling this for four portions.  The pan size should still work.

4 huge or 8 normal chicken thighs (or other favorite pieces)
1 Tb oil
*2 Tb mustard
1 tsp honey
1/2 C water or chicken broth
*1/4 C cream
salt and pepper to taste

1.  Heat a 12" skillet with a lid over medium-high heat.  Drizzle in oil and swirl to coat.

2.  Add chicken pieces, skin side down if skin on, bone side down if not.  Sear until browned, about 5 minutes.  Turn over and sear another 5 minutes.
3.  Add mustard, honey, and water to the pan.  Stir around to combine.  Reduce heat to medium-low, cover, and simmer until internal temperature of the chicken is 165º, about 40 minutes.  Add more water if pan gets too dry.

4.  Add cream and bring sauce to a light simmer.  Taste and add salt and pepper as necessary.  Serve hot, with sauce spooned over.

Difficulty rating  π

Wednesday, November 2, 2022

Split-Pea Stew


It's really hard to come up with something using split peas that isn't soup.  I could have done an Indian-inspired curry, but I wasn't in the mood for something with that much liquid.  Instead, I decided to employ some of the giant container of dried tarragon I bought and skew French.

As a result, this is going to look a lot like the lentil and potato salad.  I realized that when I thought of putting preserved lemon in it and it sounded very familiar.  Yeah, I just made that.

So instead, I managed to turn 30¢ of split peas into a $7 meal.  It would be more for the average person, since I made my own broth and pulled half a loaf of bread out of the freezer for a side.  Plus, Sprouts seems to have caught on to the regrowing of kitchen scraps and cut off the roots of all the leeks.  Not the green tops that no one eats, but the roots.  I found one with just a tiny bit of root left and stuck it in water.  We'll see if that manages to grow.  I considered putting plant-based sausage or chevre cheese into this (it was vegetarian rotation), but ended up leaving it all veggie.

1 leek
1 Tb olive oil
*1 C dry split peas
1 10 oz can vegetable or chicken broth
*1 tsp dried tarragon
2 medium parsnips
5 oz white or crimini mushrooms
salt and white pepper to taste

1.  Thinly slice white and light-green parts of the leek.  In a medium saucepan, sauté in olive oil over medium-low heat until softned, 8-10 minutes.

2.  While they're doing their thing, sort and rinse the split peas.  I usually dump them in, but this cheap brand had a lot of skins left in it and I had gotten into the habit of sorting them out.  First thing I found when I opened the jar was a stone.  So yeah, sort and rinse your peas, lentils, and beans.

3.  Add peas and broth to the saucepan.  It isn't going to look like enough broth, but you're not making soup.  Sprinkle in tarragon and stir to combine.  Bring to a low boil, lower heat to a simmer, and cover.  Cook for 1 hour.

4.  Near the end of the hour, peel and chop the parsnips into rounds or half-moons, depending how big they are.  Wash the mushroom and cut into halves or quarters, again depending on size.

5.  Add parsnips and mushrooms to partially cooked peas.  The mushrooms are going to give off some water, but if you need to, add a little to the pot.  Remember, not soup.  Simmer until vegetables are tender, about 20-30 more minutes.

6.  Taste and add salt and white pepper as necessary.  Serve hot, either on its own or over mashed potatoes, rice, or noodles.

Difficulty rating  :)