Friday, March 29, 2024

Dijon Mustard


I'm out of homemade mustards, so it was time for a canning day.  First up was Dijon, since it has to be started 24 hours ahead.  Not a big deal, you just marinate the flavors into the wine and soak the seeds before starting.

I'm using the Ball recipe for Dijon, as it is a gold standard for canning safety.  If you are making mustard for immediate use, I suggest a non-canning recipe.  This is going to be crazy intense the day it's made.  Canning recipes require a decent amount of time on the shelf to mellow.  I figure this will be ready to use in about a month, after Passover.  Stupid no-mustard Passover kitnyot rule.  That's why horseradish is such a big thing for that week.

I made this with two slight deviations from the original recipe that do not affect the safety, and are actually common in other canning recipes I've made.  The first was using dried rosemary instead of fresh, because that's what I had.  The other change was letting the wine mixture sit for about ten minutes after simmering before straining.  I just wanted to infuse it a little extra, and make sure it was cool enough not to crack the room-temperature jar.  Oh yeah, and I used Chardonnay, because that's the white wine that was open from previous recipes.  It was 1/4 C short, so I used vinegar to make up the volume.  You can always add more acid to a water-bath recipe, but not less.

*2 C chopped onion
*2 C Pinot Grigio or other dry white wine
1 C white wine vinegar (at least 5% acidity)
1 tsp kosher or canning salt
*6 cloves garlic, chopped
4 peppercorns
*1 sprig fresh rosemary or 1 tsp dried
*1 C yellow mustard seeds
1/3 C dry mustard
up to 2-2/3 C water, if needed

1.  Combine first 7 ingredients in a non-reactive saucepan.  Bring to a boil over high heat.  Reduce heat and simmer until onion is softened, about 20 minutes, stirring occasionally.  Remove from heat and let steep for 10 minutes if a stronger flavor is desired.

2.  Strain mixture through a fine sieve into a non-reactive (glass or stainless) bowl or jar.  Discard solids.  Stir in mustard seeds and powder.  Allow to sit 24-48 hours at room temperature.  More than two days, and it will start to ferment.

3.  After steeping, process mixture in a food processor or blender, adding water until the consistency of cooked oatmeal.  I added about 1 cup, which made my batch slightly over the expected 6 quarter-pint jars.  I refrigerated that portion, since the jar wasn't full enough to process.  Prepare jars and canner for a 3 to 3-1/2 cup yield.

4.  Transfer mixture to a saucepan.  Bring to a boil, stirring often to prevent scorching.  Reduce heat and simmer 5 minutes, stirring often, until desired consistency.

5.  Ladle hot mustard into hot jars to 1/4-inch headspace.  De-bubble, wipe rims, and apply lids and rings. Process in boiling bath canner 10 minutes.  Turn off heat, remove lid, and let jars sit 5 minutes before removing.  Mustard likes to siphon, and four of mine did despite following the directions.   Cool, test seals, clean jars, and store.  Any unsealed jars should be refrigerated or frozen.

Makes 3+ cups, depending on consistency

Difficulty rating  :)

Tuesday, March 26, 2024

Vegetarian Barley Paella

My vegetarian meals this month are turning into vegan awesomeness.  Not intentionally, it just keeps happening.

Paella is traditionally a rice dish.  I happen to have more barley than I thought I did, so that's what I'm using today.  When googling, I found recipes from medical websites recommending this idea for cancer patients.  That's encouraging, because it means it's generally anti-inflammatory, which helps a number of common conditions.  This isn't gluten-free like rice paella, but only about 10% of the population actually has an issue with wheat and/or gluten.  For the rest, GF is about weight loss and glycemic control.

I made an effort to keep this one-pan.  Paella traditionally is, but that's because rice cooks considerably faster than barley.  Some recipes I found have you par-cook the barley in a separate pot.  I would have done that if I wanted to save the barley water, but I don't see needing it right now.

I started with the recipe from Delectable Planet.  As I was copying it for easy reference (the formatting on the website could be better), I found several issues with the method that I hope I fixed.  Also, there was no salt in the recipe.  Maybe because of the capers, which I don't like and skipped.  I don't use a lot of salt, but you do need some.  And I changed a lot of the veggies.

Most months, I don't go through even one can of broth.  I only keep one or two in the pantry.  This month, I'm using a lot.  I have been making vegetable stock so far, theming it with whatever herbs I plan to use, and re-simmering it with chicken bones out of the freezer if I want to chicken-ize it.  You can use chicken stock if you don't care about it being vegetarian.  That would give it more body and a slightly fattier mouthfeel.

1 Tb olive oil
*1 C pearl barley, well-rinsed
1 C diced onion
*1 clove garlic, minced
1/2 tsp each turmeric, cumin, and kosher salt
1 tsp paprika
1/4 tsp pepper, or to taste
1 C dry white wine
*2 C unsalted vegetable or chicken stock
1/2 C fresh or frozen peas
8 oz baby bella mushrooms, caps only, quartered
*4 oz artichoke hearts, quartered
1 C cherry or grape tomatoes, halved
*Kalamata olives and chopped herbs for garnish

1.  In a wide, oven-safe skillet or pot with a lid, heat the oil over medium.  My largest skillet isn't oven-safe, and probably doesn't fit in the oven anyway, so I used the soup pot.  Rinse the barley very well.  I rigged up a strainer over a bowl so I could see when the water got clearer.  If you don't do this, the barley will become overly sticky instead of rice-like.  Cook onion, garlic, barley, and seasonings in the oil, stirring frequently, until the onion is wilted.  You want the barley to toast, not burn.

2.  Deglaze pan with the wine and allow the alcohol to cook off, like you were making risotto.  Add the stock all at once, not like risotto, and stir in the peas.  Bring to a simmer, cover, and cook 25 minutes over low heat.  Near the end, start preheating the oven to 350º.

3.  Taste the broth and adjust seasonings if necessary, then smooth out the top again.  Arrange mushrooms, artichokes, and tomatoes evenly over the barley, which will still have some liquids visible.  That's fine, and the mushrooms are going to give off a lot more.  Cover and bake in the oven for 15 minutes.  Remove lid and continue to roast until most of the liquid has boiled off.

4.  Allow paella to sit 5 minutes at room temperature, to firm up a bit, before plating and garnishing.  I used cilantro because I had some, but parsley is more traditional.

Difficulty rating  :)
Saturday, March 23, 2024

Lemon-Garlic Scallops and Polenta

Apparently I don't have a "seafood" label, so we're calling this Fish.  I don't cook with shellfish often, primarily due to cost.  99 Ranch had a good price on some huge frozen scallops, so I bought a pound.  I had intended to make pasta for them, then got the notion to do polenta instead.  Well, technically cornmeal mush, since that's what I'm using instead of fine polenta.  This isn't quite cheesy grits, but pretty close.

I'm starting with this recipe from Serving Dumplings.  I don't like capers, so they're gone from this version.  I'm adding a bit more lemon juice and some wine instead, and making the dill more important.  I did like the idea of Parmesan polenta, so we're keeping that.

The whole dish comes together fairly quickly.  I made sure to put the vegetables in the oven first, since everything else is done in 10 minutes.  Depending how well you multi-task, you can stir the polenta while monitoring the scallops, then set both aside to make the sauce.  If it has been one of those days, then make the polenta first, plate it, and put it in a 200ºF oven to stay warm while you cook the scallops and sauce.

Polenta

1 C fine polenta or cornmeal
1/2 tsp salt
1-1/2 ish C unsalted vegetable or chicken stock
1 C milk
1/4 C grated Parmesan

1.  I'm not a believer in "gently sprinkle the dry polenta over boiling water".  I always get clumps.  Stir together polenta, salt, stock, and milk in a 2 quart saucepan.  Let sit 5 minutes and stir again, to make sure everything is moistened.

2.  Turn on stove to medium.  Stirring frequently, bring to a low boil.  Cook 5 minutes.  If the polenta thickens too much, add more broth or milk to desired consistency.  I was going for just a bit more firm than soup, and hit that magic balance.

3.  Stir in Parmesan cheese until melted.  Set aside off the heat and stir every few minutes until ready to serve.  Turn on stove on lowest heat if necessary.  You can also plate the polenta or put it in a bowl and keep it in a low oven.

Scallops

1 Tb olive oil
2 Tb unsalted butter
1 lb scallops, any size
4 cloves garlic, minced
1/4 C diced onion or shallot
1/2 C dry white wine (optional)
salt and pepper to taste
1 tsp dry dill or 1 Tb fresh, chopped
1/4 C lemon juice
2 Tb cream, optional

1.  Heat olive oil and 1 Tb butter in a 10" skillet over medium-high heat.  When a drop of water dances, add scallops.

2.  I was quite disappointed in how much water the scallops gave off, and how small they ended up.  They steamed more than seared, so I never really got that charred bottom you want.  Cook 5 minutes per side, 3 if they're tiny.  Remove scallops to a plate while you make the sauce.

3.  Keep the heat high to boil off remaining scallop juice, then deglaze with wine, if using.  You can use water or broth otherwise.

4.  Add remaining 1 Tb butter and cook the garlic and onion in it.  Add lemon juice, salt, pepper, and dill.  If you want to thicken the sauce with cream, turn the heat down to low first so you don't curdle it in the acidic mixture.

5.  Add scallops back in to reheat and coat with the sauce.  Serve over or beside polenta.

Difficulty rating  :)

Wednesday, March 20, 2024

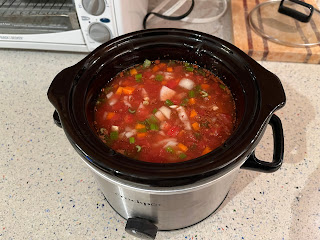
Crockpot Vegetarian Harira

This came up on a list of foods for Ramadan.  I can't imagine smelling this cook all afternoon, waiting for the iftar, because it was really nice to come home from work and realize dinner had been slow-cooking while I was gone.

I did not know until I saw the recipe that lentils could be made in a slow cooker.  Some beans cannot, and other legumes can, but you might not like the texture.  Since I like my harira completely mushy, this was something I had to try.

I did find out that you have to set the cooker on high to get it to work.  It was on low while I was gone for about 9 hours, and needed two more hours on high before the lentils split.  We're calling it six on high for the recipe.

Lamb has been super expensive lately, so I went vegetarian on this day.  Vegan, I guess, since there's no butter in it.  It's just a vegetable-lentil soup with tons of cilantro in it, because that's what really differentiates harira from other similar soups.  At the end I stirred in the cilantro and lemon juice and let it do its thing for half an hour.

If making this on the stovetop, I would sauté the onions and celery in the oil, then add everything.  Bring to a boil, lower to a simmer, cover, and cook for 2 hours before adding lemon juice and cilantro.  Simmer 5 more minutes and serve.

1 Tb olive oil
*1 C finely diced onion
1 C finely diced carrots (about 2 medium)
*1/2 C finely diced celery
1 clove garlic, minced
1 15 oz can diced tomatoes, no salt is better
3/4 C lentils, sorted and rinsed
2 C vegetable broth, unsalted if possible
1 tsp cumin
1/2 tsp turmeric
1/2 tsp paprika
1/2 tsp cinnamon
small pinch saffron, optional
salt and pepper to taste
2 Tb lemon juice
1/2 C cilantro leaves, or to taste

1.  Prep the vegetables.  Peel and finely dice onion and carrots.  Dice celery.  Mince garlic.  Sort and rinse lentils.

2.  Rub olive oil all over inside of crock.  This is mainly to make cleaning it easier, but you do get some flavor and body from it.

3.  Add everything except the lemon juice and cilantro to the pot and stir to combine.  I went easy on the salt, only half a teaspoon, and just a shake of pepper.  It will depend on the seasoning of your broth.  You can actually do all this up to 24 hours in advance.  If pulling from the fridge, run on low for the first half hour, to bring the crock up to temp slowly.

4.  Turn slow cooker on high, cover, and allow to cook 4-6 hours.  Stir in lemon juice and cilantro.  Taste and adjust seasonings.  If desired, add more broth for a thinner soup, then cover and simmer another half hour.  I didn't purée this batch, which I often do.  An immersion blender makes that easy.  Serve hot.

Difficulty rating  π

Sunday, March 17, 2024

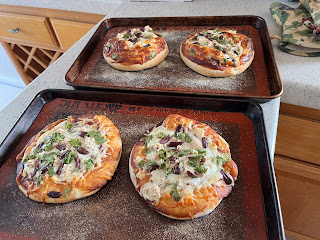
BBQ Salmon Pizza

This ended up being a pantry meal, only buying the cilantro.  I wouldn't have had to do even that, but my only current plant bolted.  The next round will be ready in a few weeks.

I haven't made pizza from scratch in ages, maybe a year.  I forgot how amazingly soft the dough is.  Of course, you can make this with store-bought bases, which will take a whopping 5 minutes to prep and 10 in the oven.

The flavors for this are a cross between BBQ Chicken pizza and a Mediterranean theme.  I used canned salmon to guarantee it would be sufficiently cooked by the time the crust was done.  If using fresh, I would recommend no more than half a pound for the entire recipe.  You never need as much in toppings as you think you do.

Crust

1 C 100º water
1 Tb honey
1 Tb olive oil
2 tsp yeast
1 tsp kosher salt
3-ish C flour

1.  Stir together water, honey, oil, and yeast.  Allow to sit until foamy, 5-10 minutes.

2.  In stand mixer with the paddle, beat together water and 1 C flour until smooth.  Add salt and another cup of flour and beat again until stringy, about 3 minutes.  Beat in enough additional flour to turn it from a batter to a dough, about half a cup.

3.  Turn out dough onto a floured surface and knead until smooth and elastic, about 5 minutes.  I decided to take a photo of the underside of what that looks like.  Everyone shows the smooth side, but this is what you're looking for on the not-pretty side before it is rounded into a ball.  Turn over in a lightly greased bowl to coat all sides, cover, and set in a warm place to rise until doubled, about 1 hour.

4.  Punch down dough and divide into 4 portions by weight.  Mine were a surprising 6 ounces each, which explains why pizza puts on weight.  I could have made 6 lunch-sized pizzas instead, but I didn't have enough cheese for that.  Round each into a ball and allow to rest while you prepare the toppings.

Toppings

Cornmeal for the pan
*1/4 C BBQ sauce, plus more for drizzling
8 oz (2 C) shredded mozzarella cheese
1 5 oz can salmon, drained
1/4 C Kalamata olives, slivered
1/4 C cilantro leaves

1.  Drain salmon well.  If using fresh, slice thinly into bite-sized pieces.  You could even sear them first.  Drain olives and cut into slivers or cross-slices.  Tear cilantro leaves off the stems.

2.  Scatter a generous amount of cornmeal on two baking sheets, about a tablespoon on each.  This is to prevent sticking and give the bottoms a little crunch and stability.  Roll out each dough ball into a 6" round for thick crust or 8" for thinner and place on baking sheets.

3.  Spoon a tablespoon of sauce onto each crust, leaving an edge clean for holding.  Sprinkle each pizza with 1/2 C of cheese, then evenly divide salmon, olives, and cilantro between them.  Allow to rest in a warm spot for half an hour, turning on the oven to 400º halfway through.

4.  Once oven is preheated, place pizzas in them and bake for 10 minutes.  Rotate pans and continue to bake until crust is lightly golden and before the bottoms turn dark brown.  You're only cooking the dough and melting the cheese here if using canned salmon, so it's only 10 minutes total if using pre-baked pizza crusts.

5.  Allow pizzas to sit 5-10 minutes before slicing and serve with additional sauce on the side for dipping or drizzling.

Difficulty rating  :) (π if not making dough)

Thursday, March 14, 2024

Tarragon-Roasted Eggplant

I usually make eggplant with rosemary, but the asparagus already had that in the dressing, so I grabbed something else from the dried herb shelf.

By the time you're on the fourth blog recipe from a single meal, things get kind of simple.  But I really ended up liking the result and will definitely make this again, so it's going in the blog, where I can find it.  And sometimes it's the simple recipes that people end up enjoying the most.

1 medium eggplant
2 Tb olive oil
salt and pepper to taste
*1/2 tsp dried tarragon

1.  Preheat oven to 400º and line a baking sheet with parchment.

2.  Slice eggplant crosswise into 1/2" thick slices and place in a bowl.  Drizzle with oil and rub it into the slices.  Eggplant is a sponge, so it isn't going to seem like enough.  It will occupy more space as the slices cook, and you don't want these super soggy.

3.  Arrange slices in a single layer on the baking sheet.  Sprinkle with salt, pepper, and tarragon.  Roast for 10 minutes, turn, and roast an additional 10 minutes.  They should be lightly browned, but still hold their shape when you move them.  Serve hot.

Difficulty rating  π

Monday, March 11, 2024

Asparagus with Balsamic Dressing

This is a leap year on the Jewish calendar as well, so Easter is a full month before Passover.  All of the holidays will be "late", pushing Rosh Hashanah into October.  I also get to enjoy all the Easter sales without checking to see if the foods are KLP.  Mmm, mini Robin's Eggs.  I love malt candy.

What this means is that asparagus is at its best price of the year right now.  I had my heart set on it when I got to the store, and was slightly disappointed when the only kind they had was the very thin spears.  The older an asparagus crown, the thicker the spear.  Well, at least I didn't have to peel them.

This is a simple recipe of making a basic balsamic dressing, tossing the raw spears in it, and roasting until done.  With the thin ones, it was only 5 minutes before they turned a vibrant green, under the dressing's wine color.

1 lb asparagus
2 Tb balsamic vinegar
2 Tb olive oil
1/4 tsp kosher salt
*1/4 tsp granulated garlic
*1/4 tsp crushed dried rosemary

1.  Preheat oven to 400º and line a baking sheet with foil or parchment.  It will make cleanup easier.

2.  To prepare the asparagus, gently bend the bottom half of the spear.  Wherever it snaps is the natural point where you should discard the tough base.  Repeat for all of it and place the tops in a bowl.

3.  Whisk together vinegar, oil, salt, and rosemary.  Pour over asparagus and toss to coat.

4.  Arrange spears on prepared baking sheet.  Pour any remaining dressing over them.  Roast for 5-15 minutes, depending on diameter of spears.  They're done when the color is bright and the skins are just barely beginning to wrinkle.

5.  Serve hot, or chilled as an accent for salads.

Difficulty rating  π

Friday, March 8, 2024

Kale and Onion Yogurt Dip

My little mezze meals tend to be a great source of appetizer recipes.  Usually, I just go for a cheese and crudité plate with hummus and nuts, but this time I kind of went all out.  Probably should have saved some of the ideas for Purim, but I do have a separate list for that...somewhere.

This dip counted as the protein for the meal.  Greek yogurt actually has a lot of protein in a 3/4 C serving. You can add Parmesan for additional protein, but I'm still working through the cheddar.  The never-ending two pound block of cheddar.  Good thing I love grilled cheese sandwiches.

Because I'm using caramelized onions, this is going to take a while.  Very little of the time is active.  I used the time to chop veggies and set the table, and still sat down for a bit to relax.  Multitasking while waiting for onions to caramelize is a real thing.

1/2 yellow onion
1 Tb olive oil
1/2 tsp kosher salt
*1 bunch kale
1 clove garlic, minced
*2 C Greek yogurt
milk as needed to thin

1.  Pour oil in a wide skillet or pot and sprinkle in the salt.  Thinly slice the onions and add them to the pot.

2.  Start to cook the onions over medium heat.  Once they begin to soften, stir and lower heat to medium-low.   Stir every 10 minutes or so until they are as done as you like them.

3.  While the onions are cooking, prepare the kale.  Strip the leaves from the tough stems and thinly slice crosswise (chiffonade).  I was using kale from my garden, and the stems were thin, so I didn't bother to de-stem.

4.  Add garlic and kale to the onions and cook until kale is thoroughly wilted, about 5 minutes.  Remove from heat and set aside to cool.

5.  Once no longer steaming, combine onion-kale mixture with the yogurt.  Taste and add salt if necessary.  Thin with milk to desired consistency.  The Fage I was using was pretty thick, but other brands may be smoother.  Chill until ready to serve.

Makes 2 C

Difficulty rating :)

Tuesday, March 5, 2024

Smashed Potatoes

I wanted a starch for a vegetarian mezze meal that doubled as something dippable.  I considered latkes or some other starchy pancake, but didn't really feel like frying anything.

At first glance, these look like a bit of work.  They aren't.  It is two pans to wash, but the boiling one isn't a big deal.  The oil came off the baking sheet far easier than I was expecting.

The recipe I semi based this off of told me to use the back of a sturdy measuring cup to smash the potatoes.  I decided that I never use my wooden mallet and got it out.  I think it's easier to smash them while they're still hot.  I boiled them the night before and refrigerated them.  It did occur to me to warm them in more boiling water before the smash, but I didn't do it.

These potatoes come out of the oven crispy on the outside and tender in the middle.  They're great on their own, with a little sour cream and cheese, or as a kind of canapé base.  I'm probably going to make them for Seder.

12 baby potatoes, about 1 to 1-1/2 lbs
kosher salt
pepper to taste
dried parsley
olive oil as needed

1.  Clean potatoes and place in a large pot with water to cover by one inch.  The only baby potatoes the market had that day were red ones, but Yukon would be ideal.  Red are more dense and are probably why several cracked when I smashed them.  Add a generous pinch of salt and bring to a boil.  Turn down the heat a little and gently boil until easily pierced by a fork, about 15-20 minutes.  Drain.  As a do-ahead, refrigerate at this point.

2.  Preheat oven to 425º (or 400º with the convection fan).  Brush a rimmed sheet pan with olive oil to coat.  Press down on the potatoes with the back of something flat and sturdy, like a heavy glass or metal measuring cup, until less than 1/2" thick.

3.  Arrange smashed potatoes on the baking sheet.  Sprinkle with salt, pepper, parsley flakes, and a drizzle of olive oil.  Bake another 15 minutes, until the edges are crispy and browning.  Serve hot.


Makes 12, serves 4 as a side dish

Difficulty rating  :)

Saturday, March 2, 2024

Korean-Inspired Meatballs

I wanted to have a bit of a fusion meal with Korean-ish meatballs and kimchi in a pita with a little Bibigo sauce.  The pita got a tiny bit soggy, but the flavors were what I had in mind.

I'm really enjoying being able to pull a ginger puck out of the freezer whenever I want fresh ginger in a recipe.  It takes about 15 minutes to defrost at room temperature if I forget to do it properly the night before in the fridge.  They've been going in stir fry and chai tea for the most part.  Totally worth the effort.

Since I had already gotten the food processor dirty making breadcrumbs, I mixed everything except the meat in it.  Then, after pouring the seasoning mix on the meat, realized I had forgotten the cilantro.  It did make mixing everything evenly much easier.

I didn't get the gochujang paste.  Thought about it.  Had the jar in my hand.  Then decided that one recipe plus one or two batches of kimchi a year weren't enough to make the it worth the space in the fridge.  I subbed chili powder, and it worked just fine.

1 lb 80/20 ground beef
1/2 C panko breadcrumbs
2 green onions, thinly sliced
*2 Tb cilantro, chopped
2 cloves garlic, minced
*1 Tb minced ginger
1 egg
1 Tb soy sauce
2 Tb gochujang or 1 tsp chili powder
Korean BBQ sauce for serving

1.  If using a food processor, ignore all the stuff about mincing.  Run a stale piece of bread through it to make the breadcrumbs.  Then add everything except the meat and run again.

2.  Knead together all ingredients and allow to sit in the fridge 30 minutes to meld.  This can also be done early in the day.

3.  Preheat oven to 350º and line a rimmed baking sheet with parchment or foil.  I reused a challah piece of parchment, and it worked fine.

4.  Shape meat into balls about 1 oz, or a generous tablespoon.  I used the 1 Tb cookie scoop, rounded, and got 20.  Place balls on lined sheet at least 1" apart.

5.  Bake 15-20 minutes, until well browned and a thermometer reaches 165º.  Allow to cool 10 minutes so they don't fall apart when you try to move them.  Serve as desired, with a Korean-themed sauce, over rice, with kimchi or veggies, etc.

Difficulty rating  π