Sunday, October 31, 2021

Brandied Fruit Mincemeat

Instead of buying a jar of mincemeat this year, I decided to make my own.  The Ball book has a recipe that makes a stunning 8 pints - a full canner - or four whole pies.  I cut it in half, which is still a lot, but I figure I will be using one jar as hamantaschen filling next year.  It's a great topping for vanilla ice cream.

It took a while to accumulate the ingredients because I started too early.  Dried currants were out of stock for about a month.  I had enough golden raisins, but waited until the Thompsons went on sale.  The real sticking point was the fresh cranberries.  I could have used frozen, but they were expensive.  The day I found them, this recipe happened.  I'll get another bag, once the price goes down a bit, for a batch of cranberry sauce.

This one is going to take you a while, I won't lie.  It took over half an hour just to get all of the ingredients chopped, measured, and into the pot.  Then it took almost 15 minutes to get it to a boil.  Since I was canning, that was another 30 minutes once the 40 minutes of cooking were done.  It does smell fantastic, though a bit clove-heavy, and I like knowing what is in something with such a huge ingredient list.

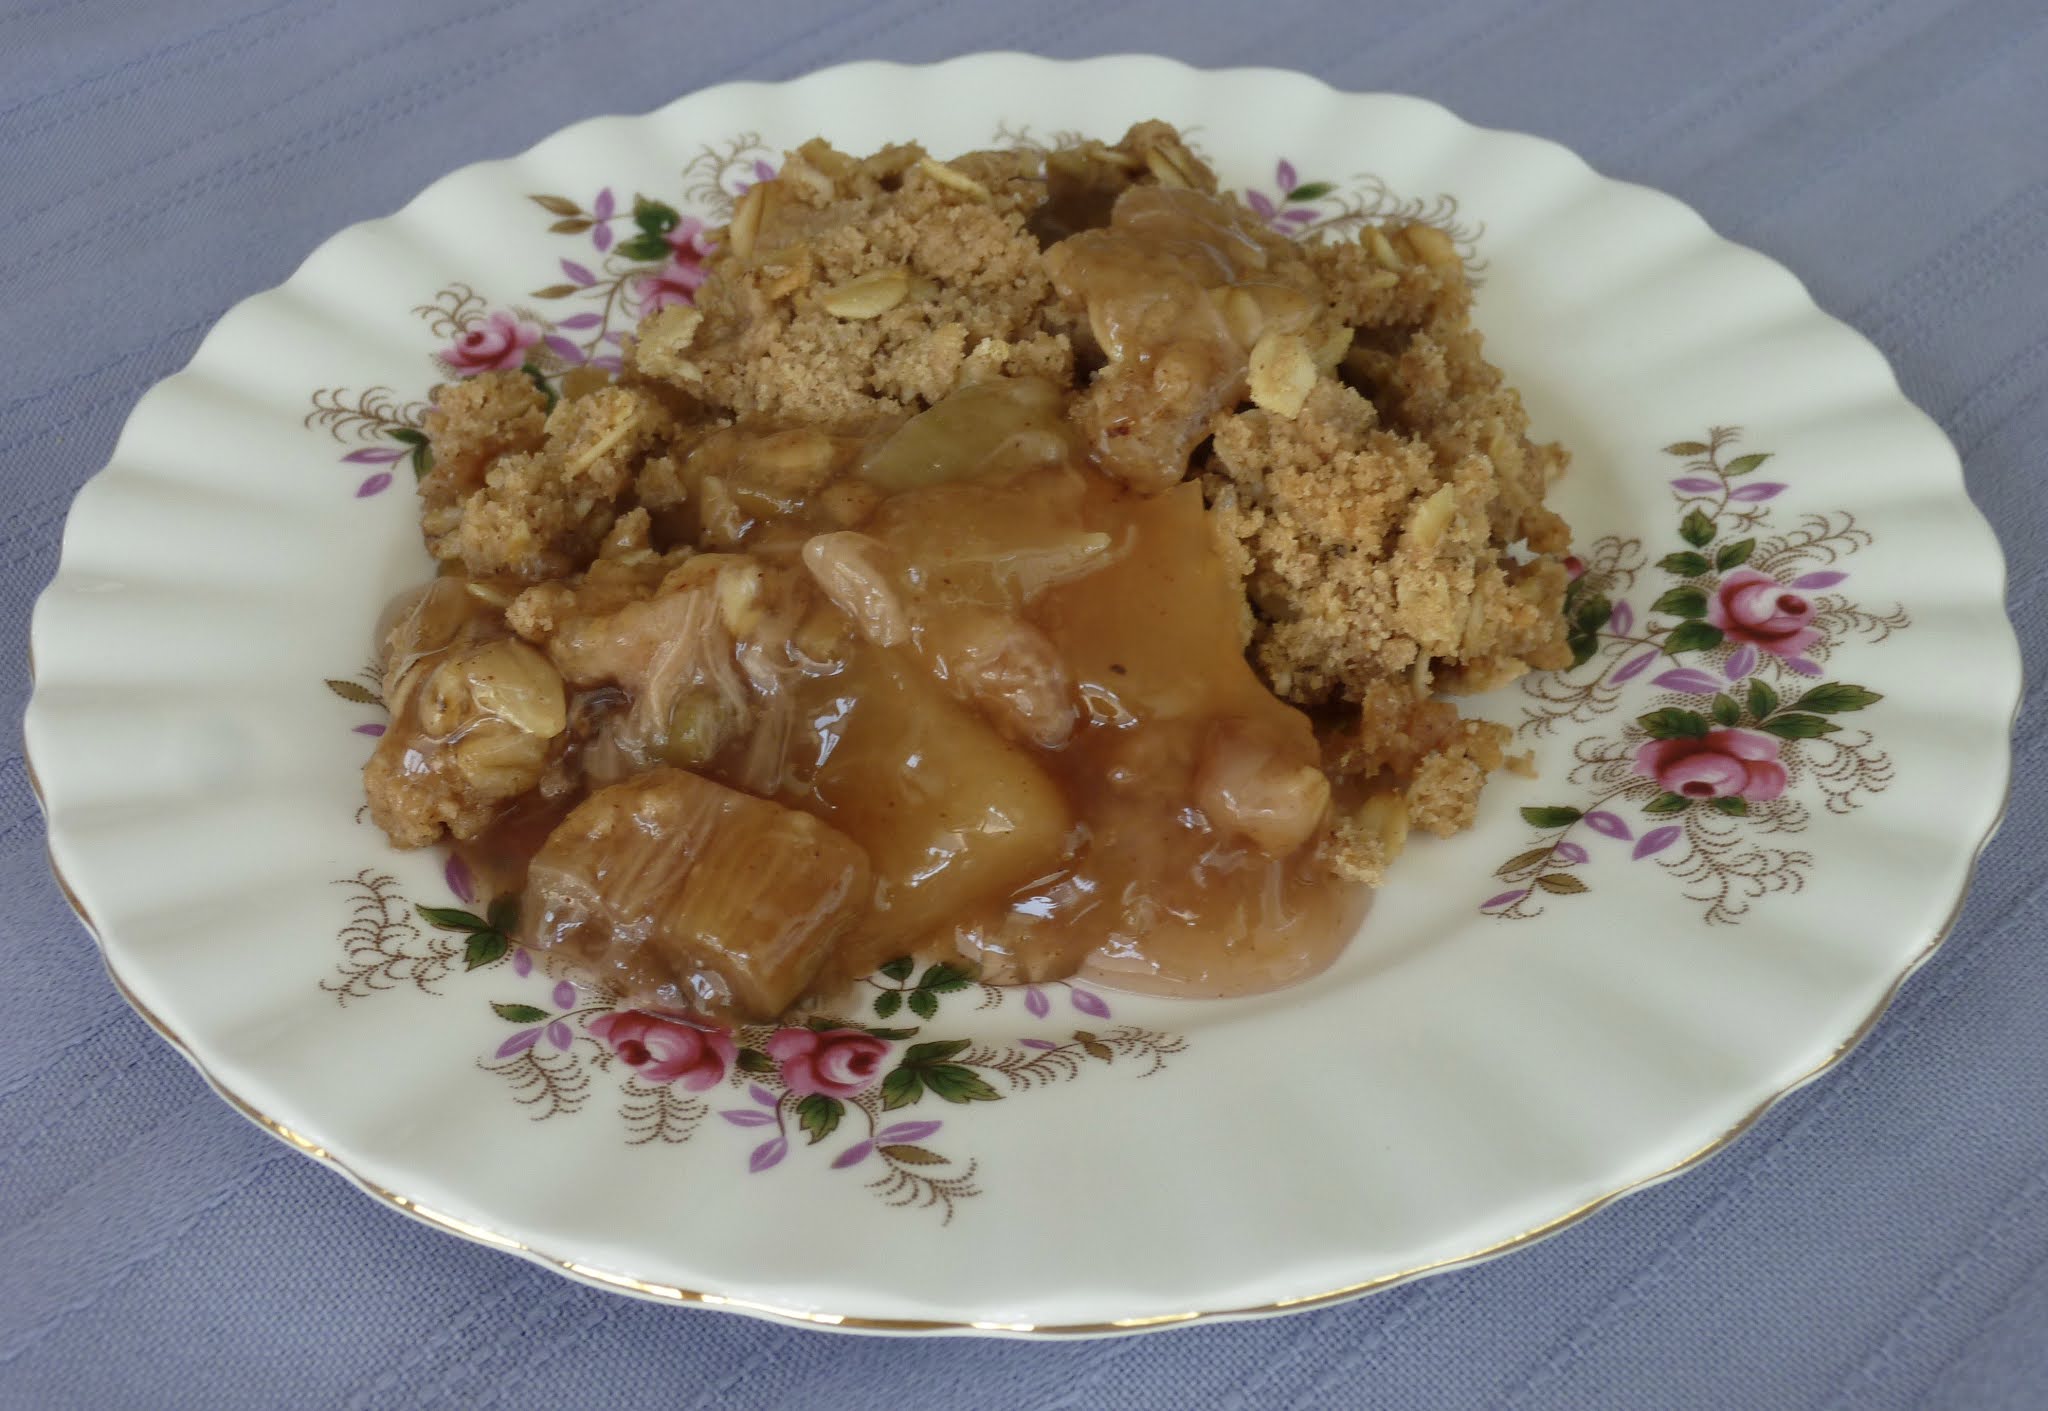
While this recipe is safe for canning, it is not a requirement.  You can definitely use this the same day it is cooked without processing, refrigerate for near-term use, or freeze it if not using within a week.  Unlike the Sure-Jel recipes I did over the summer, this pie filling is good to go once it reaches the desired consistency.

Despite its size, I'm posting the original yield of this recipe, with the link to the book.  Smaller batches just create odd amounts.  By the time you get down to the 1/4 recipe for a single pie, there is some serious math involved to get the teaspoons and 1/3 cups right.  Proportions aren't critical if you are not canning, but stick to the recipe if you are.

8 C diced, cored, and peeled tart apples (like Granny Smith)
4 C fresh cranberries
*2-3/4 C golden raisins
2 C dark raisins
2-1/4 C dried currants
*2-1/2 C chopped dried figs
1-1/3 C ground seeded oranges
1 C ground seeded lemons
1 C mixed candied peel
2 C lightly packed brown sugar
4 C apple cider
1 Tb cinnamon
*2 tsp allspice
2 tsp nutmeg
1 tsp cloves
1tsp ginger
*3/4 C brandy
*1/2 C dry sherry

1.  To grind the citrus, halve fruits.  Remove and discard seeds, then coarsely chop remaining fruit.  Toss everything, peel and all, into the food processor and run to a fine to medium texture.  Then measure.  For a half batch, one of each was enough, but it was a large orange.  Tip, if you use Navel oranges, they don't have seeds.  Neither do some strains of Meyer lemons.

2.  If canning, prepare canner, jars, and lids for an 8-pint/ 4-quart yield.

3.  In a very large saucepan or 2-gallon stockpot (full recipe), combine apples, cranberries, golden and dark raisins, currants, figs, ground oranges and lemons, candied peel, brown sugar, and apple cider.  Bring to a boil over medium-high heat, stirring frequently.  Reduce heat and boil uncovered, stirring occasionally, for 30 minutes, until raw fruit is cooked and dried fruits have absorbed most of the cider.

4.  In a small bowl, combine ground spices.  Whisk in brandy and sherry.  Stir mixture into the pot.  Return mincemeat to a boil over medium heat, stirring frequently, and cook for 10 more minutes to boil off most of the alcohol.

5.  Ladle hot mincemeat into jars, leaving 1/2 inch headspace.  De-bubble and adjust headspace if necessary.  Wipe rims clean with water or vinegar.  Center lids on jars.  Screw bands down fingertip-tight.

6.  Place hot jars in warm canner with water to cover by at least 1 inch.  Bring to a full boil and start the timer for 30 minutes.  When the process time is up, turn off the heat and remove the lid.  Wait 5 minutes to remove jars to reduce the risk of siphoning.  Allow jars to cool to room temperature.  Remove rings, test seals, wipe jars clean, and store.  Any failed seals should be refrigerated and used within a week or two or frozen for up to 3 months.

Makes 8 pints

Difficulty rating  :)

Thursday, October 28, 2021

Hearty Borscht with Barley

I kept forgetting my beets in the garden because they had such a slow start.  By the time I was in the mood to pull them, I didn't feel like making anything summery with them.  That led me to a search for a beet and barley soup, which turns out to be hot borscht.

I'm used to chilled borscht in the spring and summer, but have never had a hot version.  It's what is common in Russia, Poland, and other countries in Eastern Europe.  It is not a light, first course soup.  It's a winter meal.  It's vegetable soup with all kinds of root vegetables, a sturdy beef broth, and even sometimes chunks of beef stew meat.  Beef was $9 a pound for stew meat, so I'm using pork today at one-third the cost.

There are convenience beets now, for those who hate cleaning and peeling fresh beets.  You could also use canned in water.  I'm choosing to roast my fresh-pulled beets for deeper flavor.  Besides, the skin peels right off once they're roasted.

You will notice in the top photo that the soup is not dark.  That's partly because the beets were smaller than I was expecting and I didn't feel like going back to the store.  It's also because I'm not using tomatoes.  I wanted to taste the root vegetables.  As a result, this soup is slightly sweet.  You can add lemon juice and/or more salt to counteract that sweetness, or use potatoes instead of parsnips.

*1 bunch (3) red beets
2 Tb olive oil
1/2 C diced yellow onion
*1 rib celery, diced
1 quart unsalted or low-sodium beef broth
1/2 C pearl barley, rinsed
2 carrots, peeled and chopped
2 parsnips, peeled and chopped
1 lb stew meat, optional
salt and pepper to taste
parsley and/or sour cream, for garnish

1.  Preheat oven to 375º.  Scrub beets clean.  Remove tops and any long taproot.  Wrap in foil and roast until tender, about 30 minutes.  Allow to cool 10 minutes.  Unwrap from foil and rub skins off.  Chop into bit-sized pieces.

2.  While the beets are roasting, start the soup.  In a large pot over medium heat, cook the onion and celery in the oil until soft.  Add the meat and cook until browned, stirring often.

3.  Add the stock and rinsed barley and bring to a low boil.  Reduce heat to a simmer, cover, and cook about 20 minutes.  By now, the beets should be done and ready for the pot.

4.  Add carrots, parsnips, and beets to the soup.  Taste broth and add salt and pepper.  You want to add seasonings when the soup is the same temperature it will be served.  Cover and continue to simmer until vegetables and barley are cooked, about 15-20 more minutes.

5.  Ladle soup into bowls and garnish with parsley and/or sour cream.  Serve hot.

Difficulty rating  π

Monday, October 25, 2021

Other Meat Options

In case you haven't noticed, the price of meat has gone up.  Fish and seafood has always been high, but now it's largely unattainable as an everyday thing.  Some meat products aren't available at all.  It's largely due to supply disruptions caused by the pandemic and its related worker shortages.  Those should resolve in time.

So what's the average shopper to do until things go back to normal?  If you have infinite financial resources, you probably haven't noticed  beef prices almost doubling in the past year.  For everyone else, here are a few ideas.

Canned Meat & Fish

All canned meat is not SPAM and tuna.  There's some decent roast beef in cans, salmon, chicken, shrimp, even duck.  There's also the inexplicable corned beef in a tin that isn't horrible, just not what you were probably expecting.  And something called "Luncheon Meat" that I'm not brave enough to try.  Seafood does dominate the canned meat aisle.  All of these options are cheaper than the fresh versions.  The can of roast beef can serve 4 people for about $5, and you can't screw it up.  These do come with more salt than I'm used to, but dumping a can of chicken into a casserole is half the price and none of the work of making your own shredded chicken.

Buying Frozen

Frozen meat and seafood is generally cheaper than fresh because the waste margin is much lower.  A lot of our fresh meat is never sold and has to be trashed.  Frozen has a long life and is only destroyed if there's a refrigeration issue.  It's also less labor intensive and the cuts don't have to look as appealing in a case.

Shopping the Sales

That should be obvious.  Check the clearance section and weekly ads.  Frankly, I'm going with Economics 101 and simply not buying something that costs more than I want to pay for it.  If 30% off in the clearance bin is still too much per pound, I'm skipping that package.

Vegetarian and Vegan Options

Cheese is a protein.  Eggs and quinoa are complete proteins.  Beans are loaded with protein and iron.  The key is to learn recipes that just happen to use legumes or pulses, but satisfy as though there was meat in them.  Sure, you can get Beyond Meat and Morningstar Farms at most supermarkets, but those aren't complete nutrition and are really for reluctant vegans.  Plus, they aren't all that much cheaper than the real thing.

At the beginning of the pandemic, all the beans disappeared because they have a long shelf life and are very nutritious.  Everything has recovered, both canned and dry.  Ignore the blank space on the dry bean shelf; the market was in the process of rotating the split green peas and I found all of them in the clearance rack.  Too bad I don't use them, because they would have been 80¢ for a pound bag.


Less Popular Meats

I keep finding duck at an equal or better price than chicken.  You don't get as much per pound because of bones, but it's a nice substitute for pork, which often costs more.  I've actually seen ground bison and lamb for less than 93/7 ground beef.  If you're willing to expand your culinary horizons, you may discover proteins you've been blind to out of habit, like rabbit and goat.  I haven't tried goat yet, but that goes into the next topic.

Ethnic Markets

By focusing on a specific cuisine or region of the world, smaller ethnic markets can often offer items at a better price.  99 Ranch has the aforementioned goat, as well as frozen rabbit, duck, and venison at better prices than major chains.  Mitsuwa's meats were kind of pricey, but they did have some really nice sushi-grade fish for not-outrageous prices.  Hispanic and Middle Eastern markets often have game meats and cuts that you won't find at those prices in mainstream markets because they aren't in demand there.

Big Box Stores & Buying in Bulk

I don't currently belong to Sam's or Costco, but they do offer some great deals on high-quality meat and seafood.  I have Smart & Final, which is somewhere between big box and regular markets, without a membership.  It's where restaurants go when they're stuck for something between deliveries.  It helps if you have a chest freezer and at least a passing familiarity with how to butcher your own meat.  Some grocery stores will give you a price break if you preorder a bulk quantity of an item, say a whole beef brisket.  If you have access to a farming community, you can have them raise you an entire lamb.  Techie did that once and ended up with something like 35 or 40 pounds of various cuts at far below market price.  But before investing in a side of beef or pork to last you the year, secure the chest freezer.  They were out of stock at the beginning of the pandemic because everyone was hoarding and needed somewhere to store the food.

Learn How to Pressure Can

I don't do it, but pressure canning meats is an alternative to filling freezers.  It's shelf-stable for at least 18 months, and pre-cooked in case you need to open them during a blackout.  If the market can get you a 30-pound case of chicken breasts for 49¢ per pound, you can buy it and can up about 24 pints of chicken for $15.  That's a fantastic savings.


There are ways to get protein, and even meat, when prices spike.  You have to be creative and flexible.  If the last 19 months have taught us anything, it's how to adapt.

Saturday, October 23, 2021

Kolacky (Midwest-Style)

A long time ago, I bought a can of Solo Poppyseed filling on clearance.  I think at that point there was still a chance of a Purim carnival this year.  So, a long time ago.  The Best By date is approaching.  I went looking for recipe ideas and stumbled upon Czechoslovakian kolacky.

There are two versions of kolacky in the U.S., both with a basis in Czech cuisine.  The Eastern version is a cream cheese thumbprint cookie.  That's what you're likely to find in New York, Amish country, and other parts of the Eastern seaboard.  Where Grandma Sophie's roots are from, it's a Danish-style yeast pastry.  That's also the version in the Bible, but their recipe is a crazy awesome coffee cake with six types of filling.

I'm going with a cross between the Bible's recipe and one off of Simply Recipes.  It mainly adds some flavoring to the sweet yeast dough and the Minnesota-style package shape.  The latter failed miserably, with only enough staying closed to get a photo for the top of the post.  So, basically, every time I make hamantaschen.  If I had gone with the indented rounds, it would have at least looked intentional.


1 C milk
1/2 C (one stick) butter
1/2 C sugar
4 tsp yeast
~4 C flour
1/2 tsp salt
1 egg
1/4 tsp mace or nutmeg
1/2 tsp orange zest or orange juice
1 tsp vanilla
*Fillings, such as poppyseed, pie filling, thick jams, sweetened whipped cheese 
Another egg beaten with 1 TB milk, for egg wash

1.  Warm milk, sugar, and butter (or margarine) to 100ºF.  The butter does not need to melt.  Stir in yeast and allow to get foamy, about 5 minutes.

2.  In stand mixer with the paddle, stir together liquids and 1 C flour into a thin batter.  Beat until smooth.  Add egg, salt, orange zest, mace, vanilla, and another cup of flour and beat into a thicker batter.  Beat in another cup of flour to create a dough and continue to beat on medium until a stringy consistency develops.

3.  Pour out dough onto a floured surface and knead until elastic, about 5 minutes.  Remember all that butter and the egg.  It's going to be stickier than a regular bread dough.  Only add as much flour as you have to to get it to keep its shape.

4.  Shape dough into a ball.  Turn in a large, lightly oiled bowl and allow to rise in a warm place for 1-1/2 hours.  It's already bigger than a loaf of bread, and it's going to triple in volume.

5.  Punch down dough and divide into two or three pieces, to make it easier to handle.  Allow to rest 10 minutes.

6.  Roll out dough 1/4" thick on a lightly floured surface.  Either cut 2-1/2" rounds for the thumbprint version or 3- to 4-inch squares for the package. Place pieces on a lined baking sheet.  There's going to be an egg wash.

7.  For rounds, make an indent in the center.  Egg wash the rims, then fill with a generous dollop of filling. For the 3" or 4" squares, place filling in the middle, then bring up the corners and pinch shut.  Then egg wash.

8.  Allow prepared pastries to rise while you preheat the oven to 375º.  Bake 15 minutes, until golden and set.  Cool on a wire rack.  Store airtight for up to 2 days, or freeze for later.

Makes about 3 dozen

Difficulty rating  :)

Tuesday, October 19, 2021

Artichoke and Swiss Risotto

I'm enjoying working out of my pantry and freezer far more than I expected.  Yes, it's the inspiration for this entire blog, but I've been doing too much "prepping" of long-term foods for my comfort level.  That means my freezer is clogged with veggies, while perishables like cheese get forgotten in the dairy drawer.

While deciding what to make, I remembered the half a block of Swiss cheese.  Then Alton and Elizabeth did risotto on QQ.  That was a short trip.  I decided to use the brick of frozen artichokes, some homemade chicken stock out of the freezer, and open a bag of Arborio rice that I had picked up at Ralphs the last time I went there looking for red lentils.  Not sure why Kroger is the only major chain that stocks store-brand red lentils, but that's where I go for them.

Risotto takes a while because of the nature of Arborio rice, but it is not difficult.  You just can't leave the room to do other stuff for 15 minutes because you have to check on it every 5 or so.  If you just resign yourself to being tethered to the stove for half an hour and put on a podcast or something, it can be a soothing process.

1-1/4 C arborio rice
*3 C chicken stock, more to taste
*1/2 yellow onion, diced
1 Tb olive oil
*1 clove garlic, minced
*1/4 C dry white wine, optional
*8 oz frozen artichoke quarters, thawed
*1 C shredded Swiss cheese
salt and white pepper to taste

1.  In a saucepan, bring chicken stock to a low simmer.  Set a ladle in it and keep it near the main burner.

2.  In a large saucepan or soup pot, heat oil over medium.  Add onion and cook until softened.  Add garlic and a few shakes of white pepper and salt and cook until fragrant.

3.  Alton rinsed his rice in the stock at this point before adding it to the pot.  That got a little messy in my house, but it did produce a creamy product.  Whether you decide to do it rinsed or dry, the rice goes in the pot next.  Toast it lightly with the onion mixture for about 3 minutes.

4.  If using the wine, it goes in next.  Cook until absorbed/cooked off.  Then start ladling in the stock half a cup at a time.  Stir it in, then let cook, uncovered, until absorbed before adding the next ladle.  You want to be able to control the consistency of the rice.  If all the liquid goes in at the same time, or even too much at once, it's harder to judge when it's done.

5.  Once the three cups of stock are in, stir in the artichokes.  They will change the moisture content.  Bring mixture back up to a simmer, then add shredded Swiss cheese.  Taste, and add more salt and pepper if necessary.  You want the rice al dente.  If it's still too firm, add another ladle of stock (or water if you're out).  Once desired consistency is reached, ladle out onto plates or into bowls and serve, perhaps with a side salad.

Difficulty rating  π

Saturday, October 16, 2021

Jar-Lid Pies

I get all kinds of suggestions on YouTube.  One bored day of playing spot-the-difference, and it thinks I'm 10 years old.  Some weeks, it thinks I'm British, or Australian, or Canadian.  At least I usually get recommendations in English.  Usually.

These came up one week, and are the perfect way to use up a last bit of pie dough and the odd sized jar of filling.  I'm actually turning some canned grapes into filling with Clear-Jel, but the baking process is the same.

Let's be clear, I saved used lids for this project.  Baking at 375º will render a canning lid unusable for sealing canned goods.  All the videos I watched used new lids, obviously by people who don't regularly can and have no idea how expensive that is to waste.  Now, you can use them as baking bottoms more than once, so hang onto them if you want to make this a regular thing.  I just don't want anyone wasting a seal on this project if they are regular preservers.

You will need:

Pastry dough for one 9" pie
One 21 oz can pie filling (or pint home-canned and it will make fewer)
8 regular-mouth or 6 wide-mouth bands and lids

1.  Set up your lids and rings.  It's like a tart shell with a removable bottom.  Place the lid sealant-side down inside a ring (see above).  Set all on a lined, rimmed baking sheet in case of goo-splosions.

2.  Roll out the bottom crusts.  I used the largest round cutter I have, and it wasn't wide enough.  You need a lot more overhang than you think you do.  Make the crusts thin, to improve the crust-to-filling ratio.  Place the rounds inside the prepared lids.

3.  Prepare your filling.  In most cases, that's just opening the can.  For me, I turned a jar of preserved grapes into pie filling by boiling the syrup with a tablespoon of Clear-Jel.  Because canned fruit is already cooked, you can do this with the modified starch.  It doesn't need additional time to cook before going into the pie.

4.  Preheat oven to 375º and start filling your pie shells.

5.  Roll out your top crusts.  They don't have to be as wide in circumference as the bottoms, but it helps.  I decided to torture myself on the last one and make a teeny lattice.  Place crusts on top, pinch sealed, and cut vents in the top.  If desired, brush with egg wash or milk and sprinkle with sanding sugar.

6.  Bake 30 minutes, until well browned and the filling is bubbly.  Remove baking sheet and allow pies to cool until no longer boiling.  Holding the rim, push up on the inner lid to remove pies.  Cool on a rack, then remove the bases.  Rims can still be used for canning, but not the lids.

7.  Serve hot, cooled, or freeze for another day.


Makes 6 or 8, depending on size

Difficulty rating  :)

Wednesday, October 13, 2021

Apple-Rhubarb Crisp (Canned Filling)

I needed a couple of regular-mouth pint jars back.  This seemed like a good way to do it.  (Also why I opened the last kimchi in the previous post.)  And then I discovered that I have never made a crisp on this blog.

A crisp is basically a pie with the crust on top.  The topping is a crumbly mixture of flour, butter, oats, sugar, and spices.  I was going to add chopped pecans to it, then forgot.  It's very easy to prepare when you use canned fillings and is about an hour start to serving.

If you're using storebought pie filling, odds are you can't find just rhubarb.  In that case, I would suggest you substitute 2 cups frozen chopped rhubarb, thawed.  It will break down and cook in the amount of time the crisp is in the oven.  Fresh might not.  I'm not concerned about it making the crisp too tart because of all the sugar in the apple pie filling, but you could add 1/2 C granulated sugar to the filling as a precaution.

1/2 C brown sugar
1/2 C rolled or instant oats
3/4 C flour
1 tsp cinnamon
pinch of salt
1/4 C unsalted butter
1 pint Apple pie filling
1 pint Rhubarb pie filling
1 tsp vanilla

1.  Preheat oven to 350º.  Butter an 8" x 8" baking dish.

2.  In a bowl, stir together sugar, oats, flour, cinnamon, and salt.  Cut in butter to make crumbs, like the first part of making scones or pie crust.  The difference is, you aren't going to add a liquid.  That's the whole step.

3.  In another bowl, stir together pie fillings and vanilla.  You could add other spices if desired, like extra cinnamon or some cloves.

4.  Pour pie filling into the baking dish first.  Smooth into the corners.  Sprinkle with crumb topping, covering everything evenly and getting all the way to the edges and corners.

5.  Bake 45 minutes, until topping is browned and insides are bubbly.  Allow to cool almost down to room temperature before serving.  If you want to enhance the vanilla in it, serve with vanilla ice cream on the side.

Serves 6-8, depending if there's ice cream

Difficulty rating  π

Sunday, October 10, 2021

Adzuki Bean Summer Rolls

Ok, so it's fall, but these rolls are filled with less summery things.  I'm trying to justify the things in the pantry, including the rice wrappers I decided against for the tea.

To be different, I tried frying some of the rolls.  I liked the texture, and it didn't destroy the lettuce as I had assumed it would.  The only problem was that I'm not great at wrapping the rolls, and only a couple were done well enough to survive a trip through the oil.  I was sure the other two would fall apart and didn't even try.

My side dishes for this vegetarian version were the last jar of this year's kimchi and some Campari tomatoes with bleu cheese dressing to cut the spice of the leftover Thai satay sauce that I used instead of making peanut sauce.  That stuff is spicier than I remembered, but I didn't break out.  There's a good chance I'm not going to finish the jar.  Really hate throwing out food.  Maybe someone at work wants it.

I pulled the last of the regrown green onions.  Wish I'd taken a picture of it next to a yardstick.  It was starting to grow a bulb.  I'm definitely doing this again, starting with whenever I buy a bunch of green onions.  The celery is still going strong.  Once I'm sure it isn't going to get over 80º again, I'll plant the sprouted garlic cloves living in the fridge.  Those take about 8 months to grow, so I'll have to put them somewhere I don't mind a long-term resident.

*1/2 C dry adzuki beans
1/4 tsp granulated garlic
1/8 tsp powdered ginger
1/4 tsp powdered lemongrass
salt to taste
*1 C dried vermicelli bean noodles
*1 green onion, finely chopped
*2 Tb fresh mint, chopped
*2 Tb fresh basil, chopped
about 4 leaves lettuce
*16 rice paper wrappers

1.  The day before, start the beans soaking in 3" of water.  After 8 hours, drain.  Refill saucepan with water to cover by at least 1".  Add garlic, ginger, lemongrass, and a pinch of salt.  Bring to a low boil.  Lower heat to a simmer, cover, and cook 2 hours, until very tender.  Drain off most of the water and mash beans, like you were doing refried.  Set aside.

2.  It gets easy after that.  Cook noodles according to package directions, which is probably like cooking pasta but for only 3-5 minutes.  Drain and set aside.

3.  Heat water and soak the rice paper sheets one at a time until pliable.  On a work surface, add a tablespoon of beans, a bit of lettuce (not a whole leaf), a pinch of noodles, and a sprinkle of onion and the herbs.  Roll up into an eggroll (or burrito) shape, tucking in the outsides.  Place on a serving plate and repeat with all of the wrappers and fillings.

4.  If desired, heat 1/2" of oil over medium-high heat and fry rolls for 3 minutes on each side, until crispy.  They're also just fine cold.

5.  Serve within a couple of hours, with peanut dipping sauce.

Difficulty rating  :)

Thursday, October 7, 2021

How to Make a Pie from Home-Canned Filling

I found a hole in the internet, which is the title of this post.  I guess people think that, if you're canning pie filling, you have some idea how to make a pie with it.  That's what the label on the back of a can of filling is for, and home-canned items don't have those.  I had to go to the market and read a can, like an idiot.

In the 1800s, it was common to have some form of a pie at nearly every meal.  Sweet, savory, eggy... everything went into a crust and into the oven.  It was easy, especially when the oven was being kept warm all day to heat the house.  Every woman knew how to make crust at a moment's notice.  Pies were common food.  Nowadays, they are a treat, especially if the crust was both made from scratch and also edible.

Yes, you can use refrigerator pie dough.  The ones that come rolled in a cylinder generally have two for a 2-crust pie.  What I would love to find is a tube of pie dough that you can roll out yourself, like sugar cookie dough.

The main difference between making from store-bought filling versus home-made is the yield.  Store cans are 21 ounces, while home-canned "pints" are more like 14.  Therefore, two pints will get you a decent 8" pie or an under-filled 9".  The peach filling I was using was the odd small jars from the end of the batch, so I actually used a 7" tin saved from the last pie I bought at Sprouts.

But I got my cherry & peach pie, which is kind of what I had in mind all along when I was canning the fillings.


Pie crust for double-crust pie (I used pie crust #2)
*2 pints pie filling (or 1 quart)
*egg wash or milk for brushing, optional

1.  Preheat oven to 375º.  This is half of what I needed to read a can for.  The rest was baking time.

2.  Roll out and prepare your bottom pie crust.

3.  Open jars and pour contents into a bowl first if you need to stir them together or add spices.  I added ginger and cloves to my un-spiced fillings.

4.  Fill bottom crust.

5.  Roll out top crust.  If you're cutting the vents with cookie cutters, this is the better time to do it.  If you're just making a slit pattern on top, you can do it after.  For lattice, cut strips.  Gently transfer the top crust to the pie pan, hopefully centering the holes.

6.  Crimp edges to seal the two crusts.  I had a bit of an explosion on one side in the last ten minutes.  At least then I knew it was done.  Brush with egg wash or milk, if using.  I don't usually egg wash my pies, but I had it on hand for the venison pie.  It really does make for a beautiful, crisp top crust.  Sprinkle top with sanding sugar if desired.  Place on a rimmed baking sheet in case of goo-splosions.

7.  Bake for 50 minutes.  Start checking around 40.  I think I went to about 55.  You're looking for a golden crust, but not dark.  If the rim starts to get too dark, tent it with foil for the last 15 minutes.

8.  Remove pie from oven and allow to cool to room temperature before slicing.  You will enjoy the consistency more than if it's oozing everywhere.

Makes 1 8" pie, 6-8 servings

Difficulty rating  :)

Monday, October 4, 2021

Venison-Apricot Pie

I bought some ground venison with this in mind.  We didn't have enough dinners at home during Techie Smurf's visit to make this pie, so it got postponed a month.  This is why the meat I buy goes straight into the freezer.

My only previous experience with a hot-water crust was the pork pie.  I didn't really like that crust and went searching for something better.  I settled on the one in the Scottish Pie recipe from ProFoodHomemade, by a British chef.  There is a prominent link on the page to watch the YouTube video, which is slightly different than the blog post.  The filling and sauce recipe here is largely the same as his from the Scottish Pie post, replacing some of the liquid with a jar of Apricot-Date Chutney.  If you don't have the chutney, substitute apricot jam, mincemeat, or even just chopped dried apricots and extra cooking liquid.  It won't have as much complexity as the chutney, but will be far more interesting than just the meat alone.

Most of the effort in this went into the broth and crust.  The filling is super easy to make.  If you have unsalted beef stock at home, all the better.  I just got out the broth bag and some chicken bones and let that simmer while working on the crust.

I went ahead and did the crust in metric rather than trust his conversion.  All lefties know that the backside of a Pyrex measuring cup has milliliter measurements, and my scale has a button for grams.  Either way, you're going to need a scale because the flour is by weight.  This dough was much better than the one for the pork pie, so it's better to do it this way.

Crust

400g / 14 oz flour
160 g / ml water
90 g / 3-1/4 oz unsalted butter
100 g / 3-1/2 oz shortening or lard
8 g / 1 tsp salt
1 egg beaten with 1 Tb milk or water for an egg wash

1.  In a medium bowl, stir together flour and salt.  Set aside.

2.  In a small saucepan, heat water, butter, and lard over medium-low heat until fully melted.

3.  Pour hot liquid into flour.  Stir until fully mixed.  It's going to smell like the first step of choux paste, which isn't all that pretty.

4.  Turn out dough to a lightly floured board and knead until it comes together as a smooth dough.  Flatten into a disc, wrap with plastic or parchment, and refrigerate 1-2 hours.


Filling & Sauce

*1 lb ground venison
*3/4 C apricot chutney, or 1/2 C apricot jam
1 medium onion, finely chopped
2 Tb olive oil
*1/4 tsp ground mace
*1/4 tsp dried oregano
*1/4 tsp dried parsley
salt and pepper to taste
2 C venison, beef, or lamb stock
1 Tb cornstarch mixed in 2 Tb cold water
*1/4 C bourbon (optional)


1.  In a medium saucepan over medium heat, warm the oil.  Add in diced onion and cook until softened, not browned.  This takes about 10 minutes.  If it starts to brown, turn down the heat.  Add mace, oregano, parsley, salt, and pepper and cook another minute.

2.  Add ground venison to the pot and cook until browned and crumbly.  If desired, pour off fat, but it's a lean meat.  Add pint of unsalted stock and bring to a simmer.  Cover and cook 10 minutes, to flavor the stock for when it becomes the sauce.

3.  Strain off and reserve stock.  In a bowl, add chutney to the cooked filling and work in until well distributed.

Assembly

1.  Preheat oven to 340ºF.  Cut dough into two pieces, one larger than the other, as though you were making a 2-crust pie.  You can make this in 4" mini pie pans, an 8" pie tin, or I chose a deep 6" springform.  The brave can also do what's called a hand-raised crust, with no pie tin to support it.

2.  On a lightly floured board, roll dough 1/4" thin.  If using a mini pie tin, go for 1/8".  Press into your pie pan(s) or carefully shape the bowl of your free-standing crust.  This might take a while.  Patch any holes or cracks so the pie doesn't leak.

3.  Add filling to the crust, packing down.  Add about 1/2 C of the broth to the pie (2 Tb for each if individual).

4.  Roll out your top crust from the remaining dough.  Use the egg wash to brush the filled portion before pressing on the top.  Crimp the two crusts closed, trim off any excess, then cut a vent hole in the center of the pie.  Brush with more egg wash for a lovely glaze.

5.  Place pie(s) on a rimmed baking sheet, in case of leaks or overflows.  Bake mini pies for 40 minutes, full-sized for 55.  The filling is cooked.  You're baking the crust.  Allow to cool slightly on a rack while you make the sauce.

Sauce

1.  Pour remaining broth into a small saucepan and add the bourbon, if using.  Bring to a boil, then add the cornstarch slurry.  Continue to cook until thickened.  It won't be very thick.  If you prefer that, start with a light butter and flour roux and then mix in the broth and bourbon.

2.  Gently remove pies from the tins or springform and serve with gravy.


Difficulty rating :-0