Showing posts with label Fish. Show all posts

Friday, August 15, 2025

Baked Salmon Skewers

I was feeling guilty that I hadn't made fish in a while.  Pavilions had my discount salmon trimmings.  Done.

I considered doing these out on the grill.  I have no idea how to grill fish without it sticking, falling apart, and becoming a total fail.  Time to turn on the oven in the middle of a summer afternoon.

I'm including the sheet pan veggies because they really made the meal complete.  As long as I was using the oven anyway, it wasn't a big deal to throw in another tray while doing the actual skewering.  Since I ended up misjudging the pan size for the kebabs and ran two batches, the veggies were done when the second one came out.

8 bamboo skewers
1 lb salmon, cut in cubes
16 pearl onions, about 4 oz
8 oz white or baby bella mushrooms
1 eggplant
1/2 small cabbage
olive oil
salt and pepper
rice for serving
teriyaki or bbq sauce for serving

1.  While you're assembling ingredients, soak the skewers for at least 30 minutes.

2.  Preheat oven to 375º.  Line one baking sheet with parchment paper.  Top a second rimmed sheet with a rack.  Paper too, if you want an easy cleanup.

3.  Cut off the cap from the eggplant and cut in long strips.  Remove core from cabbage half and cut in wedges.  Arrange on paper-lined baking sheet.  Drizzle lightly with oil and rub to coat, especially the eggplant.  Sprinkle with salt and pepper and place in the oven on the lower rack.  Roast roughly 45 minutes, until the eggplant is done, turning pieces halfway through.

4.  While the veggies are roasting, build the skewers.  First, cut off the two ends and peel the onions.  That's going to take 10 minutes.  I finally got the last inner layer of peel off by simmering them for a minute.  It's about as hard as peeling garlic.  Wash the mushrooms and cut in half if large.  Skewer the salmon, onions, and mushrooms in any pattern you wish.  They don't all have to be the same.  Lay finished skewers on rack-topped baking sheet.  Lightly season with salt and pepper.

5.  Before putting the fish in the oven, start your rice.  Bake skewers on the top rack for 15 minutes, or until the mushrooms are as done as you would like.  They will take the longest to cook.

6.  Plate the veggies, rice and skewers.  Top with sauce as desired.  Serve hot.

Difficulty rating  :)

Sunday, January 5, 2025

Grape Leaf-Wrapped Lemon Cod

I hate coming up with names for recipes I invent.  But, well, that's what this is.

I'm trying to tidy up the chest freezer by eating things that were a good idea when I bought them.  I picked up the cod on sale at a time I was feeling guilty about not eating enough fish.  Freezer-pack fish portions take up much more space than they have the right to, so they went on the list.  I still have that jar of grape leaves in the fridge to deal with, and several lemons on the tree past ripe.  That and a few herbs and seasonings made an easy dinner.

I'm going to stop buying frozen fish.  They're all water.  I forgot that until I took off the foil and they were drowning in way more juice than I expected.  I wouldn't have covered them at all if I had realized that.  It was a disappointment with the scallops, and equally so here.

*4 portions cod fillets
1 Tb olive oil
*12-ish grape leaves
*1 lemon, thinly sliced
salt and white pepper
dried dill and tarragon

1.  Gently grease a roasting pan with the olive oil.  Preheat oven to 375º.  Rinse the grape leaves well and trim off any stems.

2.  Lay out two grape leaves on a work surface.  Lay a portion in the middle.  Sprinkle with salt, white pepper, dill, and tarragon.  Top with a couple of lemon slices.  Place another leaf on top and fold into a package.

3.  Transfer portions to the baking dish.  Cover with foil and bake until 155º, about half an hour.  Mine took quite a bit longer because they were still pretty much frozen, even after a day and a half in the fridge.  Another reason to transition to fresh fish.  Remove foil and bake another five minutes to crisp up the leaves a bit.  Serve hot.

Difficulty rating  π

Sunday, November 24, 2024

Pearl Couscous Salad with Tomato Confit and Salmon

I'm not doing pesto this month.  Need a break.  I decided to blow my remaining home-grown tomatoes and last year's tiny garlic on this instead.  Also, the kale needed a trim.

It didn't seem right to add beans to this particular pasta dish for the protein, so I got out a can of salmon.  I forgot that the big cans are literally a rolled piece of fish.  Tastes the same.

I'm calling this a salad, but you could have it hot as a regular pasta dish.  I served it slightly warm, so the olive oil-based sauce would be fluid.

*2 lbs Roma or Campari tomatoes (or a similar salad tomato)
1 head garlic
1 tsp kosher salt
*1 tsp dried basil
1/2-ish C olive oil
2 Tb white wine vinegar
1 C pearl couscous
*6 C chopped leafy green such as kale, chard, or spinach
1 4-serving can salmon or chicken, optional
crumbled or grated cheese, such as parmesan, feta, or chèvre for garnish

1.  At least two hours ahead, or the day before, roast the tomatoes.  Preheat the oven to 375º.  Quarter the tomatoes and place in an 8x8 baking dish.  It's going to be snug, but they should all fit.  Peel the garlic cloves and arrange in the pan.  Sprinkle with the salt and basil.  Drizzle olive oil on the tomatoes until the dish is full at least 1/4" deep.  I didn't measure an exact amount, but the bottle looked like I had used half a cup.  Roast until the tomatoes are thoroughly softened, 60 to 90 minutes.  Set aside until ready to use, in the refrigerator if it's for the next day.

2.  Cook pasta according to package directions.  If using a sturdier green like kale, cook it in the pot with the pasta.  For spinach, you will be adding it after cooking.

3.  Drain the cooked pasta.  Put it back into the pot and stir in cooked tomatoes with their oil, spinach (if using), vinegar, and salmon.  Either chill for cold service, or serve immediately garnished with cheese.

Difficulty rating  :)

Sunday, November 3, 2024

Tuna Chef's Salad

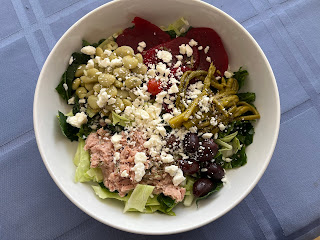
Ok, this isn't a chef's salad in the traditional sense, but I couldn't figure out what to call it.  It isn't Niçoise, though that was an inspiration.  This Mediterranean-ish main dish salad came together with pantry items and a quick vinaigrette.  Plus two sad little cherry tomatoes from the garden.  Eventually, my tomatoes will ripen.  Someday.

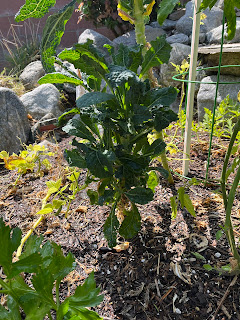
I pulled out one of the kale.  It was damaged a couple of months ago and was sprouting leaves in all kinds of crazy directions.  It was also smaller than the other two and not likely to recover from whatever raccoon trauma was inflicted.  And I seriously don't need any more kale.  I've stopped freezing it.  Any extras are going to be given to my boss for her smoothies.  I used whatever was left on the stalk and the ends of the cabbage from the steaks as my greens.

This was the first time I opened a pressure-canned jar.  This kind of dish is why I made the asparagus.  The terror that I might be poisoning myself was real, but everything went fine.  It tasted the same as the jar I had that failed to seal, exactly like commercially bought canned asparagus.

I've never bought canned lima beans before.  They live in the canned vegetable section, not with the canned beans, so I don't think about them.  We would have them from frozen when I was growing up, but I don't remember the last time I had those.  I definitely like them and will start stocking a can or two.  If you really hate them, sub in green beans.

*4 C salad greens of choice
*2 cans tuna, drained
*1 can asparagus, drained
*16-ish pitted kalamata olives
*1 can sliced beets, drained
1 can lima beans, drained
1 dry pint cherry tomatoes
*1/2 C crumbled feta cheese
1/4 C olive oil
*2 Tb white wine vinegar
*1/2 tsp dried tarragon
1/2 tsp salt
1/4 tsp white pepper

1.  Whisk together oil, vinegar, tarragon, salt, and pepper.  Set dressing aside while you assemble the salad.

2.  Arrange greens in serving bowl or on individual plates.

3.  In little sections, arrange tuna, asparagus, olives, beets, tomatoes, and lima beans.  Try to mix up the colors to make it more eye-catching.

4.  Drizzle dressing on the salad, then top with feta.

Difficulty rating  π

Sunday, September 22, 2024

Creamy Coconut Tilapia

I found another can of coconut milk nearing its expiration date.  The lite doesn't have as long a shelf life, apparently.  Note to self.

I wasn't in the mood for an Indian or south Asian curry.  Instead, I decided to poach some tilapia in an herb-infused creamy base.

I was looking for more of a French flavor in the cream sauce.  I wanted something similar to cream herring, but not as acidic.  I think I sort of got that, but you could still taste the coconut.  I will definitely keep this in mind for Passover, as a dairy-free item to have with a meat meal.

*4 tilapia filets
*2 green onions
1/2 C Italian parsley
*1 tsp dried tarragon
*1/2 tsp dill weed
*1 can lite coconut milk
salt and white pepper to taste

1.  Finely chop the parsley and green onions.  Add to a large skillet with the tarragon, dill, and some salt and pepper.  Shake the can of coconut milk and add to the skillet.

2.  Heat over medium to a simmer.  The fat solids will melt and you can stir everything into a creamy sauce.  Allow to simmer 10 minutes, for the herbs to infuse the milk.

3.  Add the tilapia to the cream in a single layer.  The sauce may or may not cover the pieces, depending on the size of the pan.  Keep at a poaching level, not boiling, for 10 minutes.  This will cook the bottom of the filets.

4.  Gently turn the fish and continue to simmer on the other side until opaque and flaky.  The time will depend on the thickness of the fish, but should be around 5-8 minutes.  Once fish is fully cooked, taste the sauce and adjust seasonings as necessary.

5.  Serve either hot or chilled, with a generous spoon of sauce on top.

Difficulty rating  π

Tuesday, July 30, 2024

Pesto Tilapia

I did mention making half a gallon of pesto, right?  It's my new ketchup.  Which isn't a bad thing.  But sheesh, it takes up a lot of room in the freezer.

I don't think I've made fish for dinner since I started taking fish oil supplements earlier this year.  That is so not the point of taking them.  They're a staple in the Mediterranean Diet, and really easy to prepare in so many ways.  I just tend to gravitate toward chicken when I think of a non-mammal meat, not fish.

The point of this dish was to have something to go with a cold soup and greens.  My kale seems to be the most productive thing in this summer's garden.  No idea what I did, but I'm harvesting what chops up to a quart every few weeks.  I ignored it for a month, and ended up with a gallon bag in addition to the six cups I cooked up that night.  Anything I'm not using goes in the freezer or to my boss, who is the only one in her family willing to eat kale.  I expect them to start bolting any day now, so all the freezer baggies will come in handy until I can get a new round going in a couple of months.  It's already almost time to start my celery and lettuces for the fall!  Doesn't feel like it.

This recipe utilizes my favorite way to bake fish, which is essentially to steam it in the oven.  While still flaky, it's also juicy and doesn't get that weird fish crust.

4 tilapia filets
1 Tb lemon juice
1 Tb oil
*1/2 C pesto

1.  Preheat oven to 350º.  Line roasting dish with parchment paper or foil.

2.  Arrange tilapia in a single layer.  Sprinkle with lemon juice and oil.  Spread pesto evenly over tops of filets.

3.  Seal pan shut with foil.  Bake until center of fish is 145º, opaque, and flaky, about 45 minutes (depending on thickness).  Start checking around 30 minutes.  Serve hot.


Difficulty rating  π

Saturday, March 23, 2024

Lemon-Garlic Scallops and Polenta

Apparently I don't have a "seafood" label, so we're calling this Fish.  I don't cook with shellfish often, primarily due to cost.  99 Ranch had a good price on some huge frozen scallops, so I bought a pound.  I had intended to make pasta for them, then got the notion to do polenta instead.  Well, technically cornmeal mush, since that's what I'm using instead of fine polenta.  This isn't quite cheesy grits, but pretty close.

I'm starting with this recipe from Serving Dumplings.  I don't like capers, so they're gone from this version.  I'm adding a bit more lemon juice and some wine instead, and making the dill more important.  I did like the idea of Parmesan polenta, so we're keeping that.

The whole dish comes together fairly quickly.  I made sure to put the vegetables in the oven first, since everything else is done in 10 minutes.  Depending how well you multi-task, you can stir the polenta while monitoring the scallops, then set both aside to make the sauce.  If it has been one of those days, then make the polenta first, plate it, and put it in a 200ºF oven to stay warm while you cook the scallops and sauce.

Polenta

1 C fine polenta or cornmeal
1/2 tsp salt
1-1/2 ish C unsalted vegetable or chicken stock
1 C milk
1/4 C grated Parmesan

1.  I'm not a believer in "gently sprinkle the dry polenta over boiling water".  I always get clumps.  Stir together polenta, salt, stock, and milk in a 2 quart saucepan.  Let sit 5 minutes and stir again, to make sure everything is moistened.

2.  Turn on stove to medium.  Stirring frequently, bring to a low boil.  Cook 5 minutes.  If the polenta thickens too much, add more broth or milk to desired consistency.  I was going for just a bit more firm than soup, and hit that magic balance.

3.  Stir in Parmesan cheese until melted.  Set aside off the heat and stir every few minutes until ready to serve.  Turn on stove on lowest heat if necessary.  You can also plate the polenta or put it in a bowl and keep it in a low oven.

Scallops

1 Tb olive oil
2 Tb unsalted butter
1 lb scallops, any size
4 cloves garlic, minced
1/4 C diced onion or shallot
1/2 C dry white wine (optional)
salt and pepper to taste
1 tsp dry dill or 1 Tb fresh, chopped
1/4 C lemon juice
2 Tb cream, optional

1.  Heat olive oil and 1 Tb butter in a 10" skillet over medium-high heat.  When a drop of water dances, add scallops.

2.  I was quite disappointed in how much water the scallops gave off, and how small they ended up.  They steamed more than seared, so I never really got that charred bottom you want.  Cook 5 minutes per side, 3 if they're tiny.  Remove scallops to a plate while you make the sauce.

3.  Keep the heat high to boil off remaining scallop juice, then deglaze with wine, if using.  You can use water or broth otherwise.

4.  Add remaining 1 Tb butter and cook the garlic and onion in it.  Add lemon juice, salt, pepper, and dill.  If you want to thicken the sauce with cream, turn the heat down to low first so you don't curdle it in the acidic mixture.

5.  Add scallops back in to reheat and coat with the sauce.  Serve over or beside polenta.

Difficulty rating  :)

Sunday, March 17, 2024

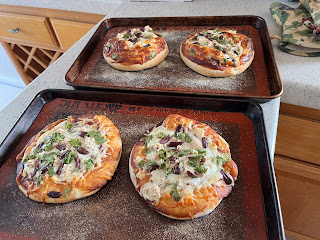
BBQ Salmon Pizza

This ended up being a pantry meal, only buying the cilantro.  I wouldn't have had to do even that, but my only current plant bolted.  The next round will be ready in a few weeks.

I haven't made pizza from scratch in ages, maybe a year.  I forgot how amazingly soft the dough is.  Of course, you can make this with store-bought bases, which will take a whopping 5 minutes to prep and 10 in the oven.

The flavors for this are a cross between BBQ Chicken pizza and a Mediterranean theme.  I used canned salmon to guarantee it would be sufficiently cooked by the time the crust was done.  If using fresh, I would recommend no more than half a pound for the entire recipe.  You never need as much in toppings as you think you do.

Crust

1 C 100º water
1 Tb honey
1 Tb olive oil
2 tsp yeast
1 tsp kosher salt
3-ish C flour

1.  Stir together water, honey, oil, and yeast.  Allow to sit until foamy, 5-10 minutes.

2.  In stand mixer with the paddle, beat together water and 1 C flour until smooth.  Add salt and another cup of flour and beat again until stringy, about 3 minutes.  Beat in enough additional flour to turn it from a batter to a dough, about half a cup.

3.  Turn out dough onto a floured surface and knead until smooth and elastic, about 5 minutes.  I decided to take a photo of the underside of what that looks like.  Everyone shows the smooth side, but this is what you're looking for on the not-pretty side before it is rounded into a ball.  Turn over in a lightly greased bowl to coat all sides, cover, and set in a warm place to rise until doubled, about 1 hour.

4.  Punch down dough and divide into 4 portions by weight.  Mine were a surprising 6 ounces each, which explains why pizza puts on weight.  I could have made 6 lunch-sized pizzas instead, but I didn't have enough cheese for that.  Round each into a ball and allow to rest while you prepare the toppings.

Toppings

Cornmeal for the pan
*1/4 C BBQ sauce, plus more for drizzling
8 oz (2 C) shredded mozzarella cheese
1 5 oz can salmon, drained
1/4 C Kalamata olives, slivered
1/4 C cilantro leaves

1.  Drain salmon well.  If using fresh, slice thinly into bite-sized pieces.  You could even sear them first.  Drain olives and cut into slivers or cross-slices.  Tear cilantro leaves off the stems.

2.  Scatter a generous amount of cornmeal on two baking sheets, about a tablespoon on each.  This is to prevent sticking and give the bottoms a little crunch and stability.  Roll out each dough ball into a 6" round for thick crust or 8" for thinner and place on baking sheets.

3.  Spoon a tablespoon of sauce onto each crust, leaving an edge clean for holding.  Sprinkle each pizza with 1/2 C of cheese, then evenly divide salmon, olives, and cilantro between them.  Allow to rest in a warm spot for half an hour, turning on the oven to 400º halfway through.

4.  Once oven is preheated, place pizzas in them and bake for 10 minutes.  Rotate pans and continue to bake until crust is lightly golden and before the bottoms turn dark brown.  You're only cooking the dough and melting the cheese here if using canned salmon, so it's only 10 minutes total if using pre-baked pizza crusts.

5.  Allow pizzas to sit 5-10 minutes before slicing and serve with additional sauce on the side for dipping or drizzling.

Difficulty rating  :) (π if not making dough)

Monday, November 27, 2023

Shrimp with Deconstructed Pesto

While I appreciate how well I've managed my basil this year, it has been a challenge to use or preserve the abundance.  I mean, how much pesto do you really need in the freezer?

I decided to do one last severe trim to the pot before it got too cold out and the leaves became damaged.  Since I don't have hard freezes, it will over-winter and bounce back in the spring.  Some of it is hung up to dry, and the rest went into this dish.

All this sauce became was a tomato-basil pesto that you don't run through the food processor.  It's still whole, with all the ingredients intact, just in different proportions.  I went easy on the cheese and heavy on the tomatoes.

The pasta was simple homemade wheat noodles, and the shrimp is thrown into the sauce at the end to cook in its heat.  You can use packaged pasta and pre-cooked shrimp if you want to focus on the sauce.  Same result.

1/4 C olive oil
*4 cloves garlic, minced
1 15 oz can petite diced tomatoes
*4 oz basil leaves
1 Tb lemon juice
salt to taste
*1 lb shrimp, size of choice
*1/2 C parmesan cheese
2 Tb pine nuts for garnish
pasta for serving

1.  Start a pot of water for your pasta.  This will come together faster than I thought.  Heat the oil over medium in a large skillet.

2.  Cook the minced garlic in the oil until fragrant, 2 minutes.  Add the can of tomatoes, with their juice, and the basil.  Bring to a low boil, then lower heat slightly so the basil doesn't fry.  Stir in lemon juice to preserve the color of the basil.  Taste and add salt if needed, keeping in mind the shrimp and cheese will bring some salt to the dish.

3.  After placing the pasta in its pot, add the shrimp to the sauce.  They should cook in about the same amount of time.  Once the shrimp is pink all the way through, turn off the heat.

4.  Serve sauce on top of pasta.  Garnish with pine nuts and cheese.

Difficulty rating  π

Sunday, November 12, 2023

Salmon with Tzatziki Sauce


Despite it being the time of year that I tend to eat 19th-century British and American types of foods, I'm still trying to incorporate Mediterranean recipes into the meal plan.

This is a very simple two-part recipe.  While I happened to make the sauce first, you can multi-task and do it while the fish is in the oven.  Tzatziki goes with really any fish.  I happened to have salmon on hand.  Not the awesome kind I got at the kosher market for Passover, just the frozen, vacuum packed filets sold generically at the supermarket.  While not life altering, they were pretty good.

I did get out the grater to do the cucumber properly.  It wasn't the worst thing in the world.  As far as kitchen messes go, cucumber juice is pretty low on the cleaning up scale.  I didn't seed it, though.  Gotta draw the line somewhere.

*4 6oz salmon filets, checked for pin bones
olive oil
salt and white pepper
*dill as needed
*1 C Greek yogurt
1/2 cucumber or 2 Persian cucumbers
2 cloves garlic, grated or through a garlic press
1 Tb lemon juice
*dried mint to taste

1.  Preheat oven to 350º.  Line a roasting pan with parchment for easier cleanup.

2.  Lay filets skin side down in pan.  Drizzle lightly with olive oil, about 1 or 2 tablespoons.  Sprinkle as desired with salt, pepper, and dill.  Keep in mind there's more dill in the sauce.  Cover pan with foil and bake until fish is opaque and flaky, about 25 minutes.

3.  For the sauce, peel (and seed) cucumber, then grate on a box grater's large holes.  Place in a strainer over a bowl or the sink and sprinkle lightly with kosher salt.  Allow to sit 10 minutes, for the salt to draw moisture out of the shreds.  Rinse lightly, then squeeze to remove as much water as possible.

4.  Stir together yogurt, cucumber, garlic, lemon juice, and half a teaspoon each salt and dill to start.  Taste, then add more of those, white pepper, and dried mint until you like the result.  I probably ended up with two teaspoons of dill in mine, but just enough mint to brighten it up.  Chill until ready to use.

5.  Serve salmon with a generous 1/4 C of tzatziki on the side or in a little cup.  It's really more of a condiment than a sauce.

Difficulty rating  :)

Saturday, August 26, 2023

Pickled Salmon


I'm trying to discover new ways to incorporate more fish into my diet.  You're supposed to have 2-3 portions per week.  I tend to have one per month unless I make an effort.

One idea I had was to have some kind of fish at breakfast instead of turkey sausage.  I googled "breakfast fish recipes", which brought up mostly Asian and Scandinavian ideas.  Those are both healthy cuisines.  I settled on the idea of pickled fish, a Scandinavian option.  When I go on a cruise, I tend to do this one of the mornings, just as a personal thing.  But when I went to get a jar of LASCCo pickled herring, the label had a surprising amount of sugar in it.  Ok, new plan: buy fish and get out the erythritol.  You have to use actual sugar in canning recipes, but refrigerator pickles can use alternate sweeteners.

The recipe I'm adapting is for pickled herring.  I don't know if you can even buy herring at a basic supermarket in California.  I went for frozen salmon portions because I have experience with curing it, and changed the seasonings to make them appropriate.

This recipe doesn't have to be exclusively for breakfast.  That's just one of the things I used it for.  I usually have the Lasco for afternoon snack.  Papa Smurf rarely had lunch, but when he did, it was often something like this or peanut butter and crackers.

There are two ways of pickling fish, raw and poached.  I'm doing the poached version, where you pour the vinegar and spices just off the boil and it barely cooks the fish through.  You can also wait for the liquid to cool and do a raw version.  The recipe site included a link to the U of Minnesota's page on preserving fish, if you have safety questions.

Water
1/4 C pickling or kosher salt
12 oz salmon filet, skin-on
1 C vinegar (I used a mix of white wine and distilled)
3 Tb sugar
1 tsp mustard seed
1 tsp peppercorns
*4 juniper berries
*1 bay leaf
*1 tsp dill weed
1 lemon, thinly sliced
*1/2 red onion, thinly sliced


1.  In a small, non-reactive saucepan, heat 3 C water and the salt until the salt thoroughly dissolves.  Allow to cool to room temperature.  Pour over salmon in a small container until submerged.  Refrigerate 8 to 24 hours, to brine.

2.  In the small saucepan, combine vinegar, 1/2 C water, sugar, and all spices except the dill.  Bring to a low boil for several minutes.  If doing the poached version, maintain a low boil while you fill the jars.  For raw, allow to cool to room temperature.

3.  Thoroughly wash two wide-mouth pint jars, or a glass quart jar with a fairly wide mouth.  It's just going to be easier to get the pieces out later.  Don't use metal, as it will react with the vinegar.  Plastic will pick up flavor and odors.  Glass or ceramic is best for this, and glass is prettier.

4.  Drain the salmon and cut into one-ounce pieces.  This is meant for small servings.  You should be able to feel that the texture of the fish is slightly denser than raw.  Add dill to the bottom of the jar.  Then alternate adding fish, lemon, and onion until all are used up.

5.  Carefully pour hot (or cooled) pickling mixture into the jars, including the spices.  The cold fish should cool off the mixture enough to prevent the jar from cracking.  Shake or debubble the jar.  By now, you can see the color of the fish change as it cooks.  Cap and refrigerate at least a day before using.  The fish will get soft, flaky, and fall apart slightly as you remove it from the jar.  Maybe use a spoon.  Use within 2-3 weeks.

Makes 12 1-ounce servings

Difficulty rating  :)