Tuesday, August 30, 2022

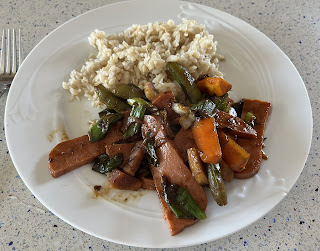
Stir-Fry with Teriyaki SPAM

I wasn't going to post this, since it's basically "fry up everything and serve over rice".  But I thought I'd turn it into a product review.

SPAM comes in flavors.  Who knew?  (Everyone who likes SPAM)  I had planned to pick up a can to use as breakfast ham when they were out of my turkey sausages, then saw a whole array of flavors.  For the heck of it, I picked teriyaki and came up with something else for breakfast.

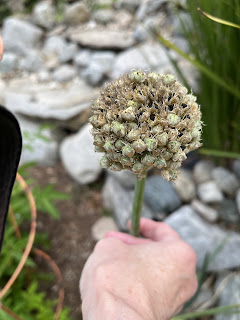
The vegetables I'm using here are pretty basic for stir-fry, but they were also what I had on hand in the freezer and in the garden.  I'm almost out of home-grown green onion.  It's been at least six months since I've bought any.  Hoping the one I let flower produces viable seeds.  That would be super cool, if a $1 purchase could self-seed and produce onions in perpetuity.

Would I buy this product again?  Probably not.  I'm particular about my teriyaki, and this wasn't what I had in mind.  I could have added sugar to the pan to compensate.  I'll stick to a more conventional recipe in the future.

1 Tb vegetable oil
*3 green onions, sliced in 2" pieces
*2 carrots, cut in 2" sticks
*1 C sugar snap pea pods
*2 Tb black bean garlic paste
*1 tsp grated ginger
*2 Tb soy sauce
*1 tin Teriyaki SPAM
*rice for serving

I also used celery root, not in the recipe
1.  Heat oil in large skillet over medium high heat.  Add onions, carrots, and peas and cook until the onions and carrots soften, about 10 minutes, stirring frequently.

2.  Slice the SPAM thinly and cut into strips.  Add to the skillet with the black bean paste, soy, and ginger. Continue to cook until everything is heated through and sauce is evenly distributed.

3.  Serve hot over rice.

Difficulty rating  π

Saturday, August 27, 2022

Peach Swiss Roll

A co-worker brought a big bag of peaches from her tree to work.  Over a week later, several were still in the fridge.  I hate to see food go to waste, and brought them home to bake with.  A later recipe went back to work as a treat for the crew.  This one was small, so I kept it for myself.

Eggs are expensive, so when I saw that my jelly roll recipe uses four, I looked for a way to cut it down.  The toaster oven's broiler pan is about the right size for a quarter recipe, and I just prayed this would work.

There was a lot of math involved in cutting it down.  Square inches in the small tray versus my half-sheet pan, then one quarter of 2/3 C of sugar.  Fortunately, I have a magnet with conversion tables on my fridge. I'm not going to torture you with that and will post the full recipe for a standard jelly roll or cookie sheet.

Part of me wanted to bake the cake in the toaster oven, but the element is slightly burned out on one side and the cake wouldn't have baked evenly.  So I put the Easy-Bake Oven sized cake in the full oven and watched it carefully.  By the way, I loved my Easy-Bake.  I begged for it for two years until Papa Smurf decided I was old enough not to burn myself, then used it for several years, until I was up to using the real oven.  I still have a couple of little pieces from the icing decoration set.

Cake

3/4 C flour
1 tsp baking powder
1/2 tsp salt
4 eggs, separated, room temperature
1/2 tsp vanilla extract
2/3 C sugar
powdered sugar for dusting

1.  Preheat oven to 375º.  Grease a baking sheet or jelly roll pan with shortening, line with wax paper, and grease the paper.

2.  Stir together flour, baking powder, and salt.  Set aside.  In a separate bowl, whip egg whites to soft peaks, add 1/3 C of the sugar, and whip to stiff peaks.  This was nice to do in a very small bowl with the hand beater's whisk attachment.  I have to remember that for the future.

3.  In a third bowl, beat egg yolks until light.  That was very hard to do with one yolk.  Add remaining sugar and the extract and beat until combined and it doesn't try to separate when you stop beating.

4.  Gently stir flour into egg yolk mixture until mostly combined.  Fold in egg whites, trying not to deflate the mixture.  Spread evenly in prepared pan, getting into the corners.

5.  Bake for 10-12 minutes, until top is set and springy.  While the cake is in the oven, dust a clean tea towel with powdered sugar.  As soon as the cake comes out of the oven, invert onto towel.  Just commit to the flip and worry about centering it after.  Any patterns on the sheet or pan will end up on the inside of the cake.  Carefully remove wax paper.

6.  Roll up cake with the towel serving as the "filling", starting with the shorter side for dessert-sized servings or the long side for tea servings.  Allow to cool that way before filling, and it won't crack when finished.

Filling and Assembly

1-1/2 C whipping cream
1/4 C powdered sugar
1/2 tsp vanilla
*3 large peaches

1.  Whip cream to firm peaks, adding powdered sugar and vanilla at the soft peak stage.  Again, that happened so fast in the small bowl that I almost turned it into butter.  Maybe two minutes.  I have to remember that hack for next time.

2.  Pit peaches and slice thinly.  Peeling optional.  Reserve several slices for garnish.

3.  Unroll cake and just leave it on the towel, which needs a wash anyway.  If desired, trim the outer edges for a cleaner look.

4.  Spread the whipped cream over the entire cake surface, but go easy on the last inch in case things start to squish out.  Reserve a tablespoon or two of cream for decoration.  Top cream with peach slices.  Reroll and place, seam-side down, on serving platter.  Add a dollop of whipped cream wherever you want a decorative slice of peach to stick and garnish.  If desired, dust with more powdered sugar.  Chill until ready to serve.


Makes one cake, 12-16 servings

Difficulty rating  :)

Wednesday, August 24, 2022

Meal Planning by Inventory

Sometime after the middle of each month, I set aside time to work on the next month's meal plan.  The first step in that session is to take a brief inventory of what I have in the pantry and freezer and decide what should be prioritized as an item to use.  Lately, I have been focusing on what I still have from my post-Pantry Challenge stock up from February.  That was a very well strategized hundred dollars, which would cost about $20 more today.  And yes, I did end up storing the half-gallon jars on the floor, which is a huge no-no.  I didn't feel comfortable putting them on a top shelf.  They're glass.

I also made a note to use any leftovers in the freezer.  The rest of the corned beef, some sauces, baked goods that aren't part of my monthly challah bake, stuff like that.  Things that are already cooked.  It's easy to forget an extra portion or two of something that you froze to keep it from spoiling.

Then there's the corn.  I like corn.  I just never cook with it, so why do I have frozen kernel, canned kernel, and cream-style?  Got the cans at the 99¢ Store, which does not excuse buying something I don't regularly use.  A recipe using the cream-style will be up soon.

I also decided to use the grill again.  That's what summer is for, right?  There are plenty of people who don't turn on the oven for months at a time.  You can even use it as a slow-cooker with a fire-safe pot or casserole.  This did involve a new purchase, but it was something that was on special and I was going to buy anyway.

If you're a vegetable gardener, it's also important to count your garden as inventory.  I don't get a lot of any one thing at once.  I get enough for a recipe or two, which is fine by me, as long as I remember to use it.  One green onion went to seed before I noticed, so I harvested those and planted some in the pot that had garlic in it last winter.  I'm starting to get a few shoots, which is all I want.  I only use maybe two or three green onions a month.  I'll succession plant in a few weeks somewhere else.  And I have my garlic "harvest" of six bulbs, drying in the garage, that are pretty much ready to use.  Carrots do need to go on the "to use" list.

By basing your menus on items already on hand, you save money in new purchases and by not letting something you've already bought spoil.  It can also lead you to creative new uses for that stray ingredient.

Sunday, August 21, 2022

Moroccan Lentil Salad

Yes, I'm still into North African food.  For the most part, it's good for you.  This one is vegan, low-fat, and gluten-free, at least until I had it with some naan.

I found a recipe on Salima's Kitchen that didn't need too much tweaking.  For one thing, half a cup of dry lentils per serving?  We're cutting that in half.  Even a vegan of many years would have tummy trouble after that.  Then there was the reader comment that preserved lemon would be a nice touch.  Done.

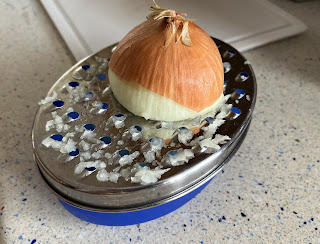
And while I wasn't thrilled about grating an onion or tomato, it was my day off and I didn't have anything else to do while the naan dough was rising.  Using my old IKEA grater with it's own storage box made it easier to deal with the drippings.


1 Tb olive oil
*3 cloves garlic, minced
*1/2 onion, grated
*1 tsp paprika
*1/2 tsp red pepper flakes, or chili powder for less heat
1 tsp kosher salt
1/2 tsp ground pepper
2 Roma tomatoes, grated
*1 C lentils of choice (I used brown), sorted and rinsed
1-1/2 C water
*1 Tb tomato paste
*1/2 preserved lemon, or 1 tsp lemon zest and 1 Tb lemon juice
Parsley for garnish, optional

1.  Heat oil over medium in a large skillet or medium saucepan with a lid.  Add garlic, onion, and spices.  If using preserved lemon later, cut amount of salt in half.  Cook until onion is well softened and everything is fragrant, about 5 minutes.

2.  Add grated tomatoes, lentils, and water.  Stir to combine.  Bring to a low boil, then lower heat to a simmer.  Cover and cook until lentils are done, which will depend on which kind you use.  Red, only 15 minutes.  Green, brown, or black, at least 30 and up to 45.  Check after 20 minutes and add a little water if too dry.  I used the original recipe's 2 cups of water, and ended up having to reduce it when they were still swimming.

3.  Once lentils are cooked, stir in tomato paste and preserved lemon or lemon juice and zest.  Taste and adjust seasonings.  Serve either hot or cold, garnished with fresh parsley, with a side of rice or bread.  I happened to have some kalamata olives opened in the fridge, so those were garnish as well.  Not Moroccan, but neither was the naan.

Serves 4 as main dish, 6 as a side

Difficulty rating  :)

Thursday, August 18, 2022

Cornmeal Pancakes


I've been wanting pancakes for a while, but with my new habit of having leftover challah for breakfast, I haven't needed to make anything.  Then I decided to use the rest of one week's loaf as the luau bread, so I had an opening for breakfast.

I decided on cornmeal pancakes because I kind of wanted some with a bit of a crunch.  These do get crispy around the edges, and you can see some grains of cornmeal.  They are also softer than all-gluten flour pancakes.  If you use a GF flour like Bob's 1-to-1, these are very easily gluten-free.

Cook Fast Eat Well had a recipe I could get behind, but it made a lot so I cut it in half (one egg).  I also decided to use buttermilk, but the recipe is designed for regular.  Up to you.  For me, either is a powder, so it doesn't matter.  I have been cutting back my portion sizes and just eating an extra snack if I get hungry, so you may need to make the full recipe if there are no side dishes.  It's a summer thing that I don't eat as much.  You can also freeze leftovers.

*1/2 C fine or medium grain cornmeal (I used regular Albers)
1/2 C A.P. flour
1-1/2 Tb sugar
1/2 Tb baking powder
1/4 tsp salt
1 egg
*1/2 C milk or buttermilk
1/2 tsp vanilla
2 Tb vegetable oil, plus more for the skillet

1.  In a bowl, combine dry ingredients.  Separately, whisk together egg, milk, vanilla, and 2 Tb oil.

2.  Add wet mix to dry and stir briefly until moistened.  Let sit 5 minutes to hydrate remaining lumps while you preheat the griddle over medium-high.

3.  Lightly grease skillet or griddle.  Add batter up to 1/4 C at a time, depending what size pancakes you want.  Mine are closer to 2 Tb, a 3" pancake.  Allow to cook about 3 minutes, until the bubbles stop breaking.  Flip pancakes and cook an additional 1-2 minutes.  Set aside, re-oil skillet, and repeat until batter is used.  Serve warm with butter and syrup.


Makes one dozen 3" pancakes

Difficulty rating  π

Monday, August 15, 2022

Poi


I got some pork "stew meat" for next to nothing on the clearance aisle and needed to do something with it.  I decided to make kalua pork, which quickly evolved into a luau-themed dinner.  Sidebar, it's pretty amazing how few vegetables are included in luau menus.  I ended up just making a salad and slicing up a pineapple.  And if I was having a luau, I needed poi.

For those who don't know, poi is a sauce made from the root of the taro plant.  Traditionally, it's pounded; modern recipes allow a food processor.  I was able to get the taro root at Pavilions, but it was $5 a pound, which was when I decided to buy only half a pound.  It's a sauce, not a side dish.  I probably could have found a bag of prepared taro in the freezer section at an Asian market, but the gas involved would have negated any savings.  Next time I go to Mitsuwa, I'll put it on my list.

You will also notice that there are zero seasonings in this sauce.  That's probably why people don't really like it at first and dare each other to taste it.  Imagine mashed potatoes thinned to a sauce, but with nothing else in them.  I added salt after the first serving, and it helped immensely.

As for working with a new ingredient, it wasn't as bad as I expected.  I do like taro smoothies and ice cream.  I can see myself making the cooked and peeled roots as freezer items for use in other recipes, and as a new Passover alternative to potatoes.

I'm following the method on Heleloa, but her amounts are a bit ambiguous.  I always thought taro roots were larger than the ones I found, and she doesn't say how much it's supposed to make.  The recipe itself is very easy.

8 oz taro root
water as needed

1.  Scrub taro roots clean, but do not peel.  Place in a saucepan with water to cover and bring to a boil.  Lower heat to a simmer and cook until they can easily be pierced by a fork, about 20-25 minutes.  Drain.


2.  Once cool enough to handle, peel roots and chop into 1" pieces.  I used a vegetable peeler on the first one, then realized they're more like beets and you can rub the skins off with your fingers.  They reminded me a lot of artichoke hearts, both in consistency and aroma.  They also oxidize like artichokes, turning from white to a kind of light greyish purple.  Process in the food processor with the main blade into mashed potato consistency.  Add water, a tablespoon at a time, until sauce is as thin as you want it.  I didn't measure, but it was probably half a cup to get to 2-finger, thinner than hummus but not falling from the spoon in ribbons.  Leave it a wee bit thicker than you want, if making it for later, because you're going to top it with water.  To go straight into a serving bowl, make it exactly how you want it served.

3.  If not serving immediately, you have two options.  One, pour into a non-reactive container, lightly add a little water to coat the surface, and refrigerate.  Two, you skip the refrigeration step and leave it on the counter for 2-4 days to ferment.  It's kind of like making the sour cream version of poi, a little tangy and almost an alcohol aftertaste.


Makes 1-1/2 to 2 cups, depending on consistency

Difficulty rating  π

Friday, August 12, 2022

Kahlua Brownies


I still have a lot of liquor in the cabinet from when my parents passed away over a decade ago.  Even after giving away all the unopened bottles in the first couple of years, it's a lot.  I give myself a mini celebration whenever I finish a bottle.  At the rate of a tablespoon, severely watered down, per drink, and maybe four drinks a week, it's taking a long time.

There's a bottle of homemade kahlua in there from some friends of theirs.  I stirred a tablespoon into some chocolate pudding as a flavor enhancer, and it was a nice accent.  So I went and found a recipe to use some in brownies.

I'm not a huge fudgy-brownie fan, but that's what happens if you put alcohol in the batter.  I'm more into cake brownies.  The recipe from That Skinny Chick Can Bake seemed to be what I was looking for.  It used less alcohol and was a bit closer to a cake brownie than some other versions.

I decided to make these after grocery day and didn't have any baking chocolate.  I used some dark chocolate bits I had bought for Passover and never used.  They had a little sugar in them, so I decreased my amount by several tablespoons.  If using actual baking chocolate, use the amounts listed.

1-1/2 C flour
1/2 tsp baking powder
1/2 tsp salt
2/3 C unsalted butter, cut in cubes
*3 oz unsweetened baking chocolate, coarsely chopped
2 C sugar
3 eggs, room temperature
*1/4 C Kahlua or other coffee liqueur

1.  Spray a 9x9 or 8x8 pan with pan spray, then line with parchment or foil.  I didn't fully line mine, and things went ok.  Some of the batter leaked under the parchment edge.  Snacks.  Preheat the oven to 350º.

2.  Melt the chocolate and butter together, either on a double boiler or in 30 second bursts on half power in the microwave.  I used half butter and half margarine, then cut back on the added salt.  Set aside to cool slightly so it doesn't cook the eggs.

3.  In a small bowl, stir together flour, baking powder, and salt.  Separately, beat together eggs and sugar until light and fluffy.

4.  Beat chocolate mixture into eggs until smooth.  Stir in 3 Tb of the Kahlua.  Stir in flour mixture until mostly combined, but don't overmix.

5.  Pour batter into prepared pan.  Bake 30 minutes for a 9x9, 35 for an 8x8, or until a toothpick comes up mostly clean.  These are fudgy, so a completely dry toothpick means you have overbaked them.  While still warm, brush with remaining tablespoon of Kahlua.

6.  Allow to cool fully before removing from pan and cutting.  Considering there is some uncooked alcohol, I made smaller pieces that easily fit in a cupcake liner.  This kind of brownie is easier to cut if you refrigerate it first.  Allow to return to room temperature for serving.


Makes 16 3-bite brownies

Difficulty rating  :)
Tuesday, August 9, 2022

Cambro Crazy

I got it into my head that I wanted to reorganize the baking shelf.  The flour bucket has been such a success, it only made sense to expand the concept to other bulk items.

Plastic containers are expensive.  I was at Big Lots! and they were $15 each.  Amazon didn't have much better prices, and neither did Target.  Ross had some for $7 each, but they were glass and not stackable.  I didn't even go into Bed Bath & Beyond.  I finally decided that the problem was I was looking at "pretty" containers, when what I needed was functional.

I went to Chef's Toys, a no-membership restaurant supply store.  Well, first I looked into getting containers from U-Line, but you had to buy in multiples of six, and the lids were separate.  Very good price though, if I had needed that many.  Not sure what they charge for shipping.  Chef's Toys prices were a little higher, but still half the price of the lay-cook version.

I went straight to the Cambro aisle.  Cambro is a brand, but also a generic term for plastic containers.  Like Kleenex.  They have every size you can imagine up to 22 quarts.  Yes, that's big, but it holds 25 pounds of flour.  The containers are BPA-free, industrial dishwasher safe, microwaveable, made in the USA, and the company is headquartered in Huntington Beach.

I picked up a bunch of 3-packs of various sizes packaged with the lids, as the most economical way to do it.  The square gallon ones are for bread flour, now that I'm using it regularly for challah, and A.P. once I get it down to that point.  The third will find a use in time.  As much as I love the flour bucket, it takes up a lot of space.  I got two packs (6 total) of square half gallons.  Those are for the freezer items of whole wheat flour, masa harina, cornmeal, and cake flour, plus granulated sugar that doesn't fit in the kitchen crock.  The masa and wheat flour actually had more than half a gallon left in their respective bags, so I'm making it a priority to use whatever didn't fit and I'm going to buy them in smaller packages in the future.  Since I was on a roll, I got round quart containers for kosher salt, powdered sugar, and brown sugar.

Putting all these flours (and sugars) on the shelf accomplishes four goals.  One, I'm not dealing with bags and boxes when I scoop or pour.  Two, it tidies up the freezer and pantry to stack the containers.  Three, I can see what I have.  And four - which should really be #1 - the airtight seals will keep the ingredients fresh and bug-free.

An advantage of using the industry containers isn't just that they are more durable than average.  They're marked with volumes in English and metric.  If I see that there's less than 4-1/2 cups of bread flour left and challah day is coming up, I can put bread flour on the shopping list.  Less than two cups of brown sugar?  Better get some before pies and gingerbread start happening.

If you're going to decant all these similar-looking flours and granulated anything, make sure you label the container.  I used some pretty canning labels I was gifted.  They go on the lid for the chest freezer and the front for the pantry.  The lids do have a place to write on with a sharpie, but I didn't want to commit to that.  I didn't bother to label the brown sugar, since it could never be mistaken for any other Cambro item. Neither would the cornmeal, but since that's stacked in the freezer, it's easier to see when you look down into it.

As long as I was in a reorganizing mood, I transferred a lot of beans and grains into smaller mason jars, freeing up a little space.  I didn't put the flours in mason jars because the whole point of this project was to make them less messy to scoop and stackable.  I did make a pint jar of vanilla sugar, separate from the Cambro of regular sugar.  I'll never need more than two cups of it at a time, even for canning.

I admit, this little remodeling project wasn't cheap.  I spent a hundred dollars.  But with home levels of usage, I'm never going to have to replace them, and it would have cost me about $250 if I had bought the OXO or Rubbermaid offerings.  In a bakery or restaurant, the containers last 2-5 years, depending on usage and how often they're dropped.  In the long run, it's worth it to prevent loss due to spoilage and spillage.

Saturday, August 6, 2022

Grilled Eggplant Salad

I always feel stupid when I light up the grill for a pound of hamburgers, so I tried to make it worthwhile by grilling the veggies, too.  The coals still lasted far longer than I needed.  I almost called my neighbors to see if they wanted to throw anything on.

This recipe fits well into my whole eating seasonal, Mediterranean-leaning good intentions for the summer.  Cooked salads are definitely a thing in that region, usually lightly dressed to you can taste the ingredients.  I kept it simple to mainly eggplant, but you could add zucchini, yellow squash, and/or bell peppers for added flavor or extra servings.

1 large eggplant
*1 yellow or red onion
2 Roma or beefsteak tomatoes
about 2 Tb vegetable oil for brushing
1 Tb balsamic vinegar
1 Tb olive oil
*1/4 tsp dried oregano
1/2 tsp honey
*1 tsp wholegrain or Dijon mustard
salt and pepper
*Lettuce leaves for serving

1.  Preheat grill or broiler.  I used a grill pan for the tomatoes, then added the onions to it when they started to fall apart.  There are also grill mats now, which look similar to Silpats.

2.  Slice eggplant into 1" thick rounds.  Quarter tomatoes.  Slice onion 1/2" thick.  Brush all veggies lightly with oil, remembering that eggplant will soak up almost as much as you're willing to give it.  Try not to go overboard.

3.  Place veggies on grill or broiler pan.  Turn every few minutes.  Cook until done, which will not be the same amount of time for everything.  You don't have to blacken the eggplant like I did.  I like the taste of char.

4.  While the veggies are cooking, whisk up the vinegar, olive oil, oregano, honey, and mustard.  Taste and add salt and pepper as needed.

5.  Allow cooked veggies to cool enough to handle.  Slice up eggplant and onions into strips or cubes.  Put all veggie pieces into a bowl and toss with the dressing.

6.  Serve warm, room temperature, or chilled, on top of lettuce leaves if desired.  You could also sprinkle with feta cheese to add a new level of tang.

Difficulty rating  π

Wednesday, August 3, 2022

Split-Pea Hummus

Every time I make something with tahini, I keep thinking that it will finish the jar.  It's the never-ending jar of tahini, and that stuff does go rancid if you let it sit too long.  Well, I finally finished it off with this one.

There's a website called pulses.org that's all about lentils and such.  They had this recipe which looked good and was all stuff I had on hand.  It was also something to do with the pound of split peas I stocked up on other than soup.

There were a couple of comments on the recipe that I'm taking to heart and incorporating as part of the directions.  I'm also personally using preserved lemon instead of the other lemony ingredients and the salt, but I'm leaving the written recipe as from fresh.  And yes, I'm putting "or to taste" a lot in this post.  The cumin, for example, sounded like a lot and the garlic didn't sound like enough.

*2/3 C dry split peas
1-1/2 C vegetable broth
*1/4 C tahini
*2 cloves garlic, or to taste
*2 Tb lemon juice
1* tsp lemon zest
1/2 tsp salt, or to taste
1 Tb cumin, or to taste
1/4 C olive oil, or to taste

1.  Check split peas for stones.  Rinse lightly, then add to a medium saucepan with the vegetable broth.  Bring to a low boil over medium.  Lower heat to a simmer, cover, and cook until peas are done and mushy, about 30-40 min.  You can either refrigerate the result to finish later, in which case it will thicken on its own, or drain off and reserve some of the remaining broth, maybe 1/3 C, as you make the hummus warm.

2.  Everybody in the food processor except the oil and reserved broth.  Pulse at first to distribute, then run until smooth.  Taste, then adjust seasonings.  Add back some of the broth if too thick, remembering that it will thicken more as it chills.  Finish with about 10 seconds of running the processor while drizzling in the oil.

3.  Chill hummus until ready to serve.  Enjoy with pita, crackers, and veggies.  I had it as part of a summery tapas meal.

Makes about 2 C

Difficulty rating  π