Saturday, February 27, 2021

Ketchup for Passover

As is the case with half of the items I put up, I learned how to make ketchup so I could have it for Passover.  I'm not a huge ketchup user, but Passover is so potato-intensive, you need it at some point.  Nearly all commercial ketchups contain corn syrup, making them chometz.  I'm not braving Glatt Mart if that's the only thing I want.  Yes, I do buy KLP mayo, but that's my jar of mayo for the year and available at my local Pavilions.  Not a fan of mayo at all, but it does play a part in some recipes.

I went through three cookbooks to come up with this recipe: the Garde Manger, Food in Jars, and the Ball Book.  The textbook was not a canning recipe, because it's generally not legal for restaurants to serve home-canned foods.  It did use part red wine vinegar as an acid ingredient, which is what I was looking for in the textbook.  The important part is that the vinegar(s) used contain at least 5% acidity by volume.  The other two books provided the correct proportions and methods for safe canning.

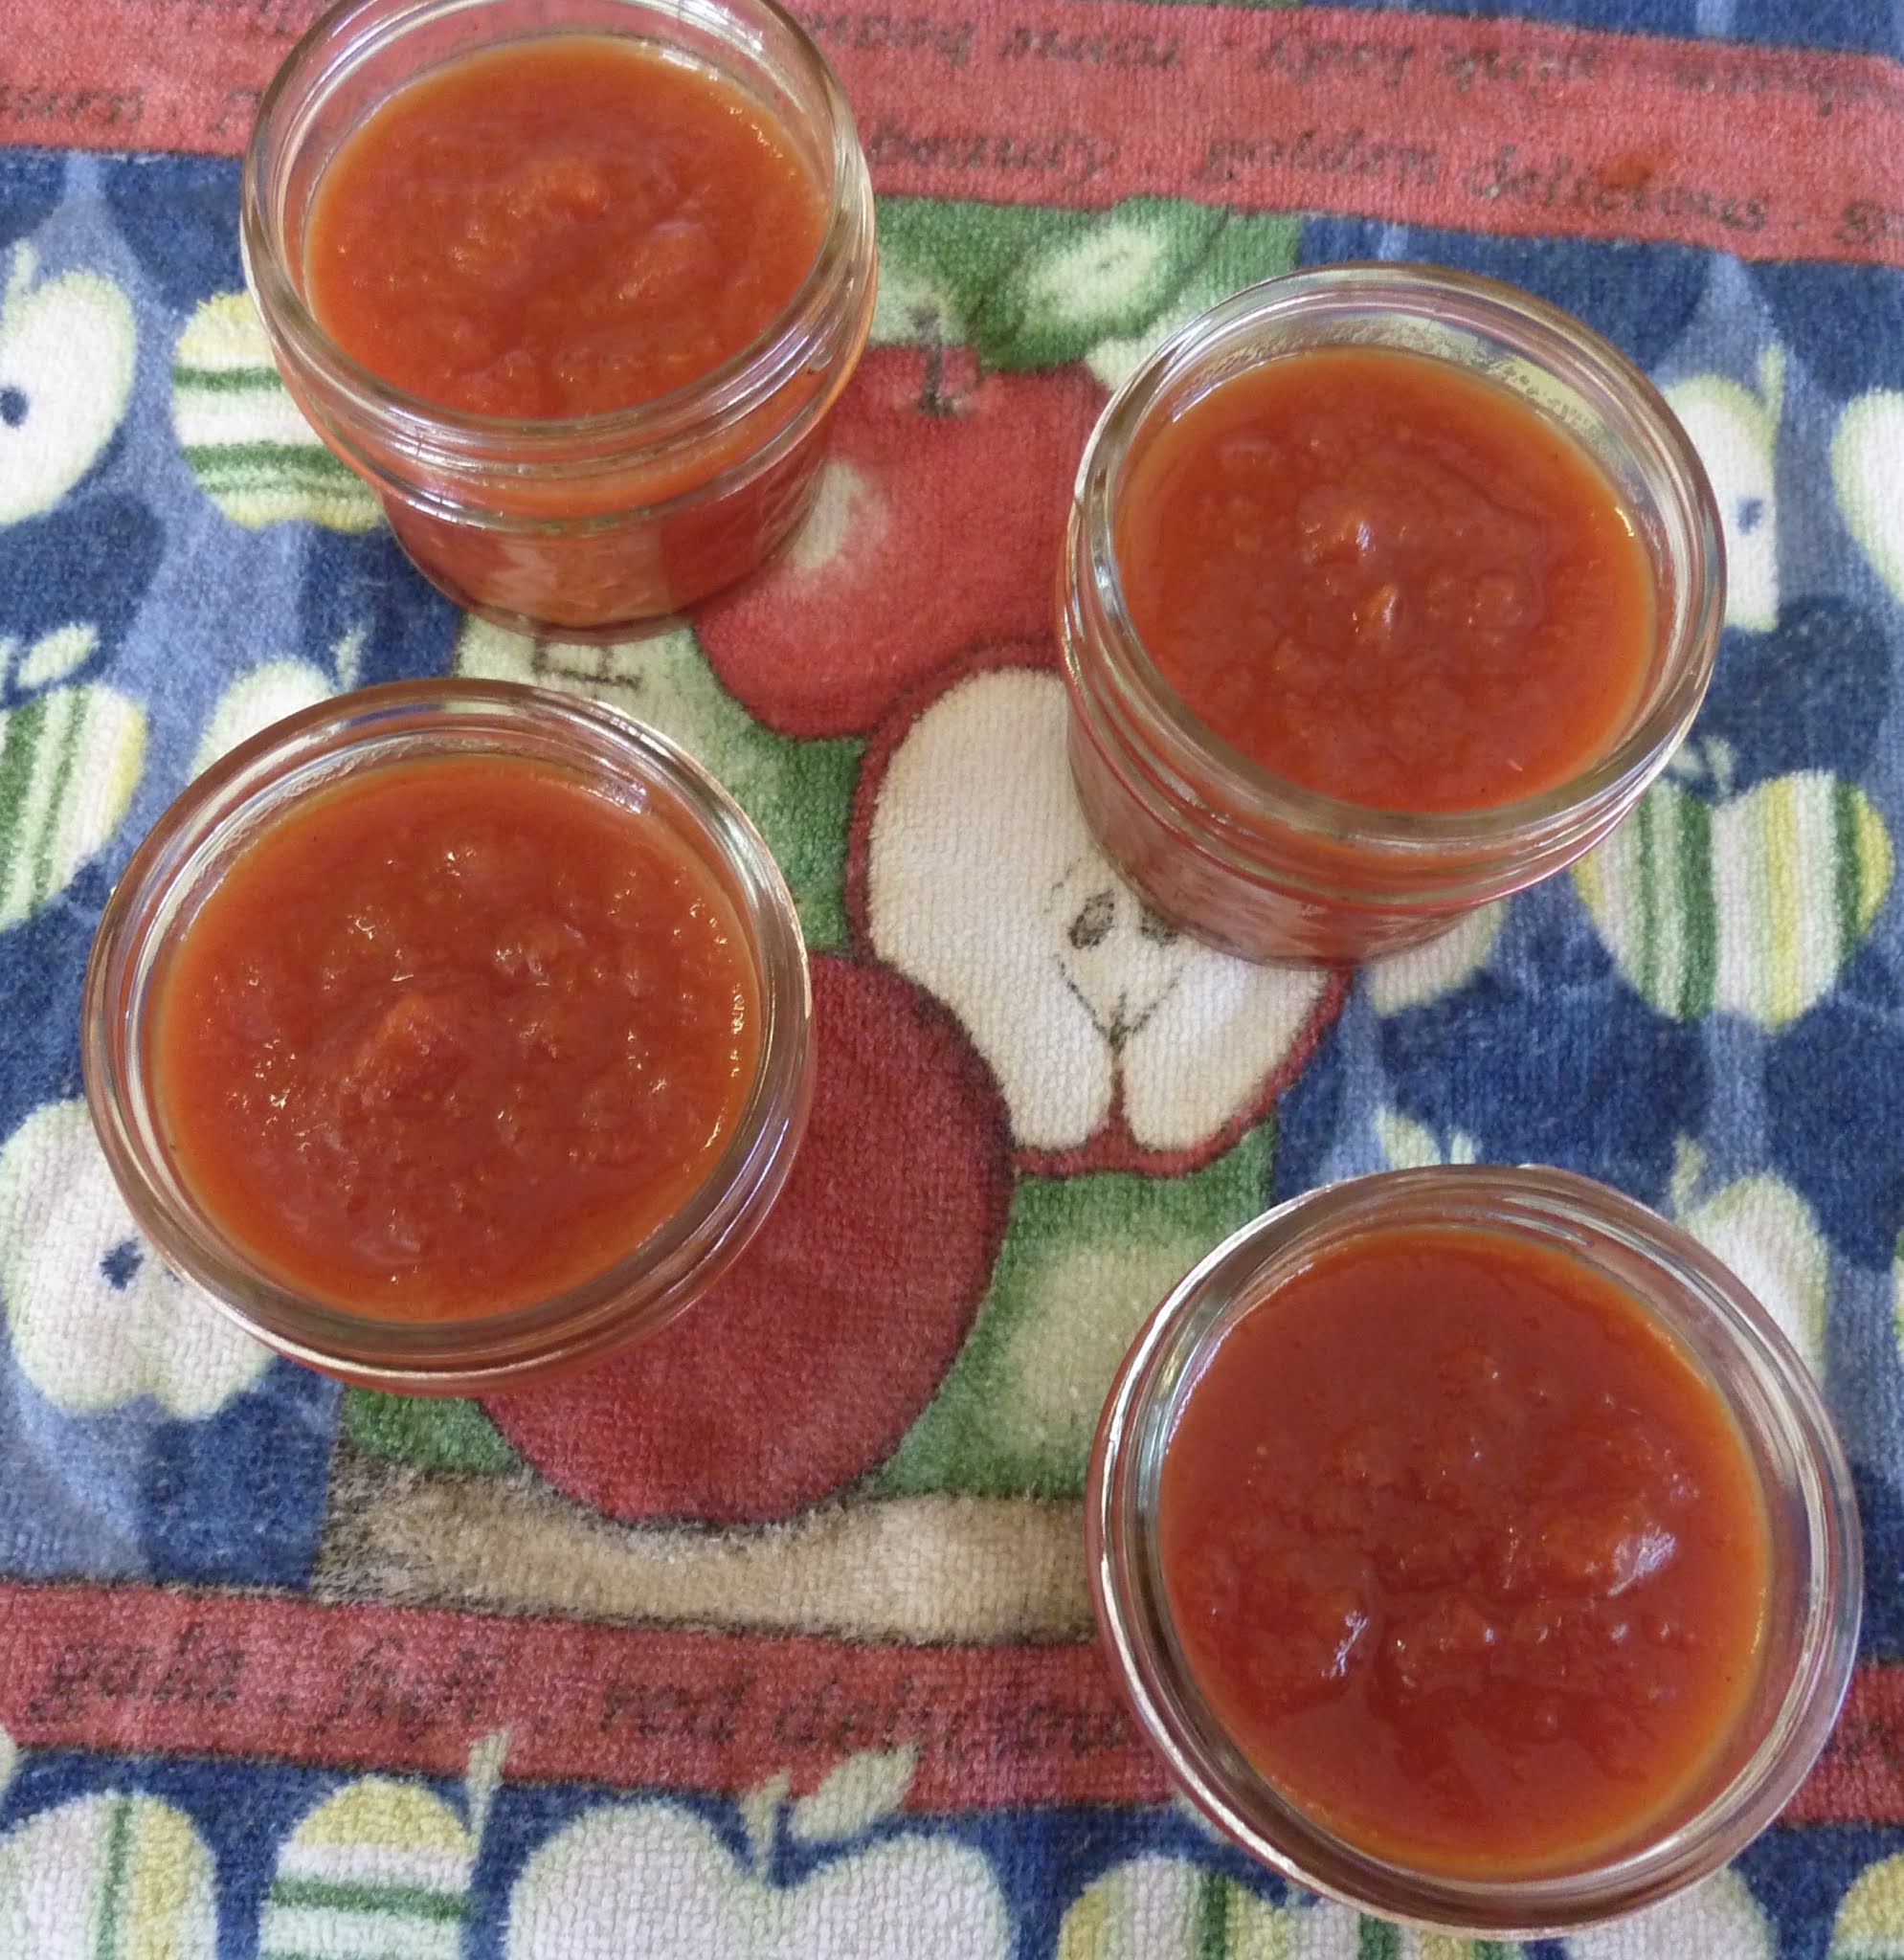
I'm going to warn you now, ketchup takes a long time.  This is 1/8 the recipe in the Ball book by pounds of tomatoes, because I was trying to make roughly the same amount as a good-sized bottle from the store.  Reducing it to the desired consistency took almost an hour.  If I had done anywhere near the 24 pounds of tomatoes in the full recipe, it would have taken 4-6 hours.

Warning #2, this doesn't save you any money unless you grew the tomatoes yourself.  The cheapest I ever see Romas at the peak season is 98¢ a pound.  With the other ingredients, that's close to $4 per pint.  The bottled Passover ketchup costs less than that.  It's a lot more tomatoes than you think, about a dozen of the big ones at the market.  You can change to a different kind of tomato, but the water content will differ and alter your yield.

If you're not process-canning your ketchup, you can reduce the amount of vinegar to make it less acidic, or change the amount of sugar and salt.  These are the proportions for safe canning.  You do have to finish the ketchup within a couple of weeks in the fridge, so bear that in mind before making a huge batch that you don't plan to process.  There aren't any notes in the Ball book about freezing failed seals.  My best guess is that it would separate upon defrosting.

  • *3/4 tsp celery seed
  • *1/2 tsp whole cloves
  • *1" piece of stick cinnamon
  • 1/4 tsp allspice berries
  • 1/3 C + 1Tb vinegars (any combination of apple cider, red wine, and balsamic if you want an extra kick)
  • 3 lbs Roma tomatoes, cored and quartered
  • 1/3 C finely chopped onion or *5 tsp dried onion flakes, crushed
  • 1/8 tsp cayenne pepper (I used chili powder instead for a smoky flavor)
  • 1/3 C sugar
  • 1/2 Tb salt

1.  Place celery seed, cloves, cinnamon, and allspice in a cheesecloth bag or stainless steel tea strainer.  Place in a non-reactive saucepan with the vinegars.  Bring to a boil.  Remove from heat and allow to steep while you start to cook the tomatoes.

2.  In a large, non-reactive saucepan, combine tomatoes, onions, and cayenne.  Bring to a boil over high heat, stirring frequently.  Reduce heat and boil gently for 20 minutes.

3.  Remove the spice container from the vinegar and discard.  Add infused vinegar to the tomatoes and boil gently until vegetables are soft and mixture begins to thicken, about 30 minutes.

4.  Working in batches, transfer mixture to a sieve placed over a glass or stainless bowl and press with the back of a spoon to extract all the liquid.  If you have a food mill, use the finest plate and be glad it will be easier to clean than the strainer.  Discard solids.

5.  Return the liquid to the saucepan.  (And yes, I'm aware this is a different pot.)  Add sugar and salt.  Bring to a boil over medium heat, stirring occasionally.  Reduce heat and boil gently, stirring frequently to avoid scorching, until volume is reduced by half and mixture is similar to commercial ketchup, about 45 minutes.  It's still going to have more of the texture of thick tomato sauce, not perfectly smooth like what you buy.

6.  If canning, use the reduction time to prepare your canner, jars, and lids for a 1 pint to 1-1/4 pint yield.  It will depend on how far you reduce and how well you strained the juices.  Ladle hot ketchup into hot jars, leaving 1/2" headspace.  This is one of those products that can possibly siphon.  Remove air bubbles, adjust headspace, wipe rims, center lids, screw on bands finger-tight.  Process for 15 minutes once canner returns to a boil.  Remove lid once time is reached and allow to sit 5 minutes before removing from the canner.  Cool jars, test lids, wipe, and store in a cool, dry place.

6a.  If not canning, allow ketchup to cool until no longer steaming.  Store in a non-reactive container in the fridge, leaving the lid cracked until product is completely cooled.  Use within 2-3 weeks.  (Same with opened processed jars.)

Makes about 1 pint

Difficulty rating  :-0

Wednesday, February 24, 2021

Masoor Dal Tadka

Here's something for this year's Purim vegan meal.  I'm quickly discovering that Indian food is a wholesome go-to for my veg/vegan rotation.  It's also a good way to run through my collection of chometz legumes and pulses.  Normally, it would also use rice, but I had this with the avocado chapati.  I had also put on a pound finishing the faultline cake, so it was diet week.

Dal is Indian for lentils, and Masoor Dal are red lentils.  Tadka is the cooked spice mix you stir into them, and you're done.  I had everything for this dish on hand.  It's cheap, nutritious, and as spiced as you want it.

This version is roughly a half-recipe of the one out of The Curious Chickpea.  I found out after finishing this post that I have a very similar Dhal recipe from a couple of years ago on this blog.  I should have tried spelling variations when I was checking.  This version is even easier, because you can use canned tomatoes.  I made a couple of minor changes, and omitted the chilis for my personal use.  Feel free to add more salt if you prefer.

*1 C red lentils
1 Tb oil (ghee for non-vegan)
1 C finely diced onion
*3 cloves garlic, minced
1/2 Tb grated fresh ginger
1 or 2 diced chilis, or to taste
1 tsp curry powder
1/2 tsp mustard seeds
1/4 tsp cumin
1/2 tsp salt
*3/4 C diced tomatoes (or 1/2 a can)
*cilantro for garnish

1.  Sort lentils and rinse until the water is clear.  Sorting means to inspect the dry product for stones or other things that shouldn't be in the package.  Red lentils need a lot more rinsing than brown ones.  I don't know what the soapy, cloudy stuff is, but in quinoa that look is slightly toxic.  I rinse my red lentils a lot.

2.  Add water to the lentil saucepan to cover by 1".  Bring to a boil, then lower to a simmer.  Cover and cook while the tadka is going.

3.  In a large skillet, heat oil over medium.  Add onion, garlic, ginger, chilis, curry, mustard, cumin, and salt.  Cook until onion is very soft, about 5 minutes.  Add tomatoes and cook until they break down, at least 10 minutes for fresh and 5 for canned.

4.  Remove lentils from heat when not quite done.  They should be just barely starting to split and lightened to a yellowish-orange.  If there's still standing water, drain some of it off.  It's ok if there's still water at the bottom.

5.  When the tadka is cooked, add the lentils.  Fold until combined, which is when the remaining water in the lentils will disappear.  Serve hot, garnished with cilantro.

Difficulty rating  π

Sunday, February 21, 2021

Faultline Cake #2

I decided to celebrate the end of my quarantine with a cake.  I had no idea how I wanted to decorate it until I ended up with three layers from two different pans.  I had used the 4" aluminum and 4-1/2" springform, so the layers were not the same size.

Instead of trimming all of the cakes the same size, I decided to attempt another faultline cake, this time with a different approach.  It worked, so I'm posting the technique.

I admit that I didn't do the best job smoothing the frosting.  I didn't level the tiers either, and it ended up taller than wide.  This was going to be just for me.  A 4" cake and not going back to work for almost a week?  It was not going to last that long.  Not when it was a double chocolate buttermilk cake.

1.  Take 3 layers of cake, one preferably a tiny bit smaller than the others.  Freeze at least the middle layer, but it's easier to frost if all are frozen.  Crumb coat one to be the bottom and place on a cake circle.

2.  Frost the outer edge of the middle layer.  This is where the instructions diverge from the original version.  I didn't have to be as careful with a 4" cake as you would have to be for a bigger one.  Before the frosting is too set, roll edge in sprinkles, sugar crystals, candies, or whatever else you want the middle to look like.  I had some crushed purple candy sticks.  Set middle layer on top of bottom and crumb-coat the top.  I didn't want to do full filling layers because the outer frosting gets thick.

3.  Place the top layer on the middle and finish crumb coating.  Smooth frosting and freeze to set.


4.  For the final coat, frost top and bottom layers only.  As you scrape off the extra, allow some frosting to work its way over the edges of the middle layer, to create the fault line.  Smooth the top of the cake.  Place on a serving platter and finish decorating as desired.

Servings vary by size of cake
Difficulty rating  :)

Thursday, February 18, 2021

Corned Pork

Pretty much everyone has heard of corned beef.  What I didn't know until recently is that any meat can be corned.  It's just a method of food preservation.  Corned lamb is a thing in several cultures.

Lamb was expensive the day I went shopping, but pork loin was slightly less expensive than beef brisket and other beef roasts that work well with corning.  Honestly, I don't know if I've ever bought one of those packaged pork tenderloins before, because they tend to run twice the size of what I normally use.  For the time involved in this recipe, you might as well do a lot and freeze the leftovers.

So what does it taste like?  Frankly, a lot like corned beef.  The texture is more delicate, possibly because I chose a tenderloin.  You can serve it as you would corned beef, in sandwiches or as hash.  I had it with some fig mustard, which was divine and cut the saltiness a bit.  Oh, there were vegetables too.

The process and most of the seasonings are the same as corned beef.  I just changed up a little for my own personal tastes and to complement the pork.  Halfway through the spice mix, I realized that I can make the corned lamb KLP by omitting mustard seed.  We'll keep that in mind for next month.

I still have a mostly-full jar of Prague Powder #1.  Theoretically, it expires this week.  My guess is the chemicals and salts are good pretty much forever as long as the contents stay sealed and dry.  Just the same, I'll make the effort to do more cured meats and offer some to anyone who wants to try it for themselves.  1/4 tsp per pound of meat, for someone who is making an effort to reduce their meat consumption, is going to last decades.  This recipe, and any corned meat recipe, works without it.  You just won't get the pink tint that's the hallmark of a corned meat.

1 quart water
1/2 C kosher salt
1/4 C brown sugar
*1/2 cinnamon stick, broken in pieces
1/2 tsp mustard seeds
1/2 tsp whole peppercorns
*8 whole cloves
4 whole allspice
4 juniper berries
*1 bay leaf, crumbled
*1 star anise
*1/2 tsp Prague Powder #1 (optional)
2 lb boneless pork loin or roast


1.  In a large saucepan, combine all ingredients down to the Prague Powder.  Bring to a low boil and stir to dissolve sugar and salt.  Simmer about 5 minutes, then remove from heat.

2.  Allow brine to cool for 1 hour, then stir in about a pound of ice to bring the temperature down to 40ºF.

3.  Place pork in a large zipper bag, at least 1 gallon.  Place in a casserole or plastic storage container deep enough to contain the brine if the bag fails.

4.  Add brine to the plastic bag.  Squeeze out as much air as possible and seal the bag.  Refrigerate 7-10 days, turning daily and checking the seal.

5.  Once brining time is finished, drain bag and rinse meat.  If you want a slightly less salty product, soak for 3 hours in plain water and drain again.  Place pork in a large saucepan with water or broth to cover.  Add 2 C mirepoix (onion, carrot, and celery trimmings) and simmer 2-3 hours, until very tender.  These tenderloins were simmered a bit less than 2 hours.  A pork butt or shoulder roast should go longer, being a tougher cut.  Slice thinly against the grain, which is easiest when the meat is slightly warm but not hot, and serve hot or cold.

Serves 6-8

Difficulty rating  π (but plan ahead 10 days)

Monday, February 15, 2021

Avocado Flatbread (Chapati)

YouTube is getting too good at anticipating my tastes.  It also seems to know what I have in my freezer.

I've mostly given up buying fresh avocados.  I don't really like them much, and they go from rock hard to overripe in the blink of an eye.  So I started buying frozen avocado chunks to keep on hand for the rare times I actually want some.  When a recipe for an avocado flatbread came up on my YouTube suggestions, it sounded like something the chunks were meant for.

The recipe I'm using is from an Indian recipe site, Cook with Kushi, so I'm considering these chapati.  If I was making them for a Mexican-themed meal, I'd call them tortillas.  For Mediterranean, I'd roll them thicker and call them pitas.  Flat breads exist in so many cuisines, it's a shame to pigeonhole them into only one.

The original recipe used all whole wheat flour.  I'm using part wheat and part white flour here because all-wheat baked goods can get a bit woody.  I'm a fan of very soft breads, even tortillas.

These are definitely healthier than your average tortilla.  The fat is replaced by the avocado.  That doesn't mean they're fat free or low calorie.  The avocado just brings actual nutrition to the party.  It's an important distinction to make.

*1 large avocado or 1-1/2 C frozen avocado chunks, defrosted
1 tsp lemon juice
1 tsp salt
1 tsp curry powder
*3 Tb fresh cilantro, chopped
1/2 C whole wheat flour
1/2 C all purpose flour, plus more for dusting
water as needed
vegetable oil for frying (optional)

1.  If working from fresh, pit avocado and scoop flesh into a bowl.  Mash pulp with lemon juice (to maintain color), salt, curry, and cilantro into a smooth, Indian-themed guacamole.

2.  Work in whole wheat flour and 1/2 C all purpose flour.  This will require some kneading.  If too dry, add a touch of water.  If too damp, add more a.p. flour.  It's going to depend on the size and water content of your avocado.  You'll get a more reliable yield out of the frozen chunks.

3.  Once the dough is properly hydrated and uniform, shape into a ball and allow to rest 30 minutes.

4.  Divide your dough according to how big you want your flatbreads.  I went with the author's 8, which was slightly over an ounce by weight and made pieces less than 6" in diameter.  They're easier to roll at that size, and I could have gone with a smaller pan.  Roll out each piece into a thin round, flouring the board and pin as necessary.

5.  Heat a skillet or griddle over medium-high heat.  If desired, add a bit of oil for a slightly fried taste.  I tried it both ways and ended up liking a very minimally oiled pan best.  It brings out the spices.  Place a flatbread on the skillet and cook until lightly browned on the bottom, about 3 minutes.  Flip and cook other side another 2 minutes.  This was when I wished I'd gotten out the pancake griddle.  It took a while to do these one at a time.

6.  Stack cooked flatbreads and cover with a towel to keep warm.  Serve immediately.  Can also be refrigerated for a few days or frozen after cooling for 1 month.

Yield depends on size, but 4 servings

Difficulty rating  :)

Friday, February 12, 2021

Goat Cheese Stuffed Meatballs

So even someone who is well prepared for a 2-week lockdown starts scrounging around near the end of it.  It would have helped if I didn't have a recipe blog to write.  I could have had peanut butter pasta for two weeks straight, or until I ran out of soy sauce.

The last shopping trip before I had to isolate, I wasn't sure if I would be putting feta or goat cheese on the falafel pizza and bought both.  Eventually opting for the feta left the package of chevre available for this lovely concoction.

The best meatballs are made from a combination of two or three ground meats.  All I had was a pound of 80/20 beef and obviously couldn't make a spontaneous trip to the market for one or two ingredients.  If I could do that, there would have been bananas on the list.  Really started to miss those by the end.  A 50/50 mix of veal and pork would probably be the best combination for this, as both are mild tastes.  Half lamb wouldn't be bad because it goes with the cheese, but you don't want too many strong flavors in competition.

Since the recipe I'm following from With Salt & Wit cheated on the pasta sauce, and because I didn't have enough ingredients to make my own from scratch anyway, the effort involved in forming the meatballs is offset by the ease of the sauce.  I was also out of dried basil to make my own Italian seasoning mix and did not have many leaves on the basil plant, but I always buy the extra basil pasta sauce and just used more oregano in the seasoning.

I decided to try the paleo/keto/GF version and use almond flour instead of breadcrumbs.  Also, out of Panko breadcrumbs.  The recipe as listed doesn't require pasta.  I just wanted it with spaghetti because I have way too much pasta in the house.  Went easy on the portion size though because I was also having this with feta twists.

*1 lb ground meat of choice
1 egg, beaten
2 Tb milk
*1/4 C almond flour or 1/2 C Panko breadcrumbs
*1/2 C minced onion
2 tsp Italian seasoning
1 clove garlic, minced
1/4 tsp pepper
1/2 tsp salt
*2 oz goat cheese
*1-1/2 C tomato pasta sauce
*1/2 C fresh basil leaves
grated parmesan and cooked *spaghetti, for serving

1.  Knead together ground meat, egg, milk, almond flour, onion, Italian seasoning, garlic, salt, and pepper.

2.  Pour sauce into bottom of 9x13 casserole and shake to cover bottom.  Sprinkle with basil leaves.  Preheat oven to 350º.

3.  Form meat mixture into 12 portions.  Flatten into circles and place 1 tsp of goat cheese into middle.  Enclose into a ball and place into casserole.  Yes, they really are that big.  Repeat until all portions are filled.

4.  Bake 25-30 minutes, until center of meatballs are 160º.  Allow to rest 5 minutes before serving.

5.  Serve topped with parmesan and more sauce over pasta, if desired.


Difficulty rating  :)

Tuesday, February 9, 2021

Feta Twists

So I had half a sheet of puff pastry from the pear strudel and quite a bit of feta from the falafel pizza left over.  Not quite enough to make a proper tyropita, so I compromised and ended up with this.

Puff pastry is an easy cheat.  It always works, and everything you do with it looks super cool.  I could have made this into little cheesy puff pockets, or tartlets, or pretty much any shape I could think of.  I just chose to do twists, like the French Twists I made some time ago.

Because I used a half sheet, these were only about three inches long.  Excellent size for snacking on an hors d'oeuvres plate.  To serve instead of breadsticks, use the whole sheet and twice as much filling.  They'll be twice as long, but you'll get the same number.

*1/2 sheet puff pastry (1/4 box)
*2 oz feta cheese
1/2 tsp oregano
1/4 tsp rosemary
kosher salt
black pepper
1 egg

1.  Defrost puff pastry according to package directions, usually 45 minutes.  Preheat oven to 400º.  Line a baking sheet with parchment or a Silpat.

2.  Crumble feta and combine with oregano, pepper to taste, and a pinch of salt.  In a small bowl, beat egg with 1 Tb of water to make an egg wash.

3.  Roll out puff pastry on a lightly floured surface to decrease the fold marks.  Brush with some of the egg wash.  Top half with the feta mixture.  Fold other half over the cheese side.

4.  Cut 1" strips of the folded-over pastry.  Pinch both ends and twist a couple of times, so the feta peeks through a little but doesn't fall out.  Place on lined baking sheet.  Once all strips are twisted, brush with more egg wash.  Sprinkle with rosemary and another touch of salt.

5.  Bake 15-18 minutes, until golden.  Cool and serve.

Makes 1 dozen

Difficulty rating  π

Saturday, February 6, 2021

Orange Tofu with Rice and Broccoli

If I go totally off my allergy meds, Panda Express orange chicken makes me break out in a rash.  Yes, there's a little chili symbol on the menu, but it isn't a spicy dish.  You get maybe one red pepper flake every two or three pieces of chicken.  I just want to point out that when someone says they're allergic to a certain food, take their word for it.

While looking for a homemade orange chicken, so I could omit the red pepper flakes, I stumbled upon how to give tofu the same treatment.  It's a wonderfully light concept, very healthy, and you can make it as spicy or flat as you want.

The rice and broccoli are being included as part of this bowl to make it a full meal.  You could incorporate the tofu as part of a veggie stir fry, or do a half-and-half with bite-sized chicken pieces for a non-vegan version.  Wayfair keeps sending me suggestions to purchase meal bowls.  I'm getting closer to caving in, but I do have that fun pasta set that's so horrible in photos but great for sloppy meals.  I would have to give those up if I bought chic, white meal bowls that photograph better.

1 package extra-firm tofu
*zest of 1 orange
*1 C orange juice
1/4-1/3 C cornstarch
1/4 C light brown sugar
1 Tb soy sauce
*1 Tb grated ginger
*2 cloves garlic, minced
red pepper flakes to taste
about 1/4 C vegetable oil
*2 broccoli crowns, chopped and steamed
rice for serving
*sesame seeds for garnish

1.  Drain tofu and press for 15 minutes to get out as much water as possible.  I did it under a layer of paper towels and a filled quart jar.  Cube into 1" pieces.

2.  While tofu is draining, make rice and steam broccoli.  In a small bowl, stir together 1 Tb cornstarch and 2 Tb orange juice.  Set aside.

3.  In a saucepan, combine remaining orange juice, orange zest, brown sugar, soy sauce, ginger, garlic, and red pepper flakes.  I listed the zest first because if I don't, I'll forget to zest it before squeezing out the juice.  The brown sugar was to make this vegan.  If you want a lighter sauce, use granulated sugar and delete about a tablespoon.  Bring to a simmer and cook until slightly reduced, 10 minutes.  Stir in cornstarch slurry and cook until thickened.

4.  Spread remaining cornstarch on a plate or in a shallow dish.  Heat oil in a large skillet over medium-high heat.  Toss tofu cubes in cornstarch and place in skillet to fry.  Cook until browned, about 8 minutes on each side.

5.  Drain off any standing oil.  Add broccoli and sauce and stir to coat.  Serve immediately over rice, sprinkled with sesame seeds.  Leftovers won't be crispy, just like leftover orange chicken isn't.

Difficulty rating  :)

Wednesday, February 3, 2021

Pear Strudel

I was thinking of doing this with the crust from the egg tarts, which is a cheaty version of puff pastry.  Then I went for the ultimate cheat of buying puff pastry in the freezer section.

Puff pastry in general is a great way to make an impressive baked good with minimal effort.  There's a channel on YouTube that's just a loop of ideas how to use it.

This super-simple recipe from Mr. Food allows you to use canned pears, which I happened to pick up on my pre-surgery shop and then not open.  Got better much faster than I expected.  So instead, I made it during quarantine.  If I could muster up the energy to make a strudel while recovering from Covid, that should tell you it isn't all that hard.

The original recipe uses two cans of pears and a full sheet of pastry.  I opted in these photos to cut the sheet in half and only use one can, but I'm giving you the recipe for the full sheet.  I turned the other half into some feta twists.  Look for them in an upcoming post.

1 sheet puff pastry (half a box)
1/3 C sugar
2 tsp cinnamon
*2 15oz cans pears
*1/3 C raisins
*1/4 C chopped walnuts
1 egg

1.  Defrost pastry sheet according to package directions, roughly 45 minutes.  Line a baking sheet with parchment or a Silpat.  Start preheating oven to 400º

2.  Combine sugar and cinnamon in a small bowl.  Drain pears and chop into bite-sized pieces.  Combine in a bowl with raisins, walnuts, and half of the cinnamon sugar.  Beat egg with 1 Tb water in a small bowl to make an egg wash.

3.  Roll out pastry sheet on a lightly floured surface just enough to minimize the folds.  Make slits in the two outer folds about 1" wide.  Transfer pastry to baking sheet.

4.  Pour filling down center section of pastry.  Weave the slits over the top, securing with egg wash.  Brush egg wash over entire pastry and sprinkle with remaining cinnamon sugar.

5.  Bake for 25-30 minutes, until puffed and golden.  Allow to cool before slicing.

Serves 8

Difficulty rating  π