Friday, May 31, 2013

How to Cut a Melon

Really, I didn't have a Fruit category until now?  Excuse me while I go back and put a few things in it.

Growing up, we often had cantaloupe at breakfast.  My mom would cut wedges, remove the seeds, then cut the wedges to the rind in kid-sized chunks.  For close to thirty years, it never occurred to me to cut it any other way.

If restaurants cut all their fruit salads that way, they would have to have one prep cook whose sole job was to cut fruit.  It takes forever.  If you don't need the presentation factor of fruit on the rind, there is a much faster way that produces very little food waste.  It works on all melons, pineapples, and even citrus.

First, wash the outside of the fruit thoroughly.  I know you're not going to eat the rind, but the surface of the knife will touch it, and you don't know where it's been.  Forget the field where it was grown, any number of people have carried it, thumped it, and probably dropped it on the floor.

Step two is to cut off the stem and bottom ends.  Just the rind portion, until you can see the fruit underneath.  For round melons, the next step is to cut them in half.  Scoop out the seeds if there are any and lay the center end cut-side down on the cutting board.  For everything else, you should be able to stand them up on the board at this point.

Using the technique on an orange
Taking your knife (I prefer serrated for thick rinds), work from the top end to the bottom.  Slice off the rind, taking as little of the fruit as possible, in strips.  It will probably take at least 12 cuts to get the rind off.
At this point, you can cut cubes, slices, wedges, or any other shape you like.  The hard part is done.  One additional step for pineapple, though, is to quarter it to remove the hard core.  If you want rings of pineapple, a small piece like a donut hole cutter will take care of the core.

And, in less than three minutes, you have a cut-up melon!

Tuesday, May 28, 2013

Part IX: Back to Basics

It has been over 10 months since I changed topics.  I really like doing parties.

I have wanted to do this "chapter" for a couple of years.  Even before I went to culinary school, I knew a lot about cooking terms and techniques.  I assumed every adult capable of feeding themselves knew the same things.

Then I had to teach Roommate Smurf how to stir-fry.  As in, how to heat oil in a pan and push things around in it.  That evolutionary imperative to feed oneself passes some people by.  This served as a reminder that cookbooks and cooking blogs exist for a reason.  They aren't simply recipe files, they are teaching tools.  So, once in a while, I'm going to teach something that I thought everyone knows how to do, but they don't.  I'll explain terms, ingredients, and techniques that I thought were commonplace knowledge until I came upon someone who didn't know how to make white rice.  Not just "made white  rice badly", but didn't even know where to start!  And hopefully, readers who do know how to cook will pick up a trick or two they hadn't heard before.

Saturday, May 25, 2013

Cheesy Artichoke Dip

My largest artichoke was finally on the verge of blooming, so I cut it.  It was still only the size of my fist, but bigger than last year's, and weighed over 6 oz.  The one I weighed in the market was 13 oz.

I could have simply steamed it as a side or chopped it up with a salad, but I've never made artichoke dip and thought I'd give it a try.

There are many versions of dips including artichokes online.  Spinach-artichoke is the most common, but I decided that I wanted to taste the veggie I had grown.  By picking the parts I liked out of several recipes, I came up with one that just happens to include only ingredients I have on hand.  Funny how that works.

I'm scaling this up to two grocery store-sized artichokes, or four times what I got.  Mincing the artichoke, onion, and garlic wasn't a chore for the small version.  If you don't feel like doing that, roughly chop them instead and pulse the batch in the food processor after simmering.  Warning, that will increase the simmering time to over 20 minutes.

2 artichokes, dark green leaves & choke removed, minced
*1 C onion, minced
*6 cloves garlic, minced
2 Tb olive oil
*salt & white pepper to taste
1 C water
*1/2 C dry sherry
2 C shredded colby-jack cheese
*1 C Greek yogurt


1.  In a medium saucepan, sauté artichoke, onion, and garlic in olive oil until onions wilt, about 5 minutes.  Add salt, white pepper, water, and sherry.  Lower heat, cover, and simmer until artichokes are very tender, about 10 minutes for minced or 20-30 minutes for chopped.

2.  Preheat oven to 350º.  Remove pan from heat.  Run mixture through the food processor if not minced.  Stir in cheese until melted.  Stir in yogurt until everything is combined.  Pour into oven-safe serving dish and cook until bubbly, about 15 minutes.  Serve hot with crackers, bread, or veggies.

Makes about 4 cups, or 8 servings

Difficulty rating  :)

Wednesday, May 22, 2013

Lamburgers

On Mother's Day, I planned to have an Independence Day-style barbecue to help Roommate Smurf deal with the loss of her mother.  Then I got next to no sleep the night before and she came down with the flu.  Neither of us felt like a barbecue, but I had already bought the ingredients and didn't want to pick up something on the busiest eating-out day of the year.  An hour after I ate, the power transformer on my block exploded, breaking all the power lines the whole length of the block and starting two fires, one at either end.  Huge ordeal with water-dropping helicopters, so it was a good thing I hadn't lit the grill.  Gotta give props to Edison; they had all three lines restrung the whole length of the block and the power on in 22 hours.

A convection broiler in the oven is the next best thing to a barbecue.  You don't get the lovely smoky taste, but the meat cooks the same.  If I'd thought about it, I would have put some liquid smoke in the meat, but it was fine without.

You'll notice in the photo that this is garnished only with a slice of tomato.  I tried putting a little bleu cheese dressing on the burger after I took the photo, but the first bite - just the naked, seasoned patty - was excellent without any additions.  If you absolutely have to put something on your burger, use a bit of mustard or yogurt (not mayo).  Don't use ketchup because the flavor doesn't work with lamb.

1 lb ground lamb
2 stalks green onion, minced
*2 cloves garlic, minced
*1/2 tsp paprika
*1/4 tsp cumin
1/4 tsp salt

1.  In a bowl, knead together all ingredients.  Cover and refrigerate for one hour to let flavors meld.

2.  Preheat broiler.  Shape meat into four very flat patties.  They will shrink up as they cook.

3.  Broil on a wire rack until one side is done and crispy.  Flip and cook other side until done.  Center of patties should be medium-rare to medium doneness.  Serve hot.

Difficulty rating π

Sunday, May 19, 2013

Black Rice

There isn't anything special about making black rice.  It's about knowing that it exists.

Most "wild rice blends" contain black rice.  I didn't realize you could buy it on its own until this recipe appeared in Bon Appetit using it.  I went to Sprouts first.  Mine didn't have it, but the new one a few miles away did.  That opening day was crowded!  I got swag: a reusable grocery bag and a coupon book for free stuff.

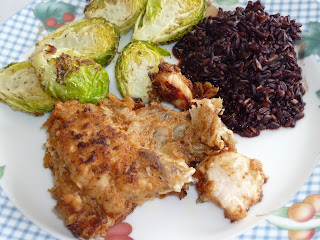
Black rice gets you the increased nutritional value of brown rice, but in less time and it doesn't clump up if you keep leftovers.  You can serve it as a side, like I did with the fried chicken, or mixed up in salads.  The photo above includes some shrimp cooked in compound butter with broccoli as a kind of skillet meal.

1 C dry black rice
1-1/2 C water
dash salt

1.  Bring all ingredients to a boil in a small saucepan.  Lower heat and simmer 35-40 minutes, until water is absorbed.  Serve hot, or chilled in salads.

Serves 4-6

Difficulty rating  π

Thursday, May 16, 2013

Skillet Fried Chicken

I hated to waste all that oil from the beignets, so I added a bit more and made fried chicken.  There's actually more to the story.  My roommate's mother died, and eating fried chicken was her way of coming to terms with it.  Everyone's got their own way of dealing with loss.  Mine was this blog.

We used to do an oven-fried chicken when I was growing up.  It involved shaking the chicken and coating in a bag.  The recipes I found online were very different.  This recipe is partially based on Alton Brown's, except I couldn't bring myself to use shortening.  I hear it produces a very tasty and crispy product, but I can't stand the smell of boiling Crisco.  Technique-wise, I used this video.  (Sorry about the commercial.)  I really liked the idea of chopping the breasts in half so they cook more evenly, and it was much easier than I expected.  My cleaver must be very sharp.

I may have turned them one too many times, because the skin started to fall apart.  Let's go with the one-turn theory and stick with it.

3 chicken half-breasts, cut in half (or mix it up with dark-meat pieces)
1 C milk
1 Tb apple cider vinegar
1 C flour
1/2 tsp salt
*1 tsp paprika
*1/4 tsp black pepper
*1/2 tsp dried sage
*oil for frying

1.  Place chicken pieces in a bowl.  Separately, combine milk and vinegar and let sit 5 minutes to make soured milk.  Pour over chicken.  Cover and refrigerate at least 4 hours, or overnight.
2.  In a pan, combine flour, salt, pepper, paprika, and sage.  Start heating 1/2" of oil in a 12", heavy, high-edged skillet to 325º.

3.  When oil is hot, pick up chicken pieces one at a time.  Let milk drip off, then dredge completely in flour.  Place in skillet.  Repeat until pan is full and sizzling.  You'll notice that the oil is much higher now.  Cook on one side until golden, about 12 minutes.  Turn to cook other side until center of pieces are 165º on a thermometer.  Allow to drain on a rack over a sheet pan and serve once they have had a few minutes to cool.

Serves 3-4

Difficulty rating :)

Monday, May 13, 2013

Beignets & Funnel Cakes

I flipped through the Bible, looking for a fun breakfast idea.  Regular donuts take 3-4 hours.  If they kept overnight, I wouldn't mind.  Then the beignet recipe said it takes only 45 minutes, so I read on.

They're just cream puffs that you fry instead of bake!  Reading further, I quickly realized that, if you pipe the dough into the oil instead of drop it, you get kind of a funnel cake.  Even better.  Just decide if you want to be all French-fancy or backyard bbq.  Same dough.  (The funnel cakes you get at the fair are more like waffle batter so that it flows through a funnel.  This is just a thicker version.)

My piped cakes turned out right, but the beignets were a bit doughy in the middle.  Either I made them too big or the oil was too hot.  Or both.  Maybe, smaller is better for this recipe.

1/2 C water
1/4 C butter
1/2 C flour
dash salt
1/2 tsp sugar
1/2 tsp vanilla
2 eggs
Oil for frying

1.  In a small saucepan, bring water, salt, sugar, and butter to a boil.  Remove from heat and dump in flour all at once.  Stir quickly with a wooden spoon to make a paste.  Add eggs, one at a time, beating mixture until smooth.  Stir in vanilla.

2.  Heat at least 1/2" of oil in a small skillet or a deep fryer to 375º.  For beignets, drop spoonfuls into oil, turning once when bottom is well browned.  Make sure you give them a bit of room, because they will puff up a bit.  For funnel cakes,  Pipe a stream in curly patterns into the oil and fry until bottom is golden.  Turn and brown other side.

3.  For both kinds of cakes, remove cooked pieces to a paper towel-lined plate and dust with powdered sugar.  Serve immediately.

Difficulty rating  :)

Friday, May 10, 2013

Spring's Bounty

For once, I'm not being sarcastic.  My fountain garden is doing wonderfully.  One of the asparagus plants is even trying a little.  The Brussels are sort of considering producing sprout stems, but at least the plant is alive and growing.  I hate to say it, but pesticides made the difference.
Artie is putting out his (her?) annual flowering stem, and I just found two very small artichokes sprouting behind the central bud!  The first time the plant flowered and then died, I thought that was it and cut off everything above ground.  Turns out, artichokes do that, then keep growing back.  Just don't disturb the roots, and you could have several years of chokes.

The ensuing broccoli crowns haven't been as large or compact as the first.  I missed the window on one, and it started to flower.  Picked off the yellow broccoli flowers and cooked up the rest.  Kind of looks more like broccoli rabe when it's loose like that.  Maybe the plant is trying to be trendy.  And thanks to the spray, there were almost no bugs in the new florets.  I felt ok about eating them because I sprayed the plant when they were tiny buds, as the directions suggested, and hadn't treated them in a couple of weeks.  Still washed them thoroughly.  I'm having the last developed crown this evening.  It will be a few weeks before any more mature, which is fine.  I'm kind of getting a little tired of broccoli.

Once the tomatoes start to ripen,  I'm going to have a lot of cherry tomatoes to deal with.  The plant is very happy, despite me accidentally breaking off half a branch.  There are plenty of other clusters to make up for the two that were lost.  I have started a list of things to do with a plethora of tomatoes.

I keep forgetting about the green onions.  I water them, but don't really pay attention.  I pulled one, just to see how they were doing.  The roots were strong, but the whole stalk was small.  I think I need to water them twice a week instead of just once, especially when it gets hot, because of the shallow roots.

The cilantro decided to flower instead of putting out more herb leaves.  I wonder if I'll get coriander seed out of it.

The mint is, well, mint.  I didn't water it enough and it almost died.  Half a gallon later, it was fine the next day.  Made a batch of basil & mint iced tea to use some of it.

I'm really enjoying the idea of going out to the back to get an ingredient.  I've always been like that with the lemons, but now I get to do it more often, for more things.  With a little luck, this will be a fun culinary summer.

Tuesday, May 7, 2013

Pork and Queso Tamales

I had some pork shoulder left over from the Pork Pie and decided to make tamales for Cinco de Mayo.  Since there wasn't enough left for a full batch of marinated-pork-only, I decided to bulk up the filling with some veggies and cheese.  Sticking to the Mexican theme, I chose nopales, tomatillos, and a queso fresco.  It mixes up the textures for an unusual blend.

Most of the effort and ingredients seem to be in the filling.  The simmered pork is effort because you're also making the broth that will flavor the masa.  The veggies have to be chopped, then sautéed and mixed with the shredded pork.  Then you have to chop the cheese without getting it everywhere.  Once you finally get all that made, assembling the tamales is almost routine.

Yes, this is a giant list of ingredients.  Sorry.

*1/2 lb pork shoulder
3 C water
1/2 C onion, chopped
*1 rib celery, chopped
*1 clove garlic, minced
*1 tsp chili powder
1/2 tsp salt
*1/2 tsp ground cumin
*1/2 tsp whole coriander seed
1/2 lb tomatillos, husks removed, chopped
1 nopales paddle, needles removed, diced
1 Tb olive oil
1/4 tsp salt
1 Tb lime juice
12 oz queso fresco, cut into 18 wedges
22 corn husks, softened in warm water
2 C masa flour
1 tsp baking powder
1/2 C butter
2 C pork broth (made while cooking pork)

1.  Into a medium saucepan, place pork, water, onion, celery, garlic, chili powder, 1/2 tsp salt, cumin, and coriander seeds.  Bring to a boil.  Reduce heat to a simmer and cook for about 2 hours, until pork is very tender.  Strain off cooking liquid and reserve to use as broth for the masa.  Shred pork and set aside.  If you cooked it right, the meat will fall apart with very little effort.

2.  To prepare filling, drizzle oil in a skillet and heat on medium.  Lightly cook chopped tomatillos until they are soft and have given off most of their liquid, about 5 minutes.  Add cactus with 1/4 tsp salt and cook until they start to soften, but are not limp, another minute.  Remove from heat and add lime juice.  Toss in shredded pork.

3.  In a mixer with the paddle, beat butter until creamy.  In a separate bowl, stir together baking powder and masa.  Into flour, stir 2 C broth and make a thick batter.  Add to butter and beat into a fluffy paste, about 2 minutes.  If too dry, add more broth a tablespoon at a time.

4.  To assemble tamales, arrange everything on the counter: softened husks, masa batter, pork & veggie mix, and queso slices.  Place a kitchen towel on the counter as an assembly surface.  On the stove, set up a steamer.  I use a stock pot with a colander that happens to fit it perfectly.  If you have a steamer basket, great.  Start simmering two inches of water at the bottom of your steamer while you put everything together.

5.  Lay one corn husk on your towel, pointy end down.  On top half, spread about 3 Tb of masa batter. Onto that, spoon 1 Tb filling and place one piece of cheese.  Bring in sides of corn husk and fold up pointy end.  Take one of the husks that looks a little torn and tear off 1/2" strips to use as ties.  Tie tamale and place, open end up, in steamer basket.  Repeat until out of masa and fillings.

6.  Place steamer basket over hot water, cover tightly, and cook for 90 minutes.  Masa will expand slightly as it cooks.  Check water level every half hour or so.

7.  Serve hot with salsa, sour cream, or your choice of accompaniments.

Makes about 18 tamales, 6-9 servings

Difficulty rating  $@%!

Saturday, May 4, 2013

Garlic Spinach with Quinoa

This is a very easy side dish that qualifies both as a vegetable and a starch.  You could even use it as a stuffing.  Best of all, it is low in fat and salt, without sacrificing flavor.

1/3 C quinoa
2 C frozen spinach (still frozen)
1 clove garlic, minced
1/4 tsp salt

1.  Combine all ingredients and 1/3 C water in a medium saucepan.  Slowly bring to a boil, which is about when the spinach is thawed.  Stir, cover, reduce heat, and simmer until water is absorbed and quinoa is cooked, about 15 minutes.  If too dry, add 2 Tb water and cook until absorbed.

Serves 2-3

Difficulty rating  π

Wednesday, May 1, 2013

Compound Butter

I saw the commercial for a new product: butter cubes with herbs in them that you can use to add flavor to things you sauté.  That is not a new idea, but making money off the pre-packaged version of it is.  Don't get suckered into this over-priced, over-salted, totally unnecessary product.  It isn't that big a deal to make your own.

There are many specific kinds of prepared beurre in French cooking.   Many of them involve browning the butter, or at least clarifying it.  I prefer to ignore the formal recipes and make the butter work with whatever I'm making.  And while fresh herbs are lovely for this sort of thing, don't rule out dried.  Just use less.

Any compound butter should be made a day ahead, so the flavors have time to meld and work their way through the log.  I'm giving a sample recipe for some fish I made.  The most common type of compound butter is called beurre maître'd, and consists of butter, lemon juice, and chopped parsley.  I guess this is a version of that one.

1/2 C butter (actual butter)
1 Tb chopped fresh parsley or 1 tsp *parsley flakes
1 Tb lemon juice
*1 tsp dill weed (or 1 Tb chopped fresh dill)
1 Tb olive oil
pinch of salt (if using unsalted butter)

1.  Soften butter to room temperature.  In a mixer, beat together all ingredients until uniform and fluffy, about 3 minutes.

2.  Set out a piece of parchment or waxed paper.  Spoon butter onto paper and roll inside of paper into a log.  I found my sushi roller to be very helpful.  Seal paper with tape, if necessary, and refrigerate until firm.  To serve, slice appropriate-sized pieces off of log.  1 Tb per person is good, more if you're using it as a cooking sauce base.

makes 1/2 C, about 8 servings

Difficulty rating  π