Thursday, September 28, 2023

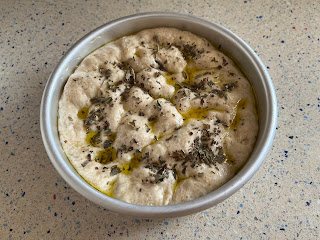
Whole Wheat Basil Focaccia

I have not given up on the whole low-carb thing, but I've worked back in enough to prevent weight loss.  What I'm still trying to avoid is excess refined sugar.  It's unfortunate, but I do feel a lot better when I lay off the carbs.  A single serving of bread does not appear to spike my blood sugar, provided I have some protein at the same time.

I've struggled with making focaccia in the past, and I think it's because I wasn't using enough olive oil.  That was when I was still focused on low-fat.  It would come out more like pizza crust.  Focaccia is related to pizza dough, but is generally more tender and has shorter gluten strands.  That's the oil.

This new technique I tried out produced the desired result.  Well, new to me.  It's probably centuries old.

1/2 C 100ºF water
1/2 tsp yeast
3-4 Tb olive oil, divided
scant 1/8 tsp honey
*1/2 C whole wheat flour
about 1 C all-purpose flour
1/2 tsp kosher salt, plus more for sprinkling
*1 Tb dried basil, plus more for sprinkling
1 Tb crumbled feta for garnish, optional

1.  Stir together water, yeast, honey, and 1 Tb oil.  Let sit until yeast is active and foamy, 5-10 minutes.

2.  In stand mixer with the paddle, stir together yeast mixture and the wheat flour.  Beat into a stringy batter.  Add 1/2 C A.P. flour, salt, and basil and beat into a thick batter/light dough for 2 minutes, until you can see gluten strands form.

3.  Pour out dough onto a floured surface and knead until smooth and elastic, about 5 minutes, adding flour as necessary to keep it from being sticky.  Smooth into a rounded ball.  Place in a lightly oiled bowl, turning to coat all sides, cover, and place in a warm place to rise until doubled, about an hour.  It's going to look like a tiny ball of dough, but it will puff up nicely.

4.  Once risen, punch down dough and let rest 10 minutes.  Swirl 2 Tb oil in an 8" round cake pan or square casserole.  Press dough into pan to the edges.  It's fine if some of the oil ends up on top.  I used a 6" pan because the dough looked small, but then the loaf ended up much thicker than I had anticipated.  Cover and let rise again 30-45 minutes.

5.  Preheat oven to 350º.  Before baking, brush top of focaccia with oil if it looks dry.  Sprinkle with coarse salt and basil flakes.  Bake 20 to 30 minutes, until hollow when tapped.  It won't look overly browned because this is a low-sugar recipe.

6.  If using feta as a garnish, remove pan from oven when bread appears almost done.  Gently remove it from the pan, then put it right back in.  This is so all the cheese won't fall off later when you try to take it out.  Top with the crumbles and put the pan back in the oven for 2-4 minutes, until the feta is slightly melted and toasty.  Now you can cool it for real 10 minutes in the pan, then completely on a rack.  Slice and serve.


Makes one loaf, about 6 servings

Difficulty rating  :)

Monday, September 25, 2023

Roasted Lamb Shawarma

There was a fantastic deal on leg of lamb, so I carved it up into four pieces to experiment.  The first one, a slow-cooker recipe, didn't go so well.  Fatty cuts of lamb work that way, but not the leaner leg.  Second attempt is this heavily marinated shawarma.

Most recipes I found had similar ingredient lists.  I had almost every spice on hand, except I had run out of turmeric.  First time buying fenugreek, though.  I had to look up what it was, and apparently it's very good for you.  There are herbal supplements of it, especially for women.  Fine, I'll start adding it to more recipes, and probably my chai mix.  It has a faintly maple aroma.  I have also started planning to add it to this winter's herb garden.  Supposedly, you can do that in zones 10 and above.

Once I started assembling the spices on the counter, I realized that this marinade puts most curry recipes to shame.  Then I put several "sweet" spices back and subbed in allspice.  I wouldn't stress out about finding everything on the list, or subbing ground versions where I used the seed.  Both star anise and fennel was probably overkill.

I'm combining several techniques.  Pan-toasting the whole spices first is from one recipe, whizzing them up into a marinade is from another.  It's a similar approach to a satay marinade, which can be subtly flavorful without overpowering.

*1 to 1-1/2 lb cut from a leg of lamb. (for a full leg, double marinade)
1/4 tsp each *coriander seed, fenugreek seed, *fennel seed, *cumin seed
Seeds from 2 *cardamom pods
*1/2 star anise
1/2 tsp each ground cinnamon, *ground pepper, *allspice, *paprika
1/4 tsp each *sumac and turmeric
2 tsp kosher salt
*1/2 tsp grated ginger
*1 clove garlic, chopped
*2 Tb diced red onion or shallot
1 Tb lemon juice
3 Tb olive oil
1/2 yellow onion, cut in 1/2" thick slices

1.  In a small skillet, toast all of the seeds: coriander, fenugreek, fennel, cumin, cardamom, and star anise. Use a dry pan over medium-low heat and shake frequently.  It should take 2-3 minutes.

2.  Place all the marinade ingredients in the food processor or blender.  That's the spices you've just toasted, any remaining spices, salt, ginger, garlic, shallot, lemon juice, and oil.  Pulse at first so it doesn't explode, then run until fairly smooth.

3.  Line the bottom of a roasting pan with the thickly sliced onion.  If you need more, slice up the rest of it.  This is going to be the "rack" holding up the meat.

4.  In a bowl, coat the meat with the marinade.  If it's a boneless, coat inside where the bone was removed. This is why I was doing the recipe with lamb pieces, so there would be more surface for the marinade.  Set meat, fat side up, on top of the onion and pour any remaining marinade from the bowl on top.  Cover with foil or a lid and refrigerate 4 hours or overnight.

5.  When ready to cook, preheat oven to 350º.  Carefully pour boiling water into the edge of the roasting pan, just until it reaches the bottom of the meat.  Place covered roast in oven and cook until tender, at least 90 minutes for less than 2 lbs and up to 3 hours for a full leg.  Every hour or so, baste with juice from the bottom of the pan.  This may be the first time I've used my beat baster.  A gravy ladle works, too.  When meat is easily pulled apart with a fork, it is ready.

6.  Slice shawarma and serve with pita, rice, and/or veggies.

Difficulty rating  :)

Friday, September 22, 2023

Sunflower Invasion

A week after tropical storm Hilary dumped about three inches of rain in my area, things started sprouting in my back lawn.  Not in the produce containers, on the grass.

I found a shell fragment sticking to a leaf.  It kind of looked like a watermelon seed, but it was too big, and I didn't remember taking the packet anywhere near that part of the yard.  I pinched it, and realized it was a sunflower seed.  I don't buy shell-on, raw sunflower seeds.  I don't grow sunflowers.

%&$# squirrels.  They were probably stolen out of a bird feeder.

After the frustration passed, I decided to let them grow and see what happened.  It isn't like I have much of a lawn in the back yard until November, and getting a new roof next month will trash whatever is below the eaves anyway.  (ooh, I need to move the basil before they start.)  I told the gardener I'd let him know when he could mow them down.

They didn't grow as fast as I was expecting.  Maybe because I only water the back lawn once a week.  I gradually found more sprouts in other non-lawn areas and the Pond.  And a smashed peanut shell.  Someone had a party out there.

After almost a month, the grass is the same height as the sprouts.  It's supposed to be healthy for a yard to let grass grow once in a while, but I think I'm ready to mow them down and just see what the stray ones do.  If I'm lucky, that's all of the seeds that intend to sprout and I won't have to deal with this again.

Tuesday, September 19, 2023

Pesto Stuffed Mushrooms

I'm definitely breaking out of my comfort zone.  First zucchini, then mushrooms.  But, well, the basil keeps turning out a ton of leaves.  I'm drying some and making pesto with the rest.  Those are the two ways I know how to preserve it.

You can choose other vegetables for the filling.  I happen to have a ton of artichokes in the freezer, but most recipes suggest spinach, kale, or sausage for non-vegetarian.

Also in the substitution category, I made these keto.  I put crushed almonds on top instead of panko.  The recipe will reflect the option.  That's also how these landed in the Passover category.  Or, you could use matzoh meal.

Unlike the veggie fritters, I made a reasonable amount of these.  It wasn't for a party, so I got a standard 8oz whole mushroom pack.  For a group, I would get the "stuffer" mushrooms, which are packaged to be a consistent size and larger than these.  I only chose the white mushrooms because all the packs of baby bellas were a bit old and scary.

8 oz whole fresh mushrooms, white button or baby bella
*1 clove garlic, minced
*2 frozen artichoke hearts, thawed and minced
1 Tb olive oil
*1/4 C pesto
*1 Tb parmesan cheese
*1 Tb panko bread crumbs, matzoh meal, or crushed nuts

1.  Clean mushrooms by brushing off dirt with a damp paper towel or mushroom brush.  (They're a thing.  I have one.)  Rub a few drops of oil into an 8x8 baking dish to make removal easier.  Preheat oven to 350º.

2.  Pull out and reserve mushroom stems, leaving a cavity for the stuffing.  Cut off any tough parts of the stems and mince the rest.

3.  Heat 1 Tb oil in a small skillet.  Add mushrooms and allow to cook down over medium heat.  Once most of the water is gone, add garlic and artichokes.  Cook until heated through and the moisture has evaporated.  Remove from heat, then stir in pesto.

4.  Fill open cavities of mushrooms with the minced mixture and place in baking dish.  Sprinkle with cheese, then crumbs.  If this is a do-ahead, cover and refrigerate up to 24 hours.  Bake until cooked through, about 20 minutes.  Serve hot.

Makes about 1 dozen

Difficulty rating  π

Saturday, September 16, 2023

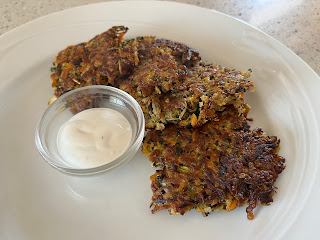
Vegetable Fritters

I've been freezer prepping a bunch of things ahead of a visit by my brother and his family next week.  We'll probably eat out a lot, but it would be nice to have meals ready to microwave or reheat in the oven.  And then, I don't have to cook for a bit after they leave.  Much of it is simply making more of whatever I was cooking anyway and packaging the rest for the freezer.  That was the case for this recipe.

Yes, I bought zucchini.  Probably for the first time in my life.  And they were very pretty vegetables.  The only other green vegetable I could think to shred was cabbage, and the eggplant was already going to be massive.  I could have done kohlrabi.  That would have required a lot more preparation.  The problem was that every recipe I found started with zucchini.

The recipe comments also talk about binder issues and the fritters becoming soggy.  I was using quinoa, which is gluten free, as a lower-carb option to breadcrumbs.  I contemplated what to add as additional binder, like matzoh meal or potato starch.  Then I hit on potato flakes, as they would absorb any and all excess moisture as the mixture sat before frying.  You can't see or taste them, and they don't change the texture.  It's like an invisible ingredient preventing liquid at the bottom of the bowl.

I used dried French tarragon as my herb because, despite my lifetime supply, I also planted Mexican tarragon that is doing very well.  There is nothing wrong with using dried parsley.

1/2 C dry quinoa, any color
2 medium zucchini
1 large eggplant
1/2 lb carrots
1/2 yellow onion
kosher salt as needed
4 eggs
1/2 tsp pepper
*1 tsp paprika
*1 Tb dried tarragon or herb of choice
*1/2 C dried potato flakes
olive oil for frying

1.  Prepare quinoa according to package directions, which will likely include rinsing.  Drain thoroughly and set aside to cool.  This can overlap with Step 2.

2.  You can do this by hand with a box grater, but I highly recommend getting out the food processor.  Trim off eggplant cap, chop in pieces, and run through the grater plate.  You can peel it first if you want, but I don't peel anything if I can avoid it.  Transfer shreds to the largest sieve you own and place it over the sink.  Sprinkle generously with kosher salt and toss lightly.  Leave it there and do the same thing to the zucchini.  You may need another sieve.

3.  Ok, you're going to have to peel the carrots and onion.  Root vegetables are where I tend to make an exception once in a while.  Run those through the grater, too, but they don't have to go into the salted mix. Instead, put them in the biggest bowl you own.

4.  By now, the eggplant and zucchini should have given off their water.  Rinse to remove excess salt, then squeeze as much water out of them as possible.  It's going to be like the kneading step of sauerkraut for a minute.  Add those shreds and the quinoa to the bowl and mix to distribute.  Stir in the potato flakes.

5.  In a small bowl, beat together eggs and spices.  Surprisingly, add half a teaspoon of salt to the mix.  If you rinsed the shreds properly, the mix is going to need it.  Stir into big bowl and make sure it is evenly distributed.

6.  Heat a large skillet or griddle with a thin layer of oil over medium-high heat.  Be careful not to overheat, or olive oil breaks.  Drop shred mixture in 1/3 C portions and cook like a pancake, about 4 minutes on the first side and slightly less on the second.  Remember, these are still gluten-free, so flip gently.  Re-oil and continue to cook in batches.  Keep finished fritters warm until ready to serve, preferably on a rack set over a baking sheet in a low oven.

7.  Serve hot and crisp.  For sauces, I did a different thing every night.  Bleu cheese dressing, lemon juice and salt, tzaziki sauce, and tahini.  Ranch would probably work, as would Italian dressing.

Makes about 3 dozen, or 8-10 main course servings

Difficulty rating  :-0

Wednesday, September 13, 2023

Product Review: Birch Benders Pumpkin Spice Pancakes

I'm not big on pancake mixes, but this one caught my eye for being low-ish carb.  No added sugar, grain free, and paleo.  I'm not paleo or GF.  Thought I'd give it a try.

The instructions are very simple.  One part mix to one part water.  Let sit while you heat up a lightly oiled griddle, then cook.

They are exceptionally easy to make.  They taste like pumpkin spice.  The only issue I had with them was the slightly gummy texture.  I definitely cooked them long enough, but cassava is going to do that.

Round two, I subbed in a tablespoon of flour for part of the mix and added a pinch of baking powder.  They were still slightly gummy.  They rose better and I was more pleased with the result overall.

If you're GF and/or Paleo, I definitely recommend these.  If you're unaccustomed to this sort of food, it's going to take some getting used to.  I'm enough of a pumpkin spice addict that I'll probably get it again.  There are waffle instructions I haven't tried yet which look promising.  Same basic recipe as pancakes, but with a bit of oil.  I do like the idea of making a single waffle instead of weeks' worth.


Sunday, September 10, 2023

Mexican-Style Wedge Salad


This was going to be black bean burgers, but I didn't have time to go to that much trouble.  It was much easier to chop up a couple of veggies and pour bleu cheese on them.  Also cooler.

A wedge salad is really all about what you put on it.  The traditional tomato and bacon is fine.  I'm calling this Mexican because it's taco fillings.  You could use a different dressing, like avocado ranch or Caesar.  I'm sure I could create other ethnic versions to fit my mood.  The point is, a salad that requires a knife.

1 head iceberg lettuce
1 15 oz can black beans, drained and rinsed
1 C grape or cherry tomatoes
1/2 C diced cucumber
*1 C black olives
*1 green onion, chopped
1 avocado, cut in chunks
*1 C cilantro leaves
bleu cheese dressing to taste

1.  Cut iceberg into 6 wedges, maintaining enough core to hold the wedges together.  You can do 8 and it will still hold.  I'm basing this on a 6-serving recipe.  Plate each wedge.

2.  Slice the tomatoes in half to prevent squirting.  I did this with whole olives, but you can use sliced.  Once all the veggies are prepped, move on to the next step.

3.  Sprinkle each plate with the beans, tomato halves, cucumber, olives, onion, and avocado.  Top with a generous drizzle of dressing and cilantro.  Serve chilled.

Serves 6 or 8

Difficulty rating  π

Thursday, September 7, 2023

Spiced Cheesecake

I told the doctor I was making keto cheesecakes, and she was ok with that.  Ok, then here's another one.

I considered making a pumpkin cheesecake, then decided to just use the spices.  What people don't realize when they get something "pumpkin spice" is that there isn't necessarily any pumpkin in it, just the spices you would use when making a pumpkin pie.  It isn't false advertising.  There's a specific spice blend called "pumpkin pie spice".

I opted here to use a pretty decent amount of those spices, plus some cardamom, to make a vaguely pumpkin/chai flavored cheesecake.  With a cinnamon and nut crust and a maple yogurt topping, this came together about as fast as my other cheesecakes.

Crust

1-1/2 C nuts (walnuts or pecans work best)
3 Tb sugar (or substitute)
1-1/2 tsp cinnamon
2 Tb butter, melted

1.  Put nuts, sugar, and cinnamon in the food processor and run until grainy.

2.  Add melted butter and pulse into a paste.

3.  Press into the bottom and sides of a 9" springform. (I'm doing my usual 1/3 recipe in a 6")

Filling

3 8oz bricks cream cheese (light ok), room temperature
6 eggs, room temperature
2-1/4 C plain yogurt (nonfat ok)
1-3/4 C sugar (or substitute)
2 Tb cornstarch
*3 Tb pumpkin pie spice (or combined cinnamon, ginger, nutmeg, cloves to make 3 Tb)
*1 tsp ground cardamom
2 tsp vanilla

1.  Preheat oven to 350º.  Surround bottom of springform with foil, and place in a slightly larger pan.

2.  Place all ingredients in blender or food processor.  Run until smooth.  Spices take a while to distribute evenly, and won't dissolve as much as you expect.  Pour into prepared springform.

3.  Place springform with its larger pan in the oven.  Pour water into the surrounding pan, up about 1" on the cake pan.  Bake until center is just set, but still moves a little, about 1 hour to 80 minutes.

4.  Turn off oven and leave the cake inside for another hour.  Then open the oven door and allow the cake to slowly cool to a warm room temperature, another hour.  This process will minimize how much it collapses.

5.  Place cooled cake in the refrigerator until chilled, about 4 hours.  Before serving, run a knife or spatula around the rim before releasing the spring.  Carefully transfer cake to serving platter.  One of these days, I'll do it without cracking the cake.  I ended up keeping the wax paper I had tried using on the bottom.

Topping

1 C plain yogurt
2 Tb maple syrup

1.  Stir together yogurt and syrup.

2.  Spread on top of cake.  Decorate with more spices if desired.

Makes one 9" cheesecake, 12-16 servings

Difficulty rating  :)


Monday, September 4, 2023

Better Late Than Never

The cool start we had to summer really did a number on my garden.  Sure, it was great for the artichokes. A few of the summer pups even put out more bud stalks, which has never happened to me.  I turned one major harvest of basil into pesto.  Then it grew back, so I'm drying it as whole leaves to add to tea.  I had little sprigs of broccoli into July, which isn't supposed to be a thing.  But that meant that veggies which rely on warmth suffered.

I didn't get a ripe tomato until August.  I only noticed fruit setting when I pulled out the broccoli the last week of July.  The pickling cucumbers couldn't set fruit.  To my surprise, some dormant cucumber seeds sprouted once it got warm.  I was heartened enough to put some late pumpkin seeds in the broccoli pot, knowing I wouldn't get fruit until the very end of the growing season.

And you'll notice that I keep saying "warm", not "hot", in relation to the weather.  With the majority of the country suffering a horrific July over 100ºF, I really had no reason to complain about mid-80s.  Around here, that's a normal summer.  I still wish I had an air conditioner, but it isn't like my health is in danger without one.  As a kid, I loved this temperature.  Everyone's metabolism changes a bit with age, and I expect to think of this as comfortable in another 10-15 years.

It's already time to start cool weather seeds.  Celery needs a three-month head start, so I've already done that.  Herbs and brassicas should be germinated by the first week of October, so I need to get on that.  I didn't start them early enough last year and missed out.  I can also do a fall planting of peas, really any day now.  The lettuce patch will have to wait until it is reliably under 80º, or the seeds either won't sprout or will bolt far too soon.  I'm embracing the cool weather growing season this year, since hot didn't really work.  What I call winter is what most of the country thinks of as spring anyway.

Friday, September 1, 2023

Blueberry Galette

I had pie crust scraps in the freezer and a bag of frozen blueberries taking up space.  I also had no interest in making a proper pie.  A galette is an easy way to make a not-perfect, rustic pie.

It really took about five minutes to put this together and shove it in the oven, which was already at temp from a challah-baking day.  It's taking me two months to go through a batch now, with eating half as much bread.  Yes, that means the same loaf is brought out for two Shabbats.  It also means that the next round will be the High Holy Days batch, and that will last until Thanksgiving, unless I start adding more bread into my life.  Now that the crisis is over, it's getting harder to justify to myself not eating as many carbs.  I don't want to get back to that place.

That said, I only added two tablespoons of sugar to this galette.  The berries were plenty sweet.  If you used a more tart berry, like raspberry, you would have to add more.  I wouldn't call this low-carb, but it wasn't excessively carby either.  Served with some no-sugar vanilla ice cream, I considered this guilt-free.

*Crust for one 9" pie
*3 C blueberries (frozen ok)
2 Tb sugar
1 Tb cornstarch
1 Tb lemon juice
1 Tb butter
Coarse or sanding sugar, optional

1.  Preheat oven to 350º.  Line a baking sheet with parchment, because there's about a 90% chance this is going to get messy in the oven.

2.  In a bowl, toss together blueberries, sugar, cornstarch, and lemon juice.

3.  Lay crust on parchment.  Pour berries into the center.  Yes, they're going to roll.  Keep putting them back.

4.  Fold crust up and inward in segments.  It's easiest to slice if you make the same number of folds as servings, so you'll probably end up with an octagon.  It's perfectly fine if some of the berries are under the folds, like a stuffed crust.

5.  Dot the top with bits of butter.  If desired, sprinkle with coarse sugar.  You can even brush the crust with milk or egg wash if you want that look.  I left it bare.

6.  Bake 50 minutes to an hour, until the crust is done and the berries are bubbly.  There's probably going to be blueberry juice outside of the crust, which is why there's parchment.  If it gets on the baking sheet, start soaking the pan as soon as you remove the galette, before it sets, and it should come right off.  Allow to cool halfway on the sheet before moving to a cooling rack.  It's going to be a little fragile.

7.  Serve room temperature or slightly chilled.  Ice cream or whipped cream makes a great companion.

Serves about 8

Difficulty rating  π