Wednesday, March 29, 2023

Carrot and Chickpea Curry

This was on the calendar as a vegan cold mezze meal.  But as much as I try to have summer foods, the weather keeps reminding me it's March.  I was considering various soups and stews, maybe something in the Crockpot, then decided that what I really wanted was carrots.  Grated carrots, but not a soup, and it quickly evolved into a curry.  Still vegan, but a hot meal in a bowl instead of a tapas platter.

Carrots tend to be sweet, which brings out the coconut taste of coconut milk.  To keep that from being too overpowering, I added several spices on the more savory side.  As a result, this isn't entirely Indian flavors, but they work better with the root vegetable palette.

As with most curries, the ingredient list is daunting.  Once you get all the spices in the pan, it doesn't feel quite so long.  As for the shredded carrot, you can torture yourself doing it on the box grater, but the food processor is faster and easier.  You just have more dishes later.

2 Tb olive oil
*1 tsp paprika
*1/2 tsp crushed coriander seed
*1/2 tsp turmeric
*1/2 tsp curry powder
*1/2 tsp powdered lemongrass or 2 Tb fresh
1/2 tsp kosher salt
*1/4 tsp white pepper
1/4 tsp celery seed
2 cloves garlic, minced
*1/2 tsp grated ginger
*1 C diced onion
3/4 lb carrots, shredded
1 can lite coconut milk
*1 can chickpeas, drained and rinsed, or 2/3 C dry, soaked & simmered

1.  In a large skillet with a lid or sauce pot, heat the oil over medium.  Add all the spices and cook a few minutes until fragrant.  Add onion and cook until softened, about 5 minutes.

2.  Stir in carrot shreds and coconut milk.  If you're making rice to have with it, start that now.  Bring to a simmer, put on the lid, and cook for 20 minutes.

3.  Stir in chickpeas and simmer until warmed through.  Serve with rice or potatoes.

Difficulty rating  :)

Sunday, March 26, 2023

Cranberry Meatloaf


This started out to use a jar of cranberry ketchup, but once I googled recipes, I found a lot of great ideas.  The ketchup got moved into the "optional basting" category instead of barbecue sauce, and here we are.

To be fair, I also have a couple of jars of cranberry sauce to use, and two 12 oz bags of berries in the freezer.  I should make more things with them.

I don't make meatloaf often, though it is super easy to do.  You can even prep it in the morning and put it in the oven after work.  I'm using ground beef today.  This recipe is minimally seasoned and would work well with any ground meat.  You could add sage for poultry, thyme for pork, or rosemary for lamb.  I considered adding dried parsley, then decided I was tired and just mixed it as is.

*1 lb 80/20 ground beef
1 C diced onion
3/4 C panko breadcrumbs (or 1 slice stale, dried bread through the food processor)
*1/2 C cranberry sauce
1/2 tsp kosher salt
1/4 tsp black pepper
1 egg
*2 Tb cranberry ketchup, tomato ketchup, or barbecue sauce, optional

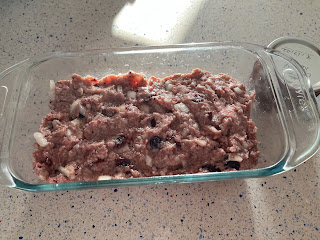
1.  Preheat oven to 350º.  Combine all ingredients down to the egg until evenly distributed and spread in a standard loaf pan.

2.  Bake to 155º, about 35 minutes, then pour off the rendered fat.  Yes, it is going to look smaller.  Baste top with cranberry ketchup, if using, and continue to bake to 165º, another 10-15 minutes.  

3.  Allow to rest in the pan about 10 minutes before slicing.  Serve with more sauce or some gravy on the side, if desired.

Difficulty rating  π

Thursday, March 23, 2023

Roasted Brussels Sprouts with Paprika

Here's another one of those "not exactly a recipe, but it tasted good enough to post" recipes.  To someone new to cooking, this will be a discovery.  And I gave this a "Passover" label designation to remind myself to consider it as the veggie side this year.

I'm not a sheet-pan dinner person, but I do like roasted vegetables.  Growing up, we had vegetables almost exclusively out of the freezer and steamed in a pot.  Sometimes there would be salad, but rarely something green out of the produce section.  And they all came topped with butter or cheese to make them palatable.

So you can understand it was a shock to discover other ways to prepare green food.  I still steam or boil some fresh veggies like broccoli or green beans, but roasting is a treat that doesn't take much longer than cooking on the stove.  It's often the same number of dishes to wash and allows you to season your food in a greater variety of ways.  Roasting brings out deeper flavors and a more complex texture.  And in the case of Brussels sprouts, keeps them from smelling quite so cabbage-ey.

1 lb Brussels sprouts
1/2 tsp kosher salt
1/4 tsp pepper
1 tsp paprika
1 Tb olive oil

1.  Preheat oven to 375º.  Wash sprouts and cut, if necessary, into two-bite pieces.  The ones at the market that day were huge and I cut them in quarters.

2.  Place sprouts in a bowl and sprinkle with salt, pepper, and paprika.  Add oil and toss to distribute all ingredients.  Spread in a single layer on a baking sheet.

3.  Roast 20 minutes, or until the outer leaves look almost burnt.  I tasted some of the "burned" bits, and they were fantastic.  Don't throw them away.  Serve hot, or chill to use as part of a salad the next day.

Difficulty rating  π

Monday, March 20, 2023

Crispy-Chewy Coconut Cookies


I wanted cookies.  No idea why, but I really wanted to make some as an easy snack.  And I was not all that convinced they needed to have dark chocolate in them, which is pretty unusual for me.

When I opened the mix-ins box to decide what I wanted, there was more coconut in there than I was expecting.  Coconut is mostly saturated fat, which will go rancid if you don't use it.  So, there was my theme.

I found a recipe on The Café Sucre Farine that looked like what I wanted.  Generally soft and chewy, but with a bit of crispiness around the edges.  They aren't hard enough to require dunking, but if you want to dip them in coffee or hot chocolate, they would probably soak up just a touch of flavor.

I'm modifying the recipe slightly and using the unsweetened shavings in the body of the dough and rolling them in sweetened flakes.  There's a lot of sugar in the cookies, so they don't need all sweetened coconut.  Since I have coconut extract, I used that instead of vanilla.  And instead of toffee as a topping, which I do like but don't have on hand, I'm using some white chocolate micro-chips that live in my fridge.  You can use any flavor of chips, preferably minis, that you like.  If you don't have any chips, a coarse sugar, crushed nuts, or even a sprinkling of brown sugar will top these nicely.

1/2 C (1 stick) butter, softened
1/2 C packed light brown sugar
1/2 C granulated sugar
1 egg, room temperature
*1/2 tsp coconut extract (or 1 tsp vanilla)
1/2 tsp baking soda
1-1/4 C flour
1/4 tsp salt
*1-1/2 C unsweetened coconut flakes
*1/2 C sweetened grated coconut
chips, nuts, toffee, etc for garnish

1.  Preheat oven to 350º and line two baking sheets with parchment or baking mats.

2.  Cream together butter and both sugars.  The original recipe says you can do this by hand with room temperature butter, but it was about 60º in my kitchen the day I made these, so in the mixer it went.  Once smooth, beat in egg, extract, and baking soda.

3.  Stir in flour and salt just until mixed, then add unsweetened coconut shavings and beat until combined.

4.  I used a 2 Tablespoon (one ounce) cookie scoop to portion these, which is larger than I usually make my cookies but works better here because you're rolling and topping them.  Form dough into 2 tablespoon balls, about 1-1/2 inch, and roll in the sweetened coconut before placing on prepared cookie sheets about 2" apart.

5.  Bake 12-14 minutes, until browned around the edges but not 100% baked in the middle.  Pull from oven, sprinkle with topping, and put back in for another 2 minutes to melt in the topping and finish baking the cookie.  Cool on the baking sheet for about 3 minutes, until they firm up enough to be moved, then cool on a rack.  Stores room temperature about 3 days or in the freezer for a month.

Makes 20

Difficulty rating  :)

Friday, March 17, 2023

Mustard Roasted Potatoes

I saw this one on Jar of Fireflies on YouTube.  Sorry, couldn't find exactly which post.  I'm not a big potato person, but it sounded like a great side dish for the lamb I had gotten out of the freezer.  The Covid-canceled Chrismukah leg of lamb I had roasted up seemed silly at the time, but gave me two packages of pre-cooked freezer meat.

This one is so basic, it's barely a recipe, but the result is flavorful and pretty amazing.  I finished off a jar of bourbon mustard because that's what I had open.  You could use any mustard you like, including basic French's.

2 lbs potatoes of choice (I used red)
*2 Tb mustard
1 Tb olive oil
1/4 tsp pepper

1.  Preheat oven to 375º.  Wash potatoes and cut into wedges or chunks and place in a bowl.

2.  Whisk together mustard and oil into a dressing.  Pour over potatoes and toss to coat.  Arrange in an 8x8 casserole and sprinkle with the pepper.

3.  Cover baking dish with foil and bake for 45 minutes.  Remove foil and test to see if the pieces are easily pierced by a fork.  If not, continue to roast uncovered until done.

Serves 4-6

Difficulty rating  π

Tuesday, March 14, 2023

Snack Prepping: Orange Slices

I can't take credit for this one.  Leisa at Sutton's Daze did a video.  I had been wondering how to preserve the last of this year's Valencia oranges.  Like Phil, I'm not a fan of peeling oranges, which is why they tend to linger on the tree.  I drink OJ daily, so it isn't an aversion to the fruit itself.

I'm going a step farther than the video did by also preserving the orange zest to use in baking through the year.  Since I don't own a dehydrator, I'm using the convection setting on the oven.  I don't go through much, so I just shred the prettiest areas, a couple of tablespoons.

"Peeling" lasted about five seconds before I got out a knife and cut the peels off.  Eleven oranges. Took long enough that way.  I don't want to know how bad it would have been if I had peeled them properly.

1.  Line a baking sheet with wax paper or parchment.

2.  Peel oranges or cut the rinds off them, then divide into segments.  That part got messy, and I probably ate an orange worth of torn pieces.  Arrange wedges on the baking sheet.

3.  Freeze tray until oranges are solid, about 2 hours.  Working quickly, fill snack baggies with them.  I only have sandwich baggies, and put about a snack-sized amount in each.  Put baggies back in the freezer. If desired, put the little baggies inside a gallon one, both for extra protection from freezer burn and so they don't get lost.

4.  To serve, defrost in the fridge for a few hours or pop into a lunch box to defrost on the way.

Difficulty rating  :) (for peeling)

Saturday, March 11, 2023

Chickpea Polenta with Mozzarella and Parsley

Still working on the freezer, and there was just enough chickpea flour stored in there for one more recipe.  Last year's parsley is finally bolting, so I need to use all the leaves somehow.  And there were the remains of a bag of mozzarella and some spaghetti sauce in the fridge.  That's how dinner happens around here.

I'm not going the whole way to panelle by frying these, but you could.  I haven't done a cold dinner in a while.  Felt like I was due, so of course I picked a chilly day to do this.  At least this is a wonderful way to do your cooking in the morning and have dinner ready when you get home.  And yes, the salad is also mostly parsley, with some home grown arugula and the first peas of the season.

*1 C chickpea flour
water
1/2 tsp salt
1/4 tsp pepper
*1/2 C chopped parsley
*1/2 C shredded mozzarella
olive oil for greasing pan

1.  In a medium saucepan, combine chickpea flour, salt, pepper, and 1 C of water.  Allow to sit about 30 minutes, to hydrate the flour a bit.  Grease a standard loaf pan with a few drops of oil and set aside.

2.  Cook the flour mixture over medium-low heat, stirring frequently.  It is going to thicken into something like a roux, which is far too thick.  Continue to stir in water and return to a low boil until a smooth, cream-like texture is achieved, 2-3 cups total of water.

3.  Stir in parsley and mozzarella.  Remove pot from heat and pour into prepared loaf pan.  Cover in plastic wrap, touching the surface if you don't want a skin, and refrigerate until set, at least 4 hours.

4.  To serve, slice and plate cold, or pan-fry for more of a panelle texture.

Difficulty rating  π

Wednesday, March 8, 2023

Red Lentil Falafel


Happy Purim!  It's too bad one of the most fun holidays of the year is followed by a month of deep cleaning.  I was debating between falafels and Turkish red lentil meatballs for the vegan part of this feast, and compromised with red lentils as the base for falafels.

I found a recipe on Tasty Simply Vegan, because you should probably click on the vegan site Google coughs up if that's the cuisine you're searching.  Also, because I'm still using up parsley.  I'm adding other herbs and spices to my version because that's what I like.  You can also add red pepper flakes if you want something spicier.  Red lentils are delicious, but can be a little bland without help.  I made a tahini sauce that could double as dipping sauce for the crudités.

Okay, I must sort and rinse beans, rice, or some kind of grain nearly every week.  This time, I ran out of hands for a moment and set the strainer down in the bowl I had just poured off the water into.  It finally occurred to me that I can just set the strainer in the bowl, add water and swish around the lentils, lift the strainer, and dump the water.  It's like those pasta cooking pots with the strainer built in.  This is going to make rinsing quinoa so much easier.  I don't know why cooking shows skip this part and just dump the rinsed item in the pot.

1 C dry red lentils
*1 small onion
*3 cloves garlic
*1 C parsley leaves
1 tsp kosher salt
1 tsp paprika
1/2 tsp ground coriander
1/2 tsp cumin
2 Tb flour
oil for frying

1.  Sort lentils and rinse well.  Red lentils tend to have a lot of crud on them.  Soak in 2-3 C water for one hour, until the lentils have split and absorbed about half of the water.  Drain and let drip dry while you prepare everything else.

2.  Chop up the onion into 1" pieces and toss in the food processor with the garlic, parsley, and spices.  Run processor until onion is minced.  Add drained lentils and run again into a coral-and-green paste.  Scrape into a bowl and stir in flour.

3.  Add oil to a medium skillet, enough to fully coat the bottom.  Preheat on medium-high.  When the oil is hot enough for drops of water to pop, spoon in heaping tablespoons of falafel mix.  I used a 1 oz (2 Tb) cookie scoop and got 20 two-bite falafels.

4.  Fry falafels until browned and crispy, then flip to cook other side, about 3 minutes per side.  I chose to flatten mine into patties rather than leave them as balls because I wasn't deep-frying.  If the outsides are browning in under 3 minutes, turn down the heat a bit.  You want to make sure the insides are cooking before the outside burns.

5.  Remove cooked falafels to a paper towel-lined plate, add more oil to the pan as needed, and continue to make them until all of the mix is used.  Can be served warm, room temperature, or chilled.  You could have a side sauce of tahini, tzatziki, Italian dressing, or any other sauce you prefer.

Makes 20, 4-5 servings as a main

Difficulty rating  π

Sunday, March 5, 2023

Spiced Ginger Chicken

I decided to invent a Thai curry-style marinade for baked chicken that I was planning to have with some kimchi and rice.  It's somewhere between an Indian curry and satay, but not exactly either, so I just called it "spiced".  Not spicy.  We don't do spicy here.  And I didn't want to call it "seasoned", because that could mean anything from only salt to a wide variety of cuisines.  We're going to go with this and hope it isn't too confusing.

I defrosted the rest of the chicken pieces in the freezer for this.  One of the thighs will end up in the freezer for a day I need a reheat-able meal.  There's still a whole bird in there, but I'm making serious progress.  It has been unbelievably hard to resist buying meat when I see a good sale, but it's a month until I defrost the freezer.  Starting the corned beef for next week was also very helpful, even though half of it will get sliced and refrozen.

Don't be daunted by the long list of ingredients.  It's almost all spices.  Once the marinade is made, the rest is remarkably easy.  And while I put in a tiny amount of ground fennel seed, I'm not putting it in the ingredients.  It got a bit dominant.

*1/2 C finely diced onion
*2 cloves garlic, minced
1 tsp grated ginger
1 tsp cumin
1/2 tsp chili powder
1/2 tsp turmeric
1/2 tsp kosher salt
*1 stalk lemongrasss, white part only, finely chopped, or 1 tsp lemongrass powder
1/2 tsp ground coriander seed
3 Tb vegetable oil
*1 Tb lime juice
8 pieces chicken (or 4 leg quarters)

1.  Start early in the day or the night before.  In a large bowl, whisk together everything except the chicken into a chunky marinade.  Add chicken pieces and turn to coat all sides.  Cover and refrigerate 6-8 hours or overnight.

2.  Preheat oven to 350º.  Arrange chicken pieces in a 9x13 baking dish and top with any remaining marinade.

3.  Bake until internal temperature of the thickest piece reaches 165º, roughly 45 minutes to an hour.

Difficulty rating  π

Thursday, March 2, 2023

Slow Cooker Beans

Because the last thing I need is another small kitchen appliance, I bought a Crockpot.  It has been getting to the point that I keep having to rearrange the meal plan because I have a slow-cooked meal scheduled on a work day, or I need the oven at two different temperatures, or I don't want to leave on the gas stove while I'm at an appointment for two hours.

My family has no experience with slow cookers.  Papa Smurf's career was analyzing mechanical and electrical malfunctions, so leaving an appliance on while out of the house or asleep was never an option.  He would be horrified to know I bought one.  But after sending Melody Smurf one for her birthday, I realized how many things I make could be so much easier if I had one of my own.

I got the smallest one, a 2-quart, because I don't plan to use it for anything big.  Most of the time, it's just me.  Yes, I cook four portions at a time, but they're true portions and not restaurant size.  The crock insert itself is quite nice and oven safe to 400ºF.  I see myself baking artisan bread in it, instead of in an aluminum cake pan.  The first thing I "made" in it didn't even use the heating element.  I put a batch of yogurt into the crock, which is when I learned it only holds 1-1/2 quarts to the dent below the rim.  It was an experiment to see if I could make Greek yogurt out of powdered Nido milk, which has other stuff in it like soy.  I have been going through a lot of yogurt lately, and it's kind of pricey because milk prices are going up, but the Nido is still pretty affordable.  The yogurt turned out wonderfully thick and not very tangy.  I didn't have to drain out any floating whey, but I think I'll up from 6 to 8 hours next time for taste.

This batch of baked beans is the first thing I cooked properly in the Crockpot.  Side note on slow-cooker beans, it is very important to soak them 8-12 hours first.  You can't half-ass it with a quick soak because they won't cook through in 8-10 hours.  And it isn't recommended to do red or kidney beans without cooking them first; there's some kind of enzyme or something in the dry beans that's toxic, but that proper cooking eliminates.  Out of a can is fine, since they're pre-cooked during the canning process.

*3/4 C dry Navy or Great Northern beans
1/2 C diced onion
*1/4 C tomato paste
1/4 lb chopped bacon (optional-I skipped it for vegetarian night)
*1 tsp paprika
1/2 tsp kosher salt
1/4 tsp ground cloves
*1 tsp prepared mustard of choice
*1 Tb molasses
*1/2 tsp liquid smoke
3 Tb brown sugar
water

1.  The night before, sort and rinse beans.  Soak in 3 C water.  Can be done in the crock.  I tried doing the baking soda thing, where you put half a teaspoon in the soaking water to loosen the skins.  No idea if it worked.  I was able to rub off some of them.

2.  Early in the morning, drain and rinse the beans.  Discard any floatings skins and beans that failed to swell.  Either spray the crock or use a liner.  I opted for a liner.  Add all ingredients to the crock.  Top with 1-1/2 C water and stir to combine.  Set slow cooker on low,  put on the lid, and let it run for 8-10 hours.  When I came home, I stirred it and temped it at 200ºF, which is enough to cook meat and veggies, but a little low for beans.  It was still a couple of hours until dinner and the sauce was kind of thin, so I turned it up to high, cracked the lid a bit, and did some other stuff until I got hungry.  That brought it to a full boil and caramelized the sugars and tomato better.  This is also when you're happy you used a liner and aren't burning anything into the crock.

2a.  If you want your beans done sooner, cook on high and they will be done in 4-6 hours, but retain the slow-cooked texture.
I need a tripod
3.  Serve hot.  It's also better warmed up the next day.

Difficulty rating  π