Monday, February 28, 2022

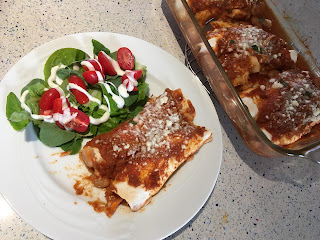
Spinach Lasagna Rolls

I had half a box of lasagna noodles and half a jar of sauce.  Just a couple more ingredients were all that were needed to turn them into dinner.

I don't remember where I first saw the idea of making single-serve rolls instead of a thick casserole for lasagna.  It allows you to make a lighter version of the dish that come out just as flavorful as if it was loaded with twice the sauce and cheese.

Speaking of lighter, this recipe goes much easier on the cheese than most lasagna recipes.  The spanakopita pie reminded me how much I really like spinach, to the point that I didn't want to drown it out with too much cheese and too much sauce.  Instead, there's a light brush of cream cheese for the barely-cheesy spinach mixture to stick to, then the dusting of mozzarella over the  top sauce.

*9 dry lasagna noodles
1 pound frozen spinach, thawed
*1/2 C ricotta or a crumbled cheese such as feta or romano
*1/2 C grated parmesan
*1 Tb dried onion flakes
1 clove garlic, minced
1/4 tsp dried oregano
1/4 tsp dried basil
Pepper to taste
1 egg
*2 oz cream cheese, softened
*1-1/2 to 2 C marinara sauce
*1/2 C shredded mozzarella

1.  Cook lasagna noodles according to package directions.  Because they're going in the oven, try not to over-cook.  They should be pliable but not falling apart.  Drain.

2.  While the noodles are cooking, mix the filling.  Squeeze spinach as dry as possible.  Stir in ricotta, parmesan, onion flakes, garlic, oregano, basil, pepper, and egg.

3.  Pour about 1/2 C of sauce on bottom of an 8x8 casserole, just enough to cover the bottom in a light layer.  Start preheating the oven to 350º.

4.  Working a few at a time, spread a thin layer of cream cheese on each noodle.  I forgot how much I like cream cheese on pasta until I was spreading it.  Follow that up with a thin layer of spinach mixture.  You don't want to put a lot on each one, or it will be hard to roll and too thick to eat a slice.

5.  Roll up each noodle.  Place, seam-side down in the pan.  Once all are arranged, pour remaining sauce over them.  Top with cheese.

6.  Bake 30-35 minutes, until bubbly all the way to the middle.  You're cooking the egg.  Everything else is either already cooked or ok raw.  Allow to sit 10 minutes before serving.


Makes 4-6 servings, either one or two rolls per person

Difficulty rating :)

Friday, February 25, 2022

Vegetable-Barley Soup with Turkey

Turkey carcasses take up a lot of freezer space.  I'm not even sure why I kept it, other than an urge not to waste.  There was barely any meat left on the bones because I did a very good job pulling it on Thanksgiving.  I made a little extra stock, and was pleasantly surprised when the extra pint I set aside gelled after cooling.  I made an aspic bone broth!  It's in the freezer, but I know what I'm going to use it for.

Soup in February just sounds like a wonderful, hearty meal.  Never mind that it was over 80º the day I made it.  I had barley in the pantry to bulk it up, and only needed to decide what vegetables to add.  I wiped out the broth bag in January and had to buy a little extra to sacrifice to the cause.  At least I still have a ton of celery in the pond.  It will probably keep going until summer and then bolt, but I'll have gotten a full year out of a single purchase, plus all the free mulch I need.

I wasn't planning for this to be a "diet" soup, but I did lose a bit of weight.  There's fat in it from the oil, and the way I made the broth had quite a bit of fat in it.  It's the veggies and barley.  They both fill you up unexpectedly fast, so one bowl and a side roll are plenty for dinner.

If, like me, you don't have much meat left on your turkey, you can add in leftovers from your freezer or even a can of chicken.  Or buy a turkey leg to add to the pot during the broth-making process, then pull the meat off that.  I just went for turkey flavoring and found maybe a cup of meat when I pulled out the solids, which kind of defeats the purpose of a turkey soup.  We went from mornings barely over freezing to T-shirt weather in two days.  My allergies were raging and I just wanted a clear soup with some semblance of nutrition.

*2 lbs turkey bones and pieces, or 1 qt turkey broth
4 C mirepoix if making broth from scratch
*1/2 C pearled barley
2 Tb oil
1 yellow onion, peeled and chopped
3 large carrots, peeled and chopped
*4 ribs celery, chopped
1 large russet potato
1 small head cabbage (under 2 lbs)
*1/2 tsp dried sage
salt and pepper to taste

1.  If making broth from scratch, place bones, mirepoix, aromatics, and 6 C of water in a large soup pot.  Bring to a boil, lower to a simmer, and cook for 2 to 3 hours.  Strain and set aside.  Pick off the meat from the bones or pieces and shred, about 2 cups of meat.  Or open a can of chicken or turkey to supplement.

2.  For the barley, check over for stones and rinse.  Place in a saucepan with water to cover by 1/2".  Bring to a boil, then lower to a simmer for 5 minutes.  Drain and rinse after this first cooking to get rid of extra starch.  Refill pot with water to cover the barley by one inch.  Bring to a low boil.  Cover, lower heat to a simmer, and cook 45 minutes, until barley is fully cooked.  If you put it in the soup only half-cooked, it's just going to suck up all of your broth.  Drain off excess water.

3.  In the large soup pot, heat oil over medium.  Add onion and celery and cook to soften.  Add carrots and turkey stock.  Simmer while you chop the potato into bite-sized pieces (peeling optional).  Add potato and sage to the pot and continue to simmer while you deal with the cabbage.

4.  Core cabbage and slice fairly thinly so you don't end up with chunks of cabbage in your soup.  Add and continue to simmer, stirring occasionally, until every vegetable is sufficiently cooked, 20-30 minutes.  Add in the turkey shreds and barley and stir to distribute.  Taste and add salt and pepper.  Serve hot.

Serves a lot more than I was planning, about 8

Difficulty rating  :), :-0 with making your own stock

Tuesday, February 22, 2022

Cranberry Cream Pie


I don't know why I bought so many cranberries in December.  It felt like there was a shortage, so I picked up one every time they were below $3, then only used them for canning mincemeat and cranberry sauce.  I had almost two bags in the freezer when I did inventory.  They're still available if you know where to look.  So I went looking for a recipe to use some of them.  It didn't have to be all in one shot, just an improvement.

Delish had 35 ideas, most of them derivations on a few themes: drinks, paired with brie, and baked goods.  A few were breakouts, like braised chicken.  When I saw the smooth, chiffon-like pie, I knew I had a pantry project dessert.  You can use frozen cranberries if it's the wrong time of year, since they're going through the blender anyway.  Delish has a recipe in the post for a Biscoff crust, but I had a graham crust in the pantry that I wanted to use.  The rest of the ingredients were things I keep on hand.

While you do have to start this early in the day because of the gelatin, it's very quick and easy to prep.  No eggs, no cornstarch base.  It's held together with the gelatin, natural pectin in the cranberries, and (unfortunately, full-fat) coconut milk.  You do have to get an appliance dirty to purée the cooked mixture, and I did not like cleaning the strainer.  Including the zester and citrus juicer, this really did produce a lot more dishes than I was expecting.  And that was without making the crust from scratch.

The recipe calls for a "medium" orange.  The Valencias on my tree are finally ripe, but on the small side.  I picked the largest and used orange blossom extract instead of almond to make up for it.  I don't like overly orange sweets anyway, and found the small one provided just the right balance.  I considered using rosewater as the extract flavoring too.  Don't get locked into vanilla or almond when a recipe calls for an extract.  Consider all the flavors you have on hand before making a choice.  If you want a standard-issue dessert, you can buy that.

You can refer to the original recipe post for the crust.  I do recommend making it 9".  Even with that large a space, I ended up with half a cup too much filling.  I poured that into a ramekin as cranberry/coconut gelatin.  You can make this whole dessert GF by doing that.

1 packet gelatin
*1 9" graham or Biscoff crumb crust
*10 oz cranberries, fresh or frozen
3/4 C brown sugar
*1 small orange, zested and juiced
1 can coconut milk
*1/2 tsp grated ginger
1/2 tsp almond or other extract
1/4 tsp salt
whipped cream for serving

1.  Soften gelatin in 1/4 C cold water and set aside until needed.

2.  Rinse cranberries.  Pick out any spoiled ones and stray stems.  If desired, set aside a few for garnish.  Place in a medium saucepan with brown sugar, orange zest, and orange juice.  I thought that looked like a lot of sugar, but, cranberries.

3.  Bring mixture to a low boil over medium-low heat.  Stir frequently.  Cook until all of the cranberries have popped and the mixture starts to thicken, but isn't quite as thick as cranberry sauce.

4.  Add coconut milk, ginger, extract, and salt.  Stir and warm until the coconut milk has melted into the mixture.  Do not boil.  Remove from heat and stir in softened gelatin until dissolved.

Sorry about the blur
5.  Purée mixture.  You can use an immersion blender, food processor, or blender.  I did it in batches, because I don't have a great track record puréeing hot liquids.  Strain to remove skin and seeds.  You can discard them, or save the couple of tablespoons to stir into overnight oats.  Allow to cool to room temperature, stirring occasionally to distribute the foam that the blender kicked up.

6.  Before the gelatin sets, pour filling into crust.  Chill 4-6 hours, until set.  If desired, roll extra cranberries in granulated sugar for a frosty look.  Garnish with whipped cream and reserved cranberries.


Makes one pie, about 8 servings

Difficulty rating  :)

Saturday, February 19, 2022

Quinoa-Mushroom Burgers

I still have klp ketchup from last year and wanted to make a new burger for it.  Beef is just too expensive to waste on burgers these days.  When I made the ketchup, I was disappointed that I only had a pint.  Now I realize that I don't use it much, and a pint was plenty for the year.  I also had some leftover frozen fries from a batch of poutine, and I will definitely put ketchup on that.

This is not a vegan burger.  I could not figure out how to keep them from falling apart without eggs.  As it is, there's a little tapioca flour in it to help as an extra binder.  They are GF, until I put them on sauerkraut rye buns.

In these burgers, moisture is the big enemy.  The quinoa and mushrooms must both be cooked until dry, and you still need starches to soak up the water in the eggs.  You can definitely use breadcrumbs or matzoh meal in place of both of the starches I used.  I was just seeing what would happen if I tried for KLP.

* 1/2 C dry quinoa
8 oz crimini or other mushrooms
*1/2 yellow onion
3 Tb olive oil, divided
1/2 tsp dried thyme
1/2 tsp granulated garlic
*1/4 tsp liquid smoke
*1 tsp fish sauce or soy sauce
*3 Tb potato starch
*1 Tb tapioca starch
2 eggs, beaten

1.  Rinse quinoa thoroughly to remove any soapy residue.  I do that even if it says pre-rinsed.  Add 1 C of water and quinoa to a small saucepan.  We're making this quinoa slightly drier than the usual recipe.  Bring to a simmer, cover, and reduce heat to the lowest.  Cook until quinoa has absorbed all the water and the little curlicues are visible, about 12 minutes.  Remove from heat and allow to cool.

2.  While that is simmering, rinse mushrooms clean.  Finely chop mushrooms and onion.  I already had the food processor out and did it in that, but I think my initial instinct to use the hand chopper would have worked better.

3.  Heat 1 Tb of the oil in a large skillet over medium heat.  Add mushroom and onion mixture, thyme, garlic, liquid smoke, and fish sauce.  Cook, stirring frequently, until mushrooms are cooked down and dry, about 7-10 minutes. What I was not expecting was for the finished result to look exactly like ground beef.  Remove from heat.

4.  Once the mushrooms and quinoa are cool enough not to instantly cook the eggs, stir them together in a bowl.  Add potato and tapioca starches and stir until thoroughly combined.  Pour in beaten eggs and fold until distributed.  The mixture is going to be a little soupy.  Refrigerate 20 minutes, while you wash the unfortunate pile of dishes (saucepan, skillet, cutting board, cutting implements, egg bowl, measuring spoons, utensils).

5.  Put the now-clean skillet back on the stove and add about 2 Tb olive oil, enough to lightly coat the bottom.  Heat over medium.  Portion out 1/2 C of mixture and pour into skillet like a very thick pancake.  Fry until bottom is crispy and golden, 8-10 minutes.  Flip, press down slightly, and cook until patty is completely done, another 6-8 minutes.  Serve hot as you would a burger.

Makes 4-6, depending on patty size

Difficulty rating  :)

Wednesday, February 16, 2022

Lamb Curry

I bought a pound of ground lamb one day when it was on discount cheaper than the ground beef next to it.  That's what the chest freezer is for.  When looking for something new to do with it, I considered curry and started an online search for recipes.

There are plenty of recipes out there using lamb stew meat, but I had to search a little harder for one with ground.  It turns out to be very easy and not time consuming at all.  With stew meat, you have to brown and braise.  Ground, it's brown and simmer until any vegetables are cooked.  Food and Wine had the idea of using sweet potato and peas as the vegetables, which I decided was the way I wanted to go.  My pea vines started blooming in January, but it's still a bit early for the amounts I needed here and I bought some.  If you want to save prep time, get peas and carrots and skip the sweet potato.

I'm seriously getting addicted to using up the pantry.  It's to the point that I start pulling out items for the next meal as soon as I have one prepared.  This made enough progress on the canned goods that I was able to bring down all the cans from the top shelf.  I cooked up whatever rice didn't fit in the quart jar of jasmine.  The next time I make a curry might finish off the box of spice.  Yes, rotating through older spices counts as pantry.  It's important to know what you're using and at what rate, so you can rotate through everything.  Otherwise, it's just money sitting on the shelf.

*1 lb ground lamb
*1 yellow onion, diced
1/2 tsp cumin
*1/2 tsp paprika
*1/4 tsp turmeric
1 Tb olive oil
2 tsp curry powder, or to taste
*1/2 tsp grated ginger
1 tsp minced or grated garlic
*1 stick cinnamon
salt to taste
*1 15 oz can diced tomatoes
*1 15 oz can lite coconut milk
1 C frozen peas
1 large sweet potato (about 1 lb), peeled and diced 1/2"
*2 Tb chopped fresh cilantro
*1 Tb chopped fresh mint
*Jasmine or basmati rice, for serving

1.  In a large, deep skillet with a lid, heat oil over medium.  Add cumin, paprika, turmeric, curry, and salt and heat into a fragrant paste, about 3 minutes.

2.  Add diced onion and cook until softened and fairly dry, about 8 minutes.  This can be when you're dicing the sweet potato.  Side note, when I was cutting mine, it let out some kind of milky sap, like it was bleeding white.  I'm assuming that's normal and continued with the meal.  Increase heat to medium-high and add ground lamb.  Cook until mostly browned and crumbled, stirring frequently.  If necessary, drain off any excessive fat.

3.  Add ginger and garlic and cook until fragrant, 2 minutes.  Add diced sweet potato and peas.  Follow that up with the canned tomatoes in their juice and the coconut milk.  Stir everything together, top with the stick of cinnamon, then cover. Bring to a boil, then lower heat to medium-low and simmer until the sweet potatoes are cooked and easily pierced by a fork, 10 to 15 minutes.

4.  Remove lid and stir in chopped cilantro and mint.  Cook an additional 5 minutes, for the herbs to work their way into the curry.  Fish out the cinnamon stick, then ladle over rice and serve hot.


Makes 5-6 servings

Difficulty rating  :)

Sunday, February 13, 2022

Gluten-Free Biscuits

I picked up the free bag of Bob's Red Mill 1-1 gluten-free flour, then had to figure out what to do with it.  There's a cookie recipe on the back, but I have a lot of sweets in the house.  I decided to check out their online recipes.  There was one for biscuits, and I was planning to make some anyway.

I'm changing their recipe slightly based on the comments.  The biggest change is using shortening instead of butter.  I use butter-flavored shortening, and I do see the chemical advantage to using it in a gluten-free recipe.  The rice flour that makes up the majority of the product absorbs water at a different rate than wheat flour does, and shortening is virtually water-free.  It also melts at a higher temperature than butter, so it doesn't disappear into the dough until baked.

I do like their idea of folding the dough.  It isn't quite the same as laminated, but will get you layers.  I became a fan of layer biscuits after buying a tube of Pillsbury Grands in December.  They were better than what I make because they have yeast in them, but I really liked the folded-dough texture.

And then, after all the trouble of attempting a gluten-free recipe, I made sausage gravy with wheat flour to put on them.  Whatever, I'm not GF.  There are ways to make a country gravy with other thickeners.  I didn't feel like going into that.  The important thing to note is that if no one tells you they're GF, you would never guess it.  They just taste like shortening biscuits with part whole wheat flour.

This is a half-recipe to make 4 large or 6 medium biscuits.  I didn't need more than that, and it was an amount of dough that was easy to work with.

1-1/4 C Bob's Gluten Free 1 to 1 flour
1-1/2 tsp baking powder
1 tsp sugar
1/2 tsp salt
1/4 C shortening
1 egg
6 Tb milk or buttermilk (1/4 C + 2 Tb) plus more for brushing

1.  Preheat oven to 450º (yes, really) and line a baking sheet with parchment or Silpat.

2.  In a bowl, stir together flour, baking powder, sugar, and salt.  Cut in shortening to make pea-sized chunks.  Up to this point, it's just like making any other biscuit.

3.  In a small bowl, beat together egg and milk.  Make a well in the flour mixture and pour in liquids.  Stir together until wet.  Unlike with a gluten dough, you don't have to worry about over-mixing.

4.  This is where it's going to get different.  Unlike with a gluten flour, you aren't going to sprinkle anything on the work surface.  Line the surface with plastic wrap and transfer the dough.  Cover the dough with another layer of plastic wrap if sticky.  Pat into a rectangle 1/2" thick.

5.  Then you are going to make the layers.  Remove the top plastic and fold the dough in half.  Pat back down to 1/2" thick.  Do this two more times.  On the third time, only pat to 1" thick, or however deep your biscuit cutter is.

6.  With a 3" cutter for big or 2" cutter for medium, cut out the biscuit rounds by pressing straight down.  Do not twist.  Transfer rounds to the baking sheet.  You don't have to worry about reworking the scraps because there's no gluten or added flour, but you'll lose the layers.  Repeat until all the dough is used.

7.  Brush tops with a bit more milk, then bake for 15-18 minutes, until lightly browned and set.  While warm, brush with melted butter or more milk, if desired.  Allow to cool 5 minutes before serving.  They won't rise much, but you'll be able to see the layers where the shortening melted away.  Serve warm.


Makes 4 to 6

Difficulty rating  :)

Thursday, February 10, 2022

New Ingredient: Bob's Red Mill 1-1 Gluten Free Flour


I am so far from gluten-free it would be a disaster if I had to go GF for medical reasons.  I actually feel malnourished during Passover from the lack of gluten in my diet.  But I had a coupon, and decided to pick up some free GF flour to learn a new skill.  It may be useful some day if I'm hosting someone who's GF.

Unfortunately, the flour is largely rice, meaning I can't use it for Passover.  Anyone who does not observe the kitniyot rules and sticks to the wheat-oat-barley-spelt-rye basics is good to go.

Bob's website makes it clear that this product is meant for cookies, quick breads, and other products that use chemical leaveners.  It is not intended for use with yeast.  They have a different GF flour for that.  One helpful thing you can use it for is any kind of chiffon cake that is raised by egg whites or one that gets tough easily through over-mixing.

Because this is cup-for-cup equivalent to A.P. flour, you can sub it into any non-yeast recipe without making adjustments.  If gluten isn't a dietary issue, you could also swap out only part of the wheat flour for a tender product that still has some structure.

The free bag was only 22 oz, so I won't be able to make much with it; probably just two recipes.  Still, it's a nice experiment that didn't cost me $5.99.  Wow, GF foods are expensive.

Monday, February 7, 2022

Pumpkin Enchiladas

Pantry challenge or not, I had leftover canned pumpkin in the freezer that I wanted to use.  I've already done a pumpkin lasagna, and went in search of other ideas.

Enchiladas drenched in a pumpkin tomato sauce are a great savory idea.  The filling can be shredded poultry or pork, chicken, or beans.  I got snacky and bought flour tortillas, but corn ones make this GF.

Technically, this was my last recipe of Pantry Challenge January.  I bought the tortillas new, but used cream cheese instead of shredded in the filling because I bought a two-pack when the Great Cream Cheese shortage happened.  PS, if you've never tried cream cheese on a flour tortilla, you're missing out.  My cheesy topping was a mix of the rest of the Romano and feta from every other cheese recipe I made this month.  If I had been out of cheese, I would have bought cotija.

The amount of spices in the sauce I have listed will produce a savory, flavorful blend.  If you want some heat or punch, double the amounts and add 1/4 tsp of cayenne.  It will overpower the pumpkin, which is what I was trying to avoid, but I know some people like their spice.

*2/3 C canned pumpkin
*1/4 C tomato paste or 8 oz plain tomato sauce
1 C water (if using tomato paste)
1/4 tsp cumin
1/4 tsp chili powder
1/2 tsp paprika
1/4 tsp salt
8 6" tortillas (your choice flour or corn)
*1 15 oz can cannellini, black, or pinto beans, drained and rinsed
2 C chopped greens of choice (optional)
*4 oz cream cheese, softened or room temp
*1/2 C shredded or crumbled white cheese of choice

1.  If using tomato paste, mix with water until uniform.  Stir in cumin, paprika, chili powder, and salt.  Spread half of it thinly on the bottom of a 9x12 casserole.

2.  Combine remaining tomato sauce and the pumpkin purée and set aside.  If too thick to pour, add a little more water.

3.  Begin assembling the enchiladas: If needed, warm each tortilla briefly to make it pliable.  Set it on a work surface.

4.  Spread 1 Tb of cream cheese all over one side of the tortilla.  Top with 1/4 C of beans and 1/4 C of chopped greens, if using.  I considered cabbage, but then I would have had 3/4 of a cabbage left and just snipped some green onions from the garden.  Roll up enchilada and place, seam-side down, in casserole.  Repeat with all of the tortillas, cream cheese, and fillings.

5.  Once all the enchiladas are rolled and in the casserole, pour pumpkin sauce on top and sprinkle with cheese.  You can garnish with any remaining chopped or shredded greens.  At this point, enchiladas can be refrigerated or frozen for another day, or baked immediately.  Side note, if you freeze cream cheese, it will have a slightly crumbly texture once thawed.

6.  When ready to bake, preheat oven to 350º.   Cook for 15-20 minutes, until heated through and bubbly.  Remember, the only thing raw in there is if you added greens.  Serve hot, with a side of rice and/or a salad if desired.


Difficulty rating  π

Friday, February 4, 2022

Pantry Challenge, Month 2

There are still a lot of random items I would like to finish off.  January was a good start, but my freezer and pantry are still full.  The fridge has been in great shape since the second week, so I'm not even bothering with that.  Passover is late this year, but there is no way I could finish off the chometz I've amassed before it.  The best I can hope for is only one box in the hall closet.

At the beginning of the pandemic (really, two years ago?) I could easily fit all of my everyday items on a single shelf, including home-canned jams.  A year ago, I didn't need the hard-to-reach fourth shelf, and the freezer was mostly several kinds of flour.  This year, I have four full shelves in the pantry and a full freezer.  And that's after a month of primarily buying what I intended to use within the same week.  Yes, in these times of uncertain availability it's a good idea to have a bit extra on hand, but this is ridiculous.  I don't want to know how much I spent to accumulate all this food.  It had to be twice my normal grocery budget.  Well, I'm getting it back now by only buying a few things to make a meal out of what's in there.

I will be spending more this month, I think.  I'm pretty much out of both canned and frozen vegetables.  I won't be buying meat unless it's a great deal to stick in the freezer, and that won't count as weekly spending.  One of this month's planned meals involves cheese that I'll have to buy new unless I decide to sub cream cheese, but the Romano that I bought last month was split between three recipes, so I'm still coming out ahead.  The funny thing is I don't have any rewards points at the market because I didn't spend enough.  What I have in my bank account is worth far more than a two-point dozen of eggs.

What I would really like is to get rid of that top shelf of "prepper" foods.  I think I'll be able to get all of it onto the regular shelves by the end of the month.  It will involve a little geometry and repackaging a few things into smaller jars, but it might be doable.  Fortunately, I did not win the pressure canner in a contest I entered.  That would have resulted in a few dozen more jars, mostly beans and low-sodium soups.  I just can't believe how much I stocked up, fearing shortages like March 2020, of items that I don't regularly use.  Better to have that than no food at all, I guess.  I need to let go of the fear of shortages and be willing not to carry backups just for the sake of having them.  It really does not take a lot of food to feed me for two weeks, and I don't mind altering my plans if an ingredient is unavailable.

Tuesday, February 1, 2022

Spanakopita with Puff Pastry

I haven't made spanakopita in ages, primarily because I hate working with phyllo dough.  It dries out too easily, you go through a ton of butter, and any unused sheets in the box have to be trashed.

But I did have a sheet of puff pastry in the freezer, and figured a little cheaty one wouldn't taste awful.  It worked for the melitzanopita.

Speaking of cheating, I knew this was going to be on the menu during the pantry challenge and bought the cheese before January 1st.  That was the only ingredient I didn't have beforehand, so technically the whole dish cost me $5.

The main orphan pantry item this is using is the fried onions.  When you buy the full-sized can and only make a half-batch of green bean casserole, it's on to find a use for them other than snacking before they get stale.  I've always put sautéed onions in my spanakopita, but this sounded like a great idea.

*1 sheet puff pastry, plus flour for rolling
*1 lb frozen spinach, thawed and drained
*1 C crispy fried onions
1/2 C crumbled feta cheese
1 egg, beaten
salt and pepper to taste
1 Tb melted butter

1.  Set puff pastry on a clean surface to thaw, about 30-45 minutes.

2.  In a bowl, stir together drained spinach, onions, and cheese.  My spinach wasn't very defrosted, and I didn't feel like getting another bowl dirty to microwave it.  Wasn't the end of the world, just made the filling more moist than I was expecting.  Add salt and pepper as desired, then stir in beaten egg so everything will bind together.  I tossed in the last tablespoon of pine nuts in the bag and half a teaspoon of chia seeds, but I'm not putting them in the recipe.

3.  Preheat oven to 425º.  Brush bottom of an 8"x8" casserole with some of the butter.

4.  On a floured surface, open the softened sheet of pastry.  It is 9" x 9", so you're going to end up with a bit of overhang no matter how it's rolled out.  Sprinkle more flour on top and roll out pastry to 9" x 16".  Or, if you're me, some weird configuration that yields an 9x8 square and enough trimmings to cover the top.  However it works for you, get a 9x8 square for the bottom of the dish and place it on top of the butter.

5.  Spoon the spinach filling onto the pastry bottom and spread to distribute evenly.  It's going to look like there isn't enough cheese, but this is a spinach pie, not a tyropita.  Top with remaining pastry, then brush the top with the remaining butter.

6.  Bake for 30 minutes, until pastry is cooked and filling is bubbly.  Let rest 10 minutes - or until no longer bubbling - before cutting into slices.

Difficulty rating  :)