Monday, March 29, 2021

Almond - Lemon Torte

When I was planning my Seder menu, chocolate for dessert just sounded too heavy.  So I found this fruity cake that met the requirements.  I'm not sure if it originated with Bon Appetit or Epicurious.  The recipes and directions are identical.

I've heard of olive oil cakes, but I've never made one that I remember.  The use of the oil in this case is to make the cake pareve (no meat or dairy), so it can be served with any type of meal.  Because of the matzoh meal, this is not gluten-free.  Kosher for Passover and Gluten Free are not synonymous, just frequently coincide.  You can probably sub potato starch for that restriction, but I haven't tried it or seen any comments advocating the substitution.

The original recipe had a strawberry sauce.  I chose to do blackberries because I like them better, and simply defrosted some without doing an actual sauce.  That way, I got some runny juice, which you don't get from fresh fruit unless you mash it.  A different day, I used some three-citrus marmalade, to enhance the lemon flavors of the cake.  Any fruit works.

Having Passover by myself, I did a 1/3 recipe in a 6" springform and accepted that there would be leftovers.  Scaling down the feast was a much easier task this year than last because I'd spent the year learning how much I eat.

There are three bowls involved in this recipe.  I tried to simplify the directions and reduce some dishes, but it really works best this way.  The portioning takes longer than the actual preparation.  Once all the ingredients are measured, you can start up the oven to preheat while mixing.

6 Tb olive oil, plus more for brushing
*4 Tb matzoh meal (cake meal ok)
*2 C almond flour
1 C sugar, divided
6 eggs, room temperature, separated
*2 tsp lemon zest
*2 Tb lemon juice
1 Tb orange juice
1/2 tsp salt
1/2 C sliced almonds

1.  Prepare a 10" springform pan by brushing the inside with olive oil.  Line the bottom with parchment and brush the parchment with a bit more oil.  Add 2 Tb matzoh meal to the springform and tap to coat, like you would flour on a cake pan.  Tap out any excess.  Preheat oven to 350º.

2.  In a small bowl, stir together almond flour, other 2 Tb of matzoh meal, and 1/3 cup of the sugar.  Get out any lumps that might have formed in the almond meal.  In a large bowl, whip egg whites and salt to soft peaks.  Add another 1/3 C of the sugar and beat to firm peaks.

3.  In the third large bowl, beat the yolks and last 1/3 C of the sugar until light and fluffy.  I had you beat the whites first so you don't have to wash the beaters in between.  I tried to do it in the stand mixer, but 2 yolks weren't enough to catch the whisk.  Not sure if it would work with six.  Add 6 Tb olive oil, lemon zest, lemon juice, and orange juice.  Beat until fluffy again and well mixed.  Stir in almond flour mixture until uniform.

4.  In three additions, add egg whites to yolk mixture.  The first, it's ok if the whites deflate.  You just need to loosen the almond batter.  For the last two, try to maintain a light texture.  Pour into prepared pan, smooth top, and sprinkle with the almonds.

5.  Bake for 40 minutes, until top is golden and set but edges are not dry.  If the center of the cake jiggles when you shake it, go another 5 minutes.  Allow to sit at room temperature until fully cooled.  It will rather disappointingly deflate a bit, but should not collapse unless it was underbaked.  Slide a knife around the edges before releasing the spring.  Peel off the paper slowly, in case it folded into the cake anywhere.  There's no frosting on this one, so you have to try not to crack it.

6.  Cake can be made ahead and left at room temperature up to 2 days.  I made it earlier than that, so I froze it and defrosted on the day.  After that, it lived in the fridge.

7.  Cake can be served as is, or with sliced fruit or a sauce made of half fresh and half puréed fruit.  For a dairy meal, you could sweeten up some mascarpone cheese with a bit of sugar and serve it with a dollop topped with fruit slices.

Serves 12 -16

Difficulty rating  :-0

Friday, March 26, 2021

Lamb Risotto

This is what I chose to do with this year's zeroa (lamb shank) meat.  I had one recipe of rice left in the bag of arborio I bought when things started to come back in stock last year, so it took out some chometz too.

The recipes I researched talked about using "leftover lamb" as the meat.  That doesn't happen in many households.  What I chose to do was buy cheap cuts like the lamb shank and neck slices and simmer them to remove the meat in shreds that fall off the bones.  In the process, you create a lamb stock that only needs to simmer with mirepoix and herbs another half hour to become a proper bone broth.  That becomes the risotto's liquid, so nothing is lost.

Between the wine, red onion, mushrooms, and dark bone broth, this risotto is going to come out looking "dirty".  You can lighten it a bit by subbing a white wine and chicken broth, but that will negate a lot of the depth of flavor.  I recommend serving it with something bright, like colorful vegetables or a side salad as a distraction.

2 lbs bone-in lamb cut of choice (suggest shank or neck), or 2 C leftover lamb
1 qt chicken, beef, or lamb stock, unsalted
*3/4 C dry risotto
*1 C diced red onion
5 oz sliced mushrooms of choice
1 Tb olive oil
*2 cloves garlic, minced
1/4 C red wine
salt and pepper to taste
parmesan cheese to garnish, optional

1.  If cooking the lamb, place pieces in a heavy pot with water to cover.  Bring to a boil, then lower heat to a simmer.  Cover and simmer for about 2 hours, until meat falls off the bones.  Remove pieces to a cutting board and pull off the meat in shreds.  Discard bones.  If desired, add mirepoix, bay leaf, rosemary, and other herbs to the liquid and simmer another half hour.  Strain simmering liquid through a fine-mesh sieve and transfer it to a saucepan on low heat.

2.  Wash out the large pot and put it back on the stove over medium heat.  In olive oil, cook onion and mushrooms until both are softened and well done.  The mushrooms will give off quite a bit of moisture as they cook down, but you don't have to boil it all off.  Add garlic and rice and cook until rice is toasted, about 2 minutes.

3.  If using, add wine.  Allow to absorb or boil off, then start ladling in broth one scoop at a time.  Stir frequently and wait for all of the liquid to be absorbed before adding the next ladle.  This is going to take a good half hour or longer, and you might not go through all the broth.  I kept the rest and made some soup.

4.  When the rice has softened and turned creamy, stir in the lamb pieces.  Taste and add salt and pepper as necessary.  Serve hot, with a dusting of parmesan if desired.

Difficulty rating  :)

Tuesday, March 23, 2021

Loaded Baked Potato Soup

Last of the 5 lb bag of potatoes.  One of them was starting to sprout a bit.  Also took care of some of the bacon in the freezer and half a bag of shredded cheese.  Oh, and I sneaked in the last of the chickpeas, even though they aren't in this posted recipe.  I really enjoyed the texture of the beans next to the potatoes, but you generally don't put them on a baked potato.

As the title implies, this soup includes baked potatoes.  I'm giving the recipe from scratch, but there's no reason you can't use leftover baked potatoes and bacon (is there such a thing?) and make the whole thing in 20 minutes.  It's essentially a fridge-clearing project, like many soups.

The recipe as posted includes sour cream, but you can sub plain Greek yogurt if you wish.  I had the dregs of a jar of garlic alfredo in the fridge and shook it up with the milk before adding to the pot.  It was pretty amazing.  The point of it as an ingredient is to thicken the soup, so any product which accomplishes that goal can be used.

*1-1/2 lb russet potatoes (2 large or 3 medium)
*8 oz bacon
*1 C diced onion
*2 cloves garlic, minced
1/4 tsp dried thyme
1 Tb flour
*1 C milk
*2 C unsalted chicken stock
*1 C shredded cheddar
1/2 C sour cream
salt and pepper to taste
*chopped green onion and extra cheese for garnish

1.  Preheat oven to 350º.  Scrub potatoes clean and place directly on baking rack.  Roast for 1 hour.  Remove with oven mitts and allow to cool until you can touch them.  Peel skins if desired and chop into bite-sized chunks.  If the potato is fully cooked, the skin should pretty much fall off.

2.  While potatoes are cooling, start the bacon.  In a wide, heavy bottomed soup pot, cook bacon over medium heat until as done as you like it.  I went extra crispy because I was also rendering off bacon fat to use for other things.  Remove bacon to a paper towel lined plate and reserve 1 Tb of the fat.

3.  Back in the pot, cook the onions in the bacon fat until softened, about 5 minutes.  Add garlic and thyme and cook 1 minute, until fragrant.  Add flour and cook into a paste.

4.  Gradually add milk, allowing it to thicken before continuing.  Add in stock and bring to a simmer, stirring often to keep the milk from scorching.

5.  Crumble or chop bacon and add to the pot.  I was tempted at this point to just leave it as cream of bacon soup, but I did have three potatoes baked and chopped up.  Stir in cheese and sour cream until melted and smooth, then fold in potatoes.

6.  Taste the finished soup and add salt and pepper as necessary.  Ladle into bowls and serve hot, garnished with more cheese and green onion or chives to garnish.


Difficulty rating  :)

Saturday, March 20, 2021

Spinach and Lentil Curry

While I am once again getting regular paychecks, I'm still working through items in the pantry to prepare for Passover.  Less to pack up.  Included in this eat-down are beans, rice, and pulses.  There's zero chance of actually finishing all of it, but the box won't weigh as much.  There's going to be a major restock trip once Passover is done, but that haul will hold me for months.

This marks the first time I was able to do a curry by just winging it and not writing the recipe beforehand.  I've finally gotten the process down to where it feels natural.  It's pretty easy when you're not constantly looking at a recipe, but I did write it down afterwards so I wouldn't forget.  The "hard" part of any curry is gathering the ingredients.  Once you have the spice mix memorized, it comes together quickly.

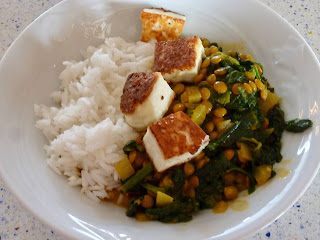
The vegetable stock was made with the whey from the paneer.  I felt like the flavors didn't transfer to the liquid as well as they do with water.  It could have to do with the fat and protein content of the whey or other factors I don't know about because I didn't actually do much research before trying it.  Well, it was worth a try and at least I didn't just pour the whey down the drain.

1 Tb olive oil
1/2 tsp cumin
1/2 tsp turmeric
2 tsp curry powder
1/2 tsp salt
*1 C finely diced onion
*2 Tb tomato paste
*1 tsp grated ginger
*1 tsp minced garlic
2 C unsalted vegetable stock
*3/4 C brown lentils, sorted
*1 can light coconut milk
2 C frozen or 4 C fresh spinach
*2 tsp lemon juice
rice and fried paneer for serving

1.  In a wide saucepan or skillet with a lid, heat oil over medium.  Add spices and heat until fragrant and pasty, about 2 minutes.  Add onion and cook until it softens, about 5 minutes.  Add tomato paste, garlic, and ginger and cook 1 minute, until fragrant.

2.  Stir in vegetable stock and lentils until mixture combines.  Bring to a low boil.  Cover, reduce heat to low, and simmer until lentils are tender, about 25 minutes.  About halfway through, start your rice.

3.  Once lentils are splitting, uncover and add coconut milk and spinach.  Cook until curry returns to a low boil.  Taste and add more salt if needed.  Finish with a splash of lemon juice and serve hot over rice.

Difficulty rating  π

Wednesday, March 17, 2021

Paneer


The first time I decided to make palak paneer, I couldn't find the cheese.  I postponed the dish until I did find some.  More recently, Techie Smurf mentioned making his own.  Soon after, Elizabeth Ingram made it for an episode of Quarantine Quitchen.  So I decided to investigate.

The recipes I found are exactly the same as the one I posted for cottage cheese.  They simply go a step farther and press the cheese into a block, which also removes more of the whey than simply straining it.  It isn't any more time-consuming and produces a block of Farmer's Cheese ready to pan-fry.

Unlike my other recent from-scratch recipes, making paneer yourself is definitely cheaper than buying it.  A quart of whole milk makes at least 5 oz, and 8 oz was $6 at the market.

I'm following the method from Swasthi's Recipes.  I made a smaller batch than her posted recipe, and I'm adding a touch of salt.  It's easy, not overly time-consuming, and definitely something I will consider making again.

1 quart whole milk
1/8 tsp salt
2 Tb (1 oz) apple cider vinegar

1.  In a heavy saucepan over medium heat, warm milk and salt.  Stir often at first, then almost constantly as the temperature gets above 150º, to reduce scorching.  The reaction works as low as 145º, but I recommend getting the milk to 200º, slightly below boiling.  The molecular structure of milk changes at this temperature and makes it conducive to all sorts of cheese and yogurt making.  Also, if you're mildly but not completely lactose intolerant, this will make it easier to digest the final product.

2.  Remove the pot from the heat and stir in the vinegar.  Continue to stir for 1-2 minutes as the curds separate from the whey.  Allow mixture to sit about 5 minutes, then stir a bit again, just to make sure all of the curds have separated.

3.  Place a cheesecloth or muslin over a strainer which is set over a bowl.  Pour the whole contents of the saucepan into the strainer.  Allow to drain for a minute, then remove the strainer to the sink and run cold water over the curds to remove any remaining vinegar.  I've always thrown out the whey at this point, but it seems like such a waste that I quickly searched uses for it.  I ended up saving it to be the liquid in the vegetable broth I was making the next day, since making it vegan wasn't necessary.

4.  Wrap the cloth around the curds and squeeze out as much whey and water as possible.  Make a bundle with the cloth and hang it for 30 minutes to allow more water to drip out.  I hung it over the kitchen faucet.

5.  The next step is pressing.  Twist the cloth so the cheese inside is a disc.  Place on a draining board or back in the sieve.  Place a cutting board or skillet or some other heavy, flat item on top of the bundle.  Then put several pounds of something on top of that.  Allow cheese to press (room temperature is fine) for about 2 hours.  This should get as much liquid out of the cheese as possible, so it can be unwrapped without crumbling.  There will be a dent from the cloth, but it shouldn't be so deep that it makes the block fall apart.  At this point, you can cut and use the cheese immediately or store for 2-3 days.

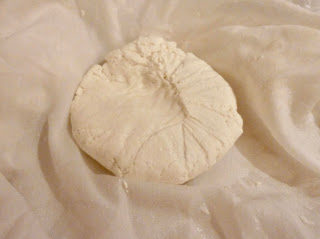
6.  For troubleshooting issues, I refer you to the photo at the top of the post.  One small part of the block was not twisted tight enough.  Those curds crumbled when I cut it.  There's nothing wrong with them; you can sprinkle them over your dish.

7.  Paneer has the cool (for cheese) property of not melting.  It cuts and fries like extra-firm tofu.  Or you can have it cold, which tastes like dry cottage cheese.  Up to you.

Makes about 5-6 oz

Difficulty rating  π

Sunday, March 14, 2021

Prepping vs Hoarding

Day One of the Blog
It's time for the annual Passover cleaning and sorting of the pantry, fridge, and freezers.  It only takes one day, but I always stress over it.  Cleaning the fridge shelves before food gets warm is the hardest part.

This is also the one-year anniversary of the grocery panic at the start of the pandemic, at least in my area.  The shortages made me rethink my buy-everything-fresh mentality.  I still did not want to get to the place I started when I began this blog.  Dozens of Prepper videos later, I think I have a system in place to prevent hoarding.  Actually, I know I have a system since having to quarantine.  I went two weeks between shopping trips and only ran out of bananas.  The fresh milk came out even, but I do have powdered in the pantry.  I still had a few days of meat in the freezer and weeks of non-meat proteins.  I was not out of frozen vegetables.  And I was still making blog-worthy meals.

So what's the difference between Prepping and Hoarding?  In my opinion, it has to do with planning.  Hoarders buy everything that looks like they might use it someday.  Preppers might buy the same amount, but they know how much they have and when they're going to use it.  Before it goes into the cart, there's a plan.

1.  Set Goals.  What do you hope to accomplish with your pantry?  Is it for natural disasters, security if there are money issues, illness, product shortages, coming up on retirement?  You can have more than one reason.  My goal for food was to manage two weeks if I was stuck home with Covid or my shop closed and I needed to stop spending money until I had a new paycheck.  Both happened simultaneously, so I didn't need to do that twice.  Whew.  Separately, I decided to carry about four months of paper goods, toiletries, and cleaning supplies in case of new shortages.  Some people want to have more on hand than that, but I live in a large metropolitan area in a temperate climate and have seen what shortages around here look like.  You can still get something, at least as long as no one hoards toilet paper.  It might be zucchini, but it's there.

2.  Learn what you Have.  Inventory is key, and what my mom never did.  She would buy something with no idea if she already had too much (wax paper, pimientos), then shove it in a random spot in the pantry, fridge, or freezer, not next to anything of its kind, and often not labeled.  Definitely not labeled with a purchase date.  I'm guessing that there was no such thing as a shopping list.  I don't remember ever seeing her with one.  I'm big on grocery lists.  I have one for perishable weekly shopping, and the "Target" list with items that can wait until I hit the restock point on something.  I don't actually always go to Target for those items, it's just called the Target list so I can draw a bullseye instead of writing out the word.  During the height of pandemic shortages, it was called the Wish List.

3.  Learn what you Use.  Don't buy stuff Just Because.  If you aren't a canned tamales person, don't buy them "just in case".  Only buy foods you like and eat often enough to rotate.  Yes, there should be some items to get you through a 3-day emergency, but you probably don't need as much as you think.  If the power is out in just your neighborhood, you can Uber Eats a hot meal, or go get it yourself.  Road closures due to weather are generally less than a week, and you probably will have power for most of it.  But you can't get cough syrup and a few other OTC cold remedies delivered due to legal restrictions, so make sure you have enough of those to handle a quarantine.

4.  Organization.  An itemized inventory, including purchase and best-by dates, is useful if you are prepping for 3+ months or keep items in multiple locations.  My 2-4 weeks of foodstuffs can be kept in a single place.  I only inventory my spices, since the collection is a bit unwieldy.  Part of this organization is being aware of FIFO: First In, First Out.  Always rotate new items behind older purchases, like they do in the grocery store.  I do that with my home-canned jams, even different varieties.  Right now, if I want the marmalade I made in January, I have to reach behind jams with a July expiration.  It makes you think twice.  It also keeps me from extra jamming sessions until I have somewhere to put the product.  Try to keep like items together in the pantry: soups, canned meats, pasta next to the sauce, oils and condiments near each other, baking supplies on the same section of their shelf, etc.  A disorganized pantry leads to hoarding and spoiled food faster than any other issue.

5.  Establish Par Levels.  A par level is an inventory management device.  It helps you estimate how much you need until the next restocking interval.  Generally, you want to keep about 10-15% more on hand than you think you need, in case of delays or product shortages.  Let's say you go grocery shopping every Friday.  Your par level for eggs would be whatever you need to make it until the following Saturday, in case something comes up and the trip to the market is delayed.  For something longer term like laundry soap, it's a learning process.  What I did was write on the package the day I opened it.  When it ran out, I knew that the large jug takes me about 8 months to use.  For a household with five people and a dog, that time would be significantly less.  Once you know how often you go through an item, you can make an informed choice how much to stock to meet your preparation goals.  This is when you establish your resupply point.  Maybe it's when you open the last of an item, or even halfway through it.  Maybe you need two - or more - unopened on the shelf.  It depends on your goals and usage.

6.  Routine Cleaning.  At least once a year, take everything out of the pantry/ shelving/ fridge/ freezer and examine it for spoilage.  Clean the shelves, defrost the freezer, and make that tough choice to toss or donate something that you are never going to use.  Or, do a Pantry Challenge week to get rid of anything that seemed like a good idea at the time and make a note - on actual paper - never to buy it again.  It's a waste of your time and money to store something that ends up in the trash.

7.  Learn from Experience.  Not only your own experience, but what has happened elsewhere.  The aftereffects of the storm in Texas and an essay by seismologist Dr. Lucy Jones convinced me to stock a little more water than I've been.  I'm not a bottled water person, but one gallon a day for a week is a reasonable amount to keep on hand if the San Andreas breaks.  In colder climates, various forms of non-electric heating might be a priority.  Evaluate how likely you are to need something if a certain type of emergency happens.

Whether you carry an inventory of one week or one year is a personal choice.  Neither is wrong if it works for you.  My problem a year ago was that it was no longer working for me because the world had changed.  By necessity, I changed to match the new reality.  By creating a personal set of guidelines, I avoided hoarding food and goods while still providing for a possible 2-week emergency.

I've already finished my Passover shopping, except for perishables.  That was done two weeks ago, and is sitting in a box waiting for the great pantry rearranging.  I did get stuck with the 5-pack case of matzoh.  Why won't they sell it by the single box?!  That is the only thing in the pantry that I would count as hoarding.  Unavoidable, inconvenient hoarding.


Thursday, March 11, 2021

Gnocchi for Passover (GF & Vegan/Pareve)

I bought a 5 lb bag of potatoes, even though I only needed about 3 lbs.  It was still cheaper than the per-pound price, and I wanted smaller potatoes to make potato nachos.  That left me with 2 lbs of potatoes to play with, far less than the giant bag I ended up with a year ago, but still food that I didn't want to go to waste.

Most of the comments in the recipes I searched complained that the dough wasn't holding together with matzoh cake meal and potato starch.  More than one said you could only taste the matzoh meal, which is usually my complaint because I don't really like the stuff.

I reran the search with the word tapioca in it and found much better recipes.  Tapioca is one of the main ingredients in vegan egg replacers, so I knew it would be an asset to the recipe.

The main problem with this recipe is its gluten-free-ness.  You can't roll the ropes.  The best you can do is squish cylinders the width of your palm and cut those.  You also can't roll them over the tines of a fork.  You could probably press the back of a fork onto the pieces on the work surface, but I was pretty hungry by that point and just wanted them in the water.  As soon as they boil, the tapioca firms up the mixture and you get your pasta.

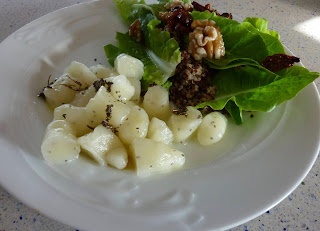
One thing you don't get with these is a whole lot of nutrition.  That's why there's a giant quinoa salad next to the finished product.  I added a teaspoon of chia seeds to the dough to keep them from being empty calories, but they do nothing for the taste so I'm not posting them as an ingredient.

*1 lb yukon or russet potatoes
1/2 tsp salt
*1/4 C potato starch
*1/4 C tapioca starch
water as needed
olive oil
sage, basil, or other herb to flavor the sauce

1.  Preheat oven to 375º.  Scrub potatoes clean and place directly on the oven rack.  Bake 1 hour to 75 minutes, until potatoes are easily pierced with a fork.  Wearing oven mitts or a doubled towel, remove potatoes to a work surface.

2.  Slice potatoes open and allow to cool slightly.  Scoop the flesh out of the skin.  Discard or snack on skins.  Run flesh through a food mill or potato ricer.  I didn't feel like cleaning the food mill and processed it pastry cutter-style with a fork.  Work in 1 Tb of oil.


3.  Separately, stir together both starches and salt.  Add to potatoes and work into a crumbly dough.  Add water 1 Tb at a time until you can get it to stick together in clumps.

4. Boil a large pot of water, at least 2 quarts.  On a work surface, form dough into ropes 1/2" thick.  Cut ropes into "pillows" about 3/4" long.  If your dough is sticky enough, try to get ridges by lightly rolling the backside of a fork crosswise against the pillows.

5.  Add the dough pieces to the boiling water.  Once they float, cook another 2 minutes.  Drain.

6.  For a sauce, heat 1/4 C oil in a small saucepan with fresh herb of choice.  Drizzle over finished pasta and serve immediately.


Difficulty rating  :)

Monday, March 8, 2021

Applesauce for Canning

I haven't bought canned applesauce in a long time.  I don't really use much at once, and the rest just goes bad.  I suppose I could get those little single-serve cups, but it seems like a waste of packaging.  I just make some out of an apple or two, which I always have in the fridge, whenever I want some.  Yes, it's a bit of work and I have to clean the food mill after, but it's enough for what I want.

Coming up on Passover, I decided to make enough for the week.  I was doing the ketchup, and figured I could make a batch of applesauce while that boiled down for an hour.  Might as well use the food mill for more than one thing as long as I'm washing it anyway.  The recipe out of the Ball book is basic and easy to do the math for a smaller batch.

As with the ketchup, this isn't going to save you money.  A 3 pound bag of Gala apples at my market runs $4, slightly more than a quart jar of brand-name applesauce on the shelf.  Plus, you're putting an hour of work into this.  The main benefit of canning your own is to control the ingredients.  I'm doing this specifically to make it KLP.  Others might can their own to ensure it's organic, or for food allergies, or just because they prefer the taste.

When you make applesauce for canning, you must add lemon juice.  You can't rely on a consistent acidity in the apples to make them safe.  As a result, you get a better product if you add at least a little sugar.  I chose honey, but I only added a tablespoon to offset the lemon juice.

To add a whole spice to your applesauce, put the cinnamon stick or star anise in the water while the chunks are simmering.  Ground spices can be added after the run through the food mill.  And if you don't have a food mill, you're going to have to peel your apples so they can go into the blender or food processor.  Sorry.


3 lbs apples of choice.  I prefer Gala.
3/4 C sugar, or to taste
*1 Tb lemon juice
spices as desired

1.  Peel, core, and quarter apples.  Peeling is optional if you're using a food mill, but your applesauce might take on a pink tint with some varieties.  Treat to prevent browning with a commercial citric acid or lemon water.  Place apple quarters in a non-reactive saucepan and add enough water to prevent them from sticking to the pot.  Bring to a boil over medium-high heat.  Reduce heat and boil gently, stirring occasionally, until tender.  This will take anywhere from 5 to 20 minutes, depending on type and size of apples.  Remove from heat and allow to cool 5 minutes.

2.  While the apples are simmering, prepare a canner, jars, and lids for a 1 quart yield.

3.  Working in batches, transfer apples to a food mill or food processor fitted with a metal blade.  Process until smooth.  For the food mill, you can choose which plate you would like for the desired chunkiness.

4.  Return apple purée to saucepan.  Add sugar, if using, and lemon juice.  Bring to a boil over medium-high heat, stirring frequently to prevent sticking.  If too thick, thin with a bit of water or apple juice.  Too thin, allow to reduce 5 minutes.  Maintain a low boil while filling jars.

5.  Ladle hot applesauce into hot jars, leaving 1/2" headspace.  Remove air bubbles and adjust headspace if necessary.  Wipe rims, center lids.  Screw bands down fingertip tight.

6.  Place jars in canner with water to cover by at least 1".  Bring to a boil and process for 20 minutes.  Turn off heat and remove canner lid.  Wait 5 minutes before removing jars to reduce the risk of siphoning. Allow to cool completely before removing bands.  Check seals, wipe jars clean, and store in a cool, dry place.

Makes 1 quart

Difficulty rating  :)

Friday, March 5, 2021

The Wall of Spices

If you've followed my blog for a while, you've witnessed my periodic overhaul of my spice cabinet.  The main problem is that I have a wide variety of herbs and spices, which seems to increase every time I discover a new cuisine.

This shot is me looking up at the cupboard.  I'm really that short.  I can only reach the bottom shelf without a step stool.  The top shelf is step ladder territory, which is why I've stopped keeping anything on the top shelves in the kitchen.  It's also a de-hoarding thing.  Even with the jars as close to the front as possible, and all the chai-related spices and some extracts on top of the oven, I was often knocking them over, sometimes into whatever I was cooking.  It's amazing none of them broke.

I saw a YouTube video of someone who built a rack on a wall to keep his spices.  I loved the idea, but didn't feel like building a rack.  Instead, I found an over-the-door rack at Target with edged shelves that was intended for pantry use.  I built it and put it up in less than an hour.  It looked great.

Then I went to close the door, and realized my pantry door is fitted too well to do an over-the-door mount. Plus, it really should have been supported by additional screws and not earthquake putty.  I didn't want to put holes in the door.

That bit of wall to the left of the pantry was wide enough for the shelves and deep enough not to run into the baskets.  It didn't have the height clearance for all of the baskets, but I could squeeze 7 of 8 onto the rails.  I asked Neighbor Smurf to bring his drill and a level, so we could use the wall-mount hardware option.

Now my spices are organized by type and/or use.  All the things you would normally use for baking are on one shelf, broths and pickles on another, herbs are together, etc.  The bottom basket is backups, and I changed the spice box in the pantry into one for cookie/granola mix-ins.

Since it's a bit of a walk from the wall to the stove, I picked up little rubber organizers.  I can put all the items I need in one and take them to the stove at the same time.  They live on the top shelf.

The major change I made from the original plan was where to put the extracts.  They should always be stored away from light, so they ended up in the old spice cabinet.  That makes sense anyway, since they're usually the last thing added to a recipe.  Store-bought are in one pull out basket, small homemade are in another, and the large vanilla bottles get their own row.

One thing I did not change was keeping the spice inventory inside the cabinet door.  Even with all the jars out in the open, I don't want to take the chance of missing an item and buying it prematurely.  That's partly how I got into this mess in the first place.

Tuesday, March 2, 2021

Chocolate Banana Cream Pie


This started as a way to put something into a store-bought graham cracker crust.  Because I still have way too much in my pantry.  I've been thinking of doing banana pudding, but it makes such a huge bowl.  This brought things down to a more manageable quantity.

But I've already done a banana cream pie and a chocolate silk, so this had to be a little different.  Filling the non-banana spaces with chocolate pudding sounded like an awesome idea, so that's what happened.

I can't express enough how much I missed bananas when I was in quarantine.  I ran out maybe two days into it.  Honestly, I think a lot of the muscle cramps I was attributing to the virus were a nutritional deficiency from not eating bananas.  The pains disappeared the day after I went grocery shopping and got a hand of slightly green ones.  I don't like overly ripe bananas.

You do need to let them ripen for this recipe.  Not to banana bread black, but mottled enough that they slice without any snap.  There should be some sugar development to complement the chocolate.

2/3 C sugar
*1/4 C cornstarch
*1/4 C cocoa powder
1/4 tsp salt
2 C milk
1/2 C chocolate chips
1 tsp vanilla
*2 ripe bananas
*1 graham cracker pie crust

1.  In a medium saucepan, whisk together sugar, cornstarch, cocoa, and salt.  Stir in milk and let it sit for about 10 minutes to work out the lumps.

2.  Once the big lumps are soaked out, place saucepan over medium heat.  Stir constantly to prevent scorching until thickened, about 10 minutes.  Remove from heat.  Stir in chocolate chips and vanilla.  Stir frequently while you're preparing the bananas, until the chocolate melts.

3.  Slice the bananas 1/4" thick.  Arrange slices on the bottom of the crust, reserving some for decorating.  Pour pudding on top of bananas and smooth if necessary.  Arrange reserved slices on top and cover with plastic wrap touching the surface.  Refrigerate until set, about 4 hours.

4.  Serve cold, with whipped cream if desired


Makes 1 pie, about 8 servings

Difficulty rating  π