Friday, October 30, 2020

Navy Bean and Artichoke Casserole


I was feeling guilty about eating more meat than usual and went in search of a bean casserole.  Don't Google "bean casserole".  All you get is green bean casserole recipes.  You have to get a lot more specific. What I finally found was this one, which seems to be from the Weight Watchers cookbook.  Really, with all that cheese?  It's still only 7 points according to the blog I'm choosing to follow.  I can't seem to access the original WW link.  Maybe it only exists in that one cookbook.

Actually, this is probably less than 6 points because I'm cutting it in half and calling it 4 portions instead of 3.  This casserole could be a vegetarian main dish, or feed twice as many as a side.

Important note on the artichokes.  Don't get marinated or grilled.  You're looking for artichokes canned in only water, or frozen artichoke hearts.  The market has been out of those since the March frenzy.  Sprouts was also out of the store-brand canned arties and I had to get the expensive ones.  Now I have to find a use for the rest of the jar before they spoil.  Probably salad.

This casserole is all about the herbs.  Beans really don't taste like much, and it's sparing on the goat cheese.  If you don't like one of the herbs in the recipe, sub in something else instead of omitting it.

The main complaint online was mushy beans.  I went from dry and it wasn't an issue.  It all depends on how much time you have.

The next biggest complaint was the number of dishes:  food processor for the breadcrumbs; skillet for the artichoke mix; bowl for the bean mix; casserole for baking.  It isn't incorrect, but I had everything washed while the casserole was in the oven.  If you're going from canned, this is a fast recipe and the dishes are more involved that the food itself.

1/2 C whole wheat breadcrumbs (*1 slice, through the processor)
1 15 oz can Navy beans (or 3/4 C soaked and simmered 90 minutes)
*1/4 tsp each dried thyme and sage
pepper and salt to taste
*2 cloves garlic, minced
1 Tb olive oil
2 leeks, white and light green parts thinly sliced
*1/2 tsp dried rosemary
1 C artichoke hearts, either defrosted or canned in water
2 oz goat cheese, crumbled

1.  Drain beans and reserve 1/2 C liquid.  Works the same with canned and cooked.  In a bowl, combine drained beans, thyme, sage, and 1/2 tsp minced garlic.

2.  Heat oil in a medium skillet over medium heat.  Add remaining garlic, leeks, rosemary, and a touch of salt and pepper.  Cook until leeks start to soften, about 5 minutes.  While that's happening, cut any larger pieces of artichoke to bite-sized.  Add artichokes and the reserved bean water to the leeks.  Lower heat to a simmer and allow to cook while you preheat the oven to 400º.

3.  Lightly spray a 2 quart casserole or 8x8 baking dish with pan spray.  Spread half of the beans on the bottom.  Follow with half of the crumbled goat cheese.  Pour in the entire leek-artichoke mixture, then the rest of the beans.  Top with the rest of the goat cheese, then sprinkle with the breadcrumbs you forgot you made like half an hour ago.

4.  Bake for 20 minutes, until crumb topping is nicely browned.  Allow to rest about 10 minutes before serving, so it doesn't burn any mouths.  When you spoon it out, it's going to fall apart anyway because there's nothing sticky in it.  Baking in individual 2-cup ramekins or soup crocks is an option.

Difficulty rating  :)

Tuesday, October 27, 2020

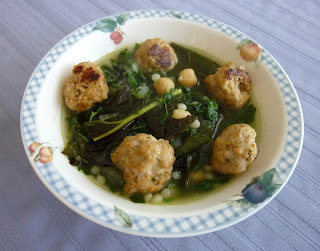
Turkey-Meatball and Spinach Soup

 I was going to call this "Sphere Soup" because that's how I was thinking about it, but a dish should really be named after its key components.  Of all the things I put in here, the meatballs and spinach are what you taste the most.

This soup got its inspiration from a Quarantine Quitchen.  Elizabeth made a black bean and sweet potato soup with Cuban influences.  I changed the black beans to chickpeas, ham to turkey meatballs, and it kept going from there.  So nothing like the original soup, which sounded good, but I'd had sweet potatoes recently.

Israeli (pearl) couscous is kind of pricey and hard to find.  Try the kosher aisle or where they keep the fancy rice and pasta.  I almost used small shells, but I was laughing at the idea of all the chewable ingredients being spherical.

While this soup is simple, it does have a lot of elements and more than a pot and cutting board to clean.  Sorry.  It's also a main dish soup, and much lighter than it sounds.  I lost some weight that week, despite the pasta.

1 lb ground turkey
*1/8 tsp ground pepper
*1/2 tsp paprika
*1/2 tsp cumin
*1/4 tsp celery salt
*1/2 tsp parsley flakes
*1/4 C breadcrumbs
1 qt unsalted chicken stock
1 Tb olive oil
*1/2 C diced onion
1 15 oz can chickpeas
2/3 C dry Israeli couscous or 3/4 C another small pasta
1 10 oz package (brick) frozen chopped spinach
salt to taste

1.  In a bowl, combine breadcrumbs and spices.  I actually used 1/4 tsp of black pepper and it was too much, so I'm cutting it for the post.  Knead spice mixture into the ground turkey.  Cover and refrigerate while you get other things started.
2.  Drizzle oil in a soup pot and heat over medium-high.  Add onions and cook until softened, about 5 minutes.  Add stock, chickpeas, and the spinach brick.  It's ok if it's still frozen, since you have almost half an hour to simmer the pot.

3.  Preheat oven to 350º.  Roll turkey mixture into 1 Tb balls (half-ounce).  It should give you 32.  Arrange on a foil-lined, rimmed baking sheet and cook for about 20 minutes, turning sheet halfway through.


4.  Bring 2 C of water to a boil in a saucepan.  Add pasta and cook until not quite done, since it will continue to cook once added to the soup.  Drain, rinse, and add to the soup pot, which should be boiling by now.  Lower heat to a simmer while you wait for the meatballs to finish.

5.  Add cooked meatballs and stir.  I also chopped up and added the last of the roasted cauliflower leaves, so mine has extra greenery in it.  Carefully taste and add salt if needed.  Ladle into bowls, dividing up the meatballs, and serve hot.

Difficulty rating  :)

Saturday, October 24, 2020

Oatmeal Scotchies

 I don't have a chocolate chip cookie recipe on this blog because I use the Tollhouse one and anyone can look it up.  I bought Nestle butterscotch chips and this recipe was on the back.  Since it's a less well-known recipe, I decided it was worth sharing and linking to the source.

Being a newer recipe than the century-old Tollhouse one, the directions have you portion out the dough into rounded tablespoons instead of teaspoons.  It also suggests you "enjoy one cookie with a cup of nonfat milk for a snack".  Like that's going to happen.

The comments online show that this recipe is kind of fussy.  If you use margarine, don't soften it first.  That's only for actual butter, and only to 65-70ºF.  Then it goes into humidity levels.  None of the comments indicate if there's a difference between instant and rolled oats in consistency.  For the record, I used rolled.  It seemed to make a difference if they were baked on the bottom or middle rack of the oven; bottom was better for shape, but I liked the look of the oats on the middle rack.  I have an electric oven and was not using the convection setting.  If you're having trouble with this recipe being too "lacy" and thin, try adding 2 Tb of flour to the dough and you'll just get a couple more cookies out of the batch.

I made a one-egg half batch for myself, but there's baking math involved so I'm going to post the full recipe.

1-1/4 C flour
1 tsp baking soda
1/2 tsp salt
1/2 tsp cinnamon
1 C (2 sticks) butter, softened
3/4 C granulated sugar
3/4 C packed brown sugar
2 large eggs
1 tsp vanilla or grated peel of 1 orange
3 C quick or old-fashioned oats
1-2/3 C (11 oz package) butterscotch chips

1.  Preheat oven to 375ºF.  In a small bowl, combine flour, baking soda, salt, and cinnamon.

2.  In a larger bowl or stand mixer with the paddle, beat butter, both sugars, eggs, and vanilla.
3.  Beat in flour mixture gradually.  Stir in oats and butterscotch chips.
4.  Portion onto ungreased baking sheets by rounded tablespoons.  Bake for 7-8 minutes for chewy cookies or 9-10 minutes for crispy cookies.  Cool on baking sheets for 5 minutes, then remove to wire racks to cool completely.

Makes about 4 dozen cookies
Difficulty rating  π

Wednesday, October 21, 2020

Tomato-Basil Socca


I was making space in the freezer and found the last little bit of a bag of garbanzo bean flour.  Yes, I keep it in the freezer.  I keep just about anything ground in there and whole nuts.  The open bag of all-purpose flour is the exception, and that's mainly so it doesn't get knocked over.  Prevents infestations in the pantry, and high-fat items don't go rancid.

There was half a cup left when I measured it, enough for a two-serving socca.  Earlier that morning, I was lamenting that some of the basil was starting to bolt again.  Mentally evaluating my refrigerator, I came up with this at the market and only needed a couple of Roma tomatoes.

Blogger has made some recent changes.  They are intended to make the posts easier to compose and read on a smartphone.  I had a huge rant written for this post about how nothing works and the formatting sucks.  When I came back the next day to add photos, most of those problems had been fixed.  It isn't quite as good as the old program, but it's slowly getting there.  I must not be the only person who was shopping for a new blogging platform.

For the sake of the blog, I'm posting this as a 10", four-serving recipe.  The photos will be the smaller one I actually made.

*1 C garbanzo bean (chickpea) flour
1 C water
3 Tb olive oil
*1/2 tsp dried rosemary
*1/2 tsp parsley flakes
*1/2 C fresh basil leaves
*1/2 C diced red onion
salt to taste
2 Roma tomatoes, diced
plain yogurt for garnish

1.  At least 2 hours ahead, stir together garbanzo bean flour, water, 1 Tb of olive oil, rosemary, a touch of salt, and parsley flakes.  Allow to sit at room temperature up to 8 hours.  This is similar to pre-soaking dried beans.
2.  Finely chop the basil and add to the batter with the diced onion.  Stir to combine and let sit while you preheat the oven.

3.  Preheat oven to 450º with an oven-safe 10" skillet in it.  When oven is to temp, pull out skillet WEARING OVEN MITTS and place on a stove burner.  Add about 2 Tb oil to the pan and swirl to coat the bottom.  Add more if necessary.
4.  Add batter to pan and swirl to distribute evenly.  Enjoy the aroma of the basil starting to cook.  Immediately place skillet back in the oven and cook 20-25 minutes, until top is set and looking dry, and edges are browned.

5.  Carefully remove socca from skillet onto a work surface and cut into wedges.  Plate and sprinkle with diced fresh tomatoes and a dollop of plain yogurt.  Serve hot or room temperature.  I had it with pao de queijo and pickles on the side, including the pickled celery.

Difficulty rating  :)

Sunday, October 18, 2020

Pumpkin Pancakes

As much as I rant against all the hoarding this year, I kind of hoarded canned pumpkin.  Instead of the one can I usually buy in the Fall, I ended up with three.  Maybe it's because it is the first Fall in my memory that we haven't done any pumpkin-flavored items at work.  I'm in a bit of withdrawal.  However, the bathroom scale is grateful that I'm not putting a 600-calorie frosted pumpkin muffin out of its misery 2-3 times a week.

While I've done pumpkin waffles on this blog, I guess I haven't done pancakes.  Maybe I've just been eating them at IHOP.  Haven't treated myself to breakfast out since February, which is a long time to go without someone else making the pancakes.

The recipe I chose to post here is from The Salty Marshmallow, which is a really cute blog name.  I'm posting a half-recipe, to adhere to my 4-serving convention.  My pancakes must have been a lot smaller than hers, because I got 19 out of the half recipe, while her full one made 12.  I'm just calling the batter 4 servings, and you can decide how big to make the pancakes.

I used my cinnamon extract instead of vanilla, just for the heck of it.  It isn't strong enough yet, because these were not overwhelmingly spiced.  Use whatever kind of extract you like with pumpkin.

1 C flour
1/2 Tablespoon baking powder
1/2 tsp salt
*3/4 tsp cinnamon
*1/4 tsp ground ginger
*1/4 tsp ground nutmeg
2 Tb butter, melted and cooled
2 Tb granulated sugar
2 Tb brown sugar
1/2 tsp vanilla extract
1/2 C pumpkin purée
1 egg
*3/4 C milk
oil for pan

1.  In a large bowl, whisk together flour, baking powder, and spices.  In a separate small bowl, whisk together butter, both sugars, extract, pumpkin, egg, and milk.  Stir wet into dry until just combined and set aside for 5 minutes, to hydrate.
2.  Start preheating a nonstick griddle over medium-high heat.  The original recipe used pan spray, but I like to oil my pans because pancakes are really slightly fried.
3.  When hot, pour pancake batter onto griddle.  I like my pancakes silver-dollar size, about 2 tablespoons.  1/4 cup is still easy to flip.  Cook until tops set up, about 5 minutes for the first batch and 3 afterwards.  Flip pancakes and cook the bottoms for about 2 minutes.  This is when you're really going to notice them rise.
4.  Serve hot, with a drizzle of maple syrup and more spices if desired.  To keep the whole batch warm and serve at the same time, set the oven to 200ºF and keep them on a covered oven-safe platter until ready.

Difficulty rating  π

Thursday, October 15, 2020

Roasted Cauliflower Leaves

After all this time, all my three cauliflower plants have put out is leaves.  The healthiest is growing leaves two feet long, green, and lustrous.  I trim them off periodically and toss them in the greens bin.

One day while trimming them, I noticed that they smell almost like cabbage.  I went off to Google if you can eat cauliflower leaves, and it turns out you can.  Since they're always trimmed at the market, it never occurred to me that they could be a thing.

Now, getting the leaves might be hard if you don't garden.  I would suggest asking at a Farmer's Market or a grocery store that has open heads, not the ones pre-packaged at the farm.  Someone must trim the leaves so you don't have to pay for their weight.

These leafy greens seem to be most popular online as roasted into chips, like kale chips.  The stems didn't roast to the point I could chew them because I cut the pieces too big, but they are theoretically edible when roasted.

One recipe on Serving Tonight came with an aioli-style dip.  It sounded good, and would also go with the kohlrabi fritters, so I whipped it up and will add it here.
*leaves from 1 head of cauliflower (way less than I used)
1 Tb olive oil
salt and pepper

1.  Thoroughly wash leaves and chop into 2" pieces.  I left mine about 6", and they did get a bit unwieldy, as well as hard to chew.  Toss in a bowl with oil and salt & pepper to taste.
2.  Preheat oven to 425º.  Spread pieces on a baking sheet.  Bake for 10 minutes, toss, and bake another 10, until crisp.  While that's going on, make the dipping sauce...

*1/2 C mayonnaise
*1 clove garlic, grated
1 tsp lemon juice
kosher salt to taste

1.  Whisk together all ingredients.  Allow to chill until leaves are ready.

Serve leaves with aioli on the side.  These do not keep for the next day, so only make what you can finish.

Difficulty rating  π

Monday, October 12, 2020

Kohlrabi Fritters

So, sometimes I Google random recipe ideas, not expecting anything.  There are quite a few recipes for these out there!  A less-starchy alternative to a potato pancake, kohlrabi fritters are really good for you up to the frying part.

This recipe from Cooking Light likens them to latkes, which is why I picked it.  It's very basic, and there's nothing wrong with that.  I'm giving it a Passover label because you can sub matzoh cake meal for the flour, or even regular matzoh meal if you want a more breadcrumb-like texture.  I get really tired of potatoes during Passover (see every post from April 2020).

So if you want to irritate the new grocery clerk who hasn't learned the codes for the weird vegetables, these are a good start.

2 medium kohlrabi
1 egg
2/3 C flour
1 tsp salt
about 1/3 C oil
chopped chives or green onion for garnish
1.  Peel kohlrabi, which is the hardest part of the whole recipe.  Chop into chunks, then shred in the food processor with the grating disc.  I guess you could do this by hand, if you want a workout.

2.  Drain as much liquid out of the shreds as you can.  Pressing between paper towels helps.  Combine in a bowl with 2 Tb of the flour, the egg, and the salt.
3.  Preheat a large skillet.  Heat oil until a drop of water pops.  Pour remaining flour in a dish.

4.  Form shreds into 1/4 C patties and coat outside with flour.  Set in skillet and fry until browned and crisp, about 4 minutes per side.  Set on paper towels to drain while you cook the next batch.  Serve hot, garnished with chives or onions.

Makes 12, about 4-6 servings

Difficulty rating  :)

Friday, October 9, 2020

Pickled Celery

After attempting to use up my celery in various ways, I went in search of preserving methods.  Turns out you can't boil-bath can it.  There aren't even any reliable pressure canning recipes.  You can, however, make refrigerator pickles from it.

I'm rapidly ending up with a pickle shelf in the fridge again.  It's easy to pickle stuff.  Vinegar, water, sugar, salt, spices.  Takes less than 10 minutes.  I have to remember to eat them.

The recipe I decided on was mainly because the brine will work with nearly anything I choose to throw in there.  When homemade pickles are done, you can re-boil the brine and pour it over something else, until you pickle something that leaves too much flavor behind like ripe tomatoes.  In this case, the celery flavor will just be like I had used celery seed as a spice.

The only white wine vinegar I had in the house was the tarragon vinegar, so I killed off that bottle.  Finally.  You can use distilled vinegar if you choose.  The flavor just won't be as complex.

I had my doubts that 2 cups of brine, 2 cups of celery, and about 1/2 cup of onion slices would fit in a pint jar and used a quart.  It actually came to about 2-1/2 cups, almost 3 before everything settled.  So, yeah.

*2 cloves garlic, peeled
*1/4 tsp dill weed
*1/2 tsp mustard seeds
*1/2 tsp whole peppercorns
*1 bay leaf
*1/4 tsp fennel seed (optional)
*1/4 yellow onion
*2 C sliced celery
*1 C white wine vinegar
1 C water
2 Tb sugar
1 Tb kosher or pickling salt
1.  Into the bottom of a quart container, place garlic, dill, mustard, peppercorns, bay leaf, and fennel seed (I just happen to have a lot).
2.  Slice celery on the bias (diagonal).  It just looks pretty that way.  Slice onion into 2", thin strips.  Toss vegetables together and add to jar.
3.  In a saucepan, bring vinegar, water, sugar, and salt to a boil just long enough to make sure all the solids are dissolved.  Pour over ingredients in jar.  If you have enough brine, the stuff on the bottom will float just a bit, maybe half an inch.  Cover and refrigerate for two days before enjoying.  Stays good for about a month in the fridge.  If you re-boil the brine for a refill, the month starts over.

Makes 1 pt

Difficulty rating  π

Tuesday, October 6, 2020

Cantaloupe Frozen Yogurt

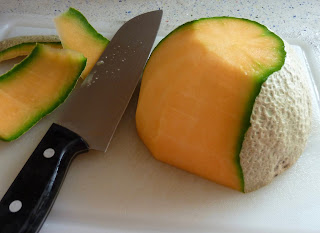
 I kind of made this one up on the fly.  I had half a quart of plain yogurt and cantaloupes were 49¢ each.  Add a bit of mint from the garden, lime juice, and honey, whiz in the blender, and I'm halfway to a frozen treat.

The market was out of limes.  I'm trying to be entitled and shocked when basic items aren't available. The truth is, a lot of the world lives like this all the time.  Having every conceivable grocery item at hand is a luxury.  We've forgotten this in First World countries.  It would be nice if the pandemic made us more aware of food security and the processing supply chain, since those are the workers hardest hit by the virus.  It won't, but that would be nice.

Anyway, I bought bottled lime juice.

2 C cantaloupe pieces
*2 C nonfat plain yogurt
~2 tsp honey
1 tsp lime juice
*mint sprig (or 1/4 tsp dried mint)
1.  Get out the blender and check that your ice cream maker bowl is frozen if you are going that route.  Taste a piece of cantaloupe to get a feel for how sweet it is.  Add all ingredients to the blender, adding extra honey if the fruit isn't very sweet.  Run until smooth.  Taste and adjust flavorings, keeping in mind that they will be slightly dulled once the mixture is frozen.
2.  Pour into running ice cream maker and process until soft-serve.  Transfer to a loaf pan and freeze for at least 2 hours.  If you don't have an ice cream maker, pour into a loaf pan, put it in the freezer, and rake it every hour with a fork until firm.  Even with the machine, you will need to use the fork method until it firms up; it just won't take as long.  This is fat-free and will freeze into a brick, even aerated in the blender.  You could also use this mix to make popsicles or flavored ice cubes.  Unfrozen, it's basically a fruit smoothie.
3.  Serve garnished with mint and/or a drizzle of honey.

Makes 1 quart

Difficulty rating  π

Saturday, October 3, 2020

Preparing for Round 2


I'm really hoping that 2020 has already thrown its worst at us.  But just in case...

There's a chance there could be some civil unrest after the election.  The absolute worst case scenario would be the three Pacific states seceding, which actually would suck much worse for the rest of the country than Cal-Or-Wash.  We have most of the food and a decent amount of the oil, the nation's largest commercial seaport, plus a major TP factory.  The rest of the country has beef and wheat, but there are far too many gluten-free vegans out here to care about that.

Just in case the supply chain goes to hell again because of a rush on items, I'm getting a few things now.  We know what people hoard after the March debacle.  I'm not stocking up on much.  Got the TP a bit earlier than I normally would.  Stuck a bag of flour in the freezer.  Picked up holiday kinds of groceries two months early, especially after canned pumpkin became hard to find.  Finally got some at Ralphs (Kroger).

I spent half as much as I did six months ago, to cover the same period of time and all the end-of-year holidays.  I'm buying reasonable amounts of inexpensive staples, enough to work with for 2-4 weeks.  I've learned how long things last, especially proteins, given my personal portion sizes.
  • Dry beans, lentils, and rice: 12 servings/pound
  • Cheeses: 8 servings/pound
  • Meats: 4 servings/pound for land animals, 3/lb for fish
  • frozen veggies: usually 2 more servings per bag than the package says
There will still be things on grocery shelves, even if they're the weird items no one else wants.  I'm also assuming that some people are still working through the non-perishables and frozen foods they bought six months ago.  All that salt that got bought out is going to take a couple of years to use.

I didn't "put up" any extra canned goods of my own.  Just made the strawberry lavender jam that I was planning to and bread and butter pickles from the cucumbers in the garden.  I let those cucumbers get too big and had to use wide-mouth jars.  Ralphs had canning lids too, while most stores are out.  I am going to plant a full winter garden in a couple of weeks.  I'll have lettuce, radishes, and peas to swap with the neighbors, and hopefully spinach if the markets run out of frozen again.

The hard part about this project is not digging into the hoard now.  I've ingrained in my psyche since the original Pantry Project that storing more than a few weeks' worth of food is wasteful.  Maybe that's why some people put their emergency food in a cabinet or the garage.  I would forget about it and it would go bad, so I'm keeping all of it in the pantry and chest freezer.
And while I bought some frozen hash browns and canned sweet potatoes, I am not buying another bag of russets!  I swear, that was my whole year's quota.  I'm going to be having PTSD from that mistake.