Saturday, July 19, 2025

Roasted Vegetable and Quinoa Salad

While I'm waiting for my tomatoes to ripen, other things are going in salads.

As a main course salad, anything grain-based is more of a "bowl".  The difference here is that I'm not going to the effort to arrange everything pretty.  It's getting tossed.

I considered many kinds of dressing for this one.  Miso-tahini was far up on the list.  Then I decided to pick up the tang of the turnips and do miso-horseradish.  The horseradish root from April was dried out and had to be tossed.  Ok, a basic white wine vinaigrette, heavy on the vinegar, with a shallot marinated into it.

I harvested a couple of carrots, but also bought some.  The carrot out of the pond was normal and about the size I was expecting.  The one I accidentally grew in the lettuce patch seemed the same size from the top, but only grew a short way into the dense clay soil.  And that's why I don't grow root vegetables in the lettuce patch.

I'm calling my four radish-sized turnips equivalent to one from the store.  Probably not, and I wished they were more evenly represented in the dish.  The plants were dying in only 80º weather.  I'll try again in the fall.

This was a do-ahead meal.  I cooked the quinoa and vegetables the day before and refrigerated them separately.  The shallot dressing marinated overnight in its own bowl.  All I had to do on the day was toss everything together.

*1 C dry quinoa
1/2 lb carrots
1 head cauliflower 
*1 turnip
3 Tb olive oil, plus more for the veggies
3 Tb white wine vinegar (or less for a more mild dressing)
1 shallot
1/2 tsp kosher salt
1 tsp dried rosemary, or 1 Tb fresh
1 tsp parsley flakes, or 1 Tb fresh
1/4 tsp white pepper

1.  Cook quinoa according to package directions.  This will likely include rinsing it until the water is no longer soapy.  Fluff and set aside to cool.

2.  While that's going on, preheat oven to 375º and line a baking sheet with parchment.  Core the cauliflower and cut into bite-sized florets.  Peel the carrots and turnip and cut into bite-sized pieces.  Toss in a light drizzle of olive oil and arrange in a single layer.

3.  Roast vegetables until softened and starting to brown, about 30 minutes.  Set aside to cool.

4.  In a small bowl, whisk together the 3 Tb oil, vinegar, salt, white pepper, rosemary, and parsley.  Taste and adjust seasonings.  Peel shallot and slice thinly.  Toss shallot in the dressing and allow to marinate while the other components of the salad are cooling to room temperature.

5.  Toss together the quinoa and vegetables.  Drizzle with the shallot dressing and toss to distribute.  Chill until ready to serve.  I chose to garnish with some vegan feta that I had a coupon for.  It tastes like feta, but doesn't have the protein, so I added a sprinkle of slivered almonds.

Difficulty rating  :)

Wednesday, July 16, 2025

Kefta Burgers

I got out the grill for the first time this year.  Oof, it needed a cleaning.

I did a recipe for keftas way-way back in the early days of the blog, but that was for the traditional version.  This time, I made them burger sized and put them on the grill.  I make them mostly the same as I did 15 years ago, but all recipes evolve.  And I had a super huge green onion from the garden to work with, so this one's onion-heavy.

In the theme of making this a garden meal, I had my burgers with chard and a cucumber-mint soup that used up the rest of the green onion and some cucumbers I had in the fridge.  Not exactly a typical 4th of July barbecue, but it worked for me.

1 lb ground lamb
*1 C finely chopped green onion
*1/4 C finely chopped parsley
*1/4 C finely chopped cilantro
1/2 tsp kosher salt
1 tsp paprika
1/2 tsp cumin
1/4 tsp black pepper
1 clove garlic, minced
4 hamburger buns, for serving

1.  In a bowl, combine all ingredients.  Knead well to distribute the seasonings evenly.  Chill for an hour for the flavors to meld while you heat up the grill.

2.  Form meat into four patties.  Set on the grill.  Every grill is different, and uses a different type of heat.  Even two piles of charcoal will produce different results.  With the lid closed, my burgers took ten minutes per side to get to medium doneness.  They're ready to flip when they come off the grate easily.  That's how you know you have char.  You can also temp them to about 160º.  Remember, ground meat should be a higher internal temperature than steaks or roasts.

3.  Serve on the buns, toasted if desired.  I considered a tahini dressing, then decided to have them naked.  I didn't even put any veggies on it.  Dress them as desired.

Difficulty rating  π

Sunday, July 13, 2025

July Garden Update

I'm pretty impressed by this summer's garden so far.  Not everything has been an instant home run, but there have been fewer complete fails than I'm used to.

A few of the chard are still going.  I heard a description of it as "better tasting beet greens", and that's very accurate.  I'm definitely planting it again next year.  The remaining turnips were smaller than I would have liked, but the greens were dying and I had to harvest.  They were enough for one recipe.

The kale is being hit hard by the cabbage loopers.  I put netting over them.  Hopefully that will keep the mama moth from landing.  Other than that, they're looking fantastic and growing at a good pace.  I'm just losing half the leaves to bug damage.

The cilantro finally finished making its seeds.  I pulled it and dried the stems in a bag for a couple of weeks before rubbing off all the coriander.  What I don't use in cooking will be my seed for next year.

After how many years of gardening, I googled how long it takes a tomato to form.  From blossom to ripe, it's 40-60 days, depending on variety and weather conditions.  That means I have at least a month before my first tomatoes are ready.  I'm definitely ready for endless cherry tomatoes.

Something was eating the leaves off my bush beans.  They were so jagged, and close to the edge of the pot, that I thought it was a critter and sprayed critter-deterrent.  That didn't work, so I started using neem oil.  That didn't work, so I added a diluted Dawn spray to the routine.  Then I opened the screen one day to step outside, and a whole flock of birds came out of the pot.  Really?  The nips absolutely could be from beaks.  Well, I'm not getting out the non-organic pesticides if it's birds, so the critter spray came out again.  Maybe they're getting revenge for me covering the berry bramble with bird netting.  I bought another roll and a cage to support it.  I think it's working.  When the plants are a little stronger, I'll trim off all the bitten leaves.  The first flowers appeared, so beans may be in my near future.

The bird thing really threw me.  I'm thinking that they know I no longer have a cat.  She must have been my scarecrow.  Also, it's only my second time attempting to grow beans, so maybe they found them for the first time.  I'm going to start picking tomatoes at first blush, so the birds and squirrels don't have at them.

It's hard to believe that it's already time to start planning for a winter garden.  I have one celery hanging on, but will have to start next year's fairly soon.  I'll get the herbs going around the end of September.  This spring's peas were a bust, so I'll try again in the fall.  Bird netting this time.

Thursday, July 10, 2025

Mediterranean-Style Pinto Dip

I wanted to do something non-Hispanic with pintos, since I'd already had a "Mexican" meal that week.  I considered the bean pâté from a couple of years ago, but this was a can of pintos that would get too mushy.  Fine, dip.

This is a vague adaptation of some chickpea-based recipes I found, with a lot of my own ingredients and flavorings mixed in.  The yogurt was completely my own addition.  Halfway through getting things out, I decided not to go vegan.

It has been warm.  Because, yes, it's summer.  I'm doing more mezze style meals to avoid cooking, so there could very well be more dips in this blog's future.  Chopping up vegetables for dippers is easy meal prep that can be done in advance, making this a good option to take on picnics or to parties.  It's also a healthy way to eat.  I'm leaning hard into the Mediterranean diet at the moment.

*1 can pinto beans, drained and rinsed
*1/2 tsp granulated onion
*2 cloves garlic, roughly chopped (or 1/2 tsp granulated garlic)
*1/4 C chopped cilantro
*1/4 C chopped parsley or 2 Tb dried
1/2 tsp cumin
1/2 tsp ground coriander
1/2 tsp paprika
salt and pepper to taste
1/2 tsp red chili flakes, optional
1/4 C lemon juice (about 1 lemon), or to taste
1/2 C Greek yogurt
Olive oil as needed for consistency

1.  Put everything except the yogurt and oil in a food processor.  Pulse first to get the big stuff like garlic, then process until almost as smooth as you would like.

2.  Add yogurt and pulse until mixed.  Taste, adjust seasonings, and pulse again.  I tasted it before adding the yogurt, and it was way over-spiced for my liking.  With the yogurt, it was more balanced.  If you want a richer texture, add a tablespoon or two of olive oil.

3.  Pour into a serving dish and chill until ready to serve.

Makes about 2 cups

Difficulty rating  π

Monday, July 7, 2025

Dehydrating Greens

I finally gave up on the last two broccoli about a month ago.  I could have gotten another small harvest out of them, but they were starting to attract cabbage loopers.  The kale don't need any help bringing those in on their own.  I decided to harvest any non-nibbled leaves and dehydrate them for future use.

Drying foods isn't only for herbs.  There's a whole subset on the NCHFP website for how to preserve by drying.  It doesn't pose the same inherent risks as canning, but doesn't preserve as long.

Having dried greens of any sort can be a way to sneak veggies into a recipe, like spaghetti sauce or casseroles.  You can powder them for smoothies.  They can be used in soups, where they pretty much disappear.  When you buy "green powder", that's most of what's in there.  Dehydrating is also one way to keep greens you bought from going to waste.

The procedure is very simple.  If you don't have a dehydrator, a convection oven can do it.  I set mine to the lowest it will allow, which is 110ºF.

Wash the leaves, then pat them dry with a towel.  Remove any thick stems.  Spread them out on a lined baking sheet.  I had better luck with the parchment one than the Silpat.

Set the trays in the oven and go do other things.  After two hours, check the progress.  They will have gotten smaller from losing water, so you can rearrange them for best airflow, and rotate trays if necessary.  After another hour or two, depending on original moisture content and oven temperature, the leaves should be completely dry and shatter with minimal pressure.

Stuff the leaves into a dry container, or powder first if that's how you want to use them.  Seal the jar to keep out moisture and store in a cool, dark place.  Use within six months for best quality.

Difficulty rating  π

Friday, July 4, 2025

Dill-Pickled Turnips

I really wanted to try my two largest home-grown turnips.  They were next to each other, and weren't going to get any bigger from being crowded.

The only other time I've had pickled turnips was at a Middle Eastern restaurant.  Those are pink from beet juice and sweet.  I didn't like those because I'm used to American-style dill pickles.  Then I figured, why not use the brine recipe I prefer with my turnips and see what happens.

The process is easy and quick.  The brine came to a boil while I was peeling and slicing the turnips.  Poured it over them in a jar, waited for it to cool to room temperature, and refrigerated for a day to marinate.

I expected the pickles to be more tangy than they were.  My eyes watered when I cut the turnips.  They're nice, somewhat mellow, and just taste like marinated turnips.  I wouldn't mind doing it again to have as a side with burgers or tapas.

What I wish I had blogged was the asparagus.  Just stir fry in olive oil, garlic, and salt, but they were the best I've made in a long time.  I'm sure I'll do it again.

*1 turnip (about 8 oz)
1/2 C water
1/2 C white vinegar
1/2 Tb kosher or pickling salt
1/2 tsp sugar
1/4 tsp peppercorns
1/4 tsp mustard seed
1/2 tsp dill weed
*1 clove garlic, smashed
*1 small bay leaf
pinch of red pepper flakes if you want them spicy

1.  Bring water, vinegar, salt, and sugar to a boil in a small saucepan for a minute or two, until the grains have dissolved.  Set aside.

2.  Peel the turnip and slice into batons.  Mine were about 1/4" thick and 2" long.

3.  Get out a non-reactive container, preferably glass, large enough to hold the turnip pieces.  Mine fit in a pint jar.  At the bottom, place the peppercorns, mustard seeds, dill weed, garlic, and bay leaf.  Also, red pepper flakes, if using.  Add the turnip pieces on top, and shake a little to settle them.

4.  Pour the hot brine into the jar.  The turnip will float, but try to get the brine all the way to the top.  Poke or shake to dislodge air pockets.  If there isn't enough brine to cover, add a little water.  If it's very low, also add a splash of vinegar.

5.  Allow the jar to sit on the counter until room temperature, then refrigerate.  The pickles will be at their best on days 2-7.  Try to finish them in under two weeks.

Serves 4-6

Difficulty rating  π

Tuesday, July 1, 2025

Lentil Bread

I was looking for something new to do with red lentils.  I've had this recipe from A Treat Life Bakery bookmarked for a while.  I haven't made it because the author admits the product needs a little help.  So I cut it down to 2/3 (to use four servings of lentils), exchanged the flax for egg replacer so the fiber wouldn't kill me, and twiddled with the flavorings to make this part of the protein for a tapas meal.  I added minced garlic and dried basil because it worked with how I was going to use it.

Calling this "bread" is like calling banana bread "bread".  It's a vegan, gluten-free quick bread that is dense by definition and savory, not sweet.  Although, toasted and topped with peanut butter and maple syrup would make a great vegan breakfast.  I topped it with pesto, fresh tomato, and mozzarella.

When I measured my 200 grams of red lentils by volume, they came out to slightly less than a cup.  If you use common brown lentils, they will equal a different volume.  I'm going to assume the recipe should be followed by weight unless you don't have a scale.

Now, if I had thought about it, red lentil flour exists.  It's used in Indian cooking, and I'm pretty sure I've seen it in some ethnic market or Whole Foods.  If you own a home grain mill, you can make it easily.  There are probably easier recipes out there that use it instead of going through the whole soaking process.  Since this is a more accessible version, we're sticking with it.

This doesn't rise much, being gluten-free.  I should have gone with my original instinct and done mini-loaf pans.  I would have gotten square-ish slices that were canapé sized.  The full loaf looked like a ciabatta.  It's still thick enough to top, but I had to cut the tomato slices in half.

200 g red lentils (about 14 Tb)
3 Tb water
1 tsp olive oil
1/2 tsp kosher salt
3 Tb cornstarch
*1 Tb ground flax or egg replacer
2 tsp baking powder 
Up to 1 Tb herbs and spices of choice

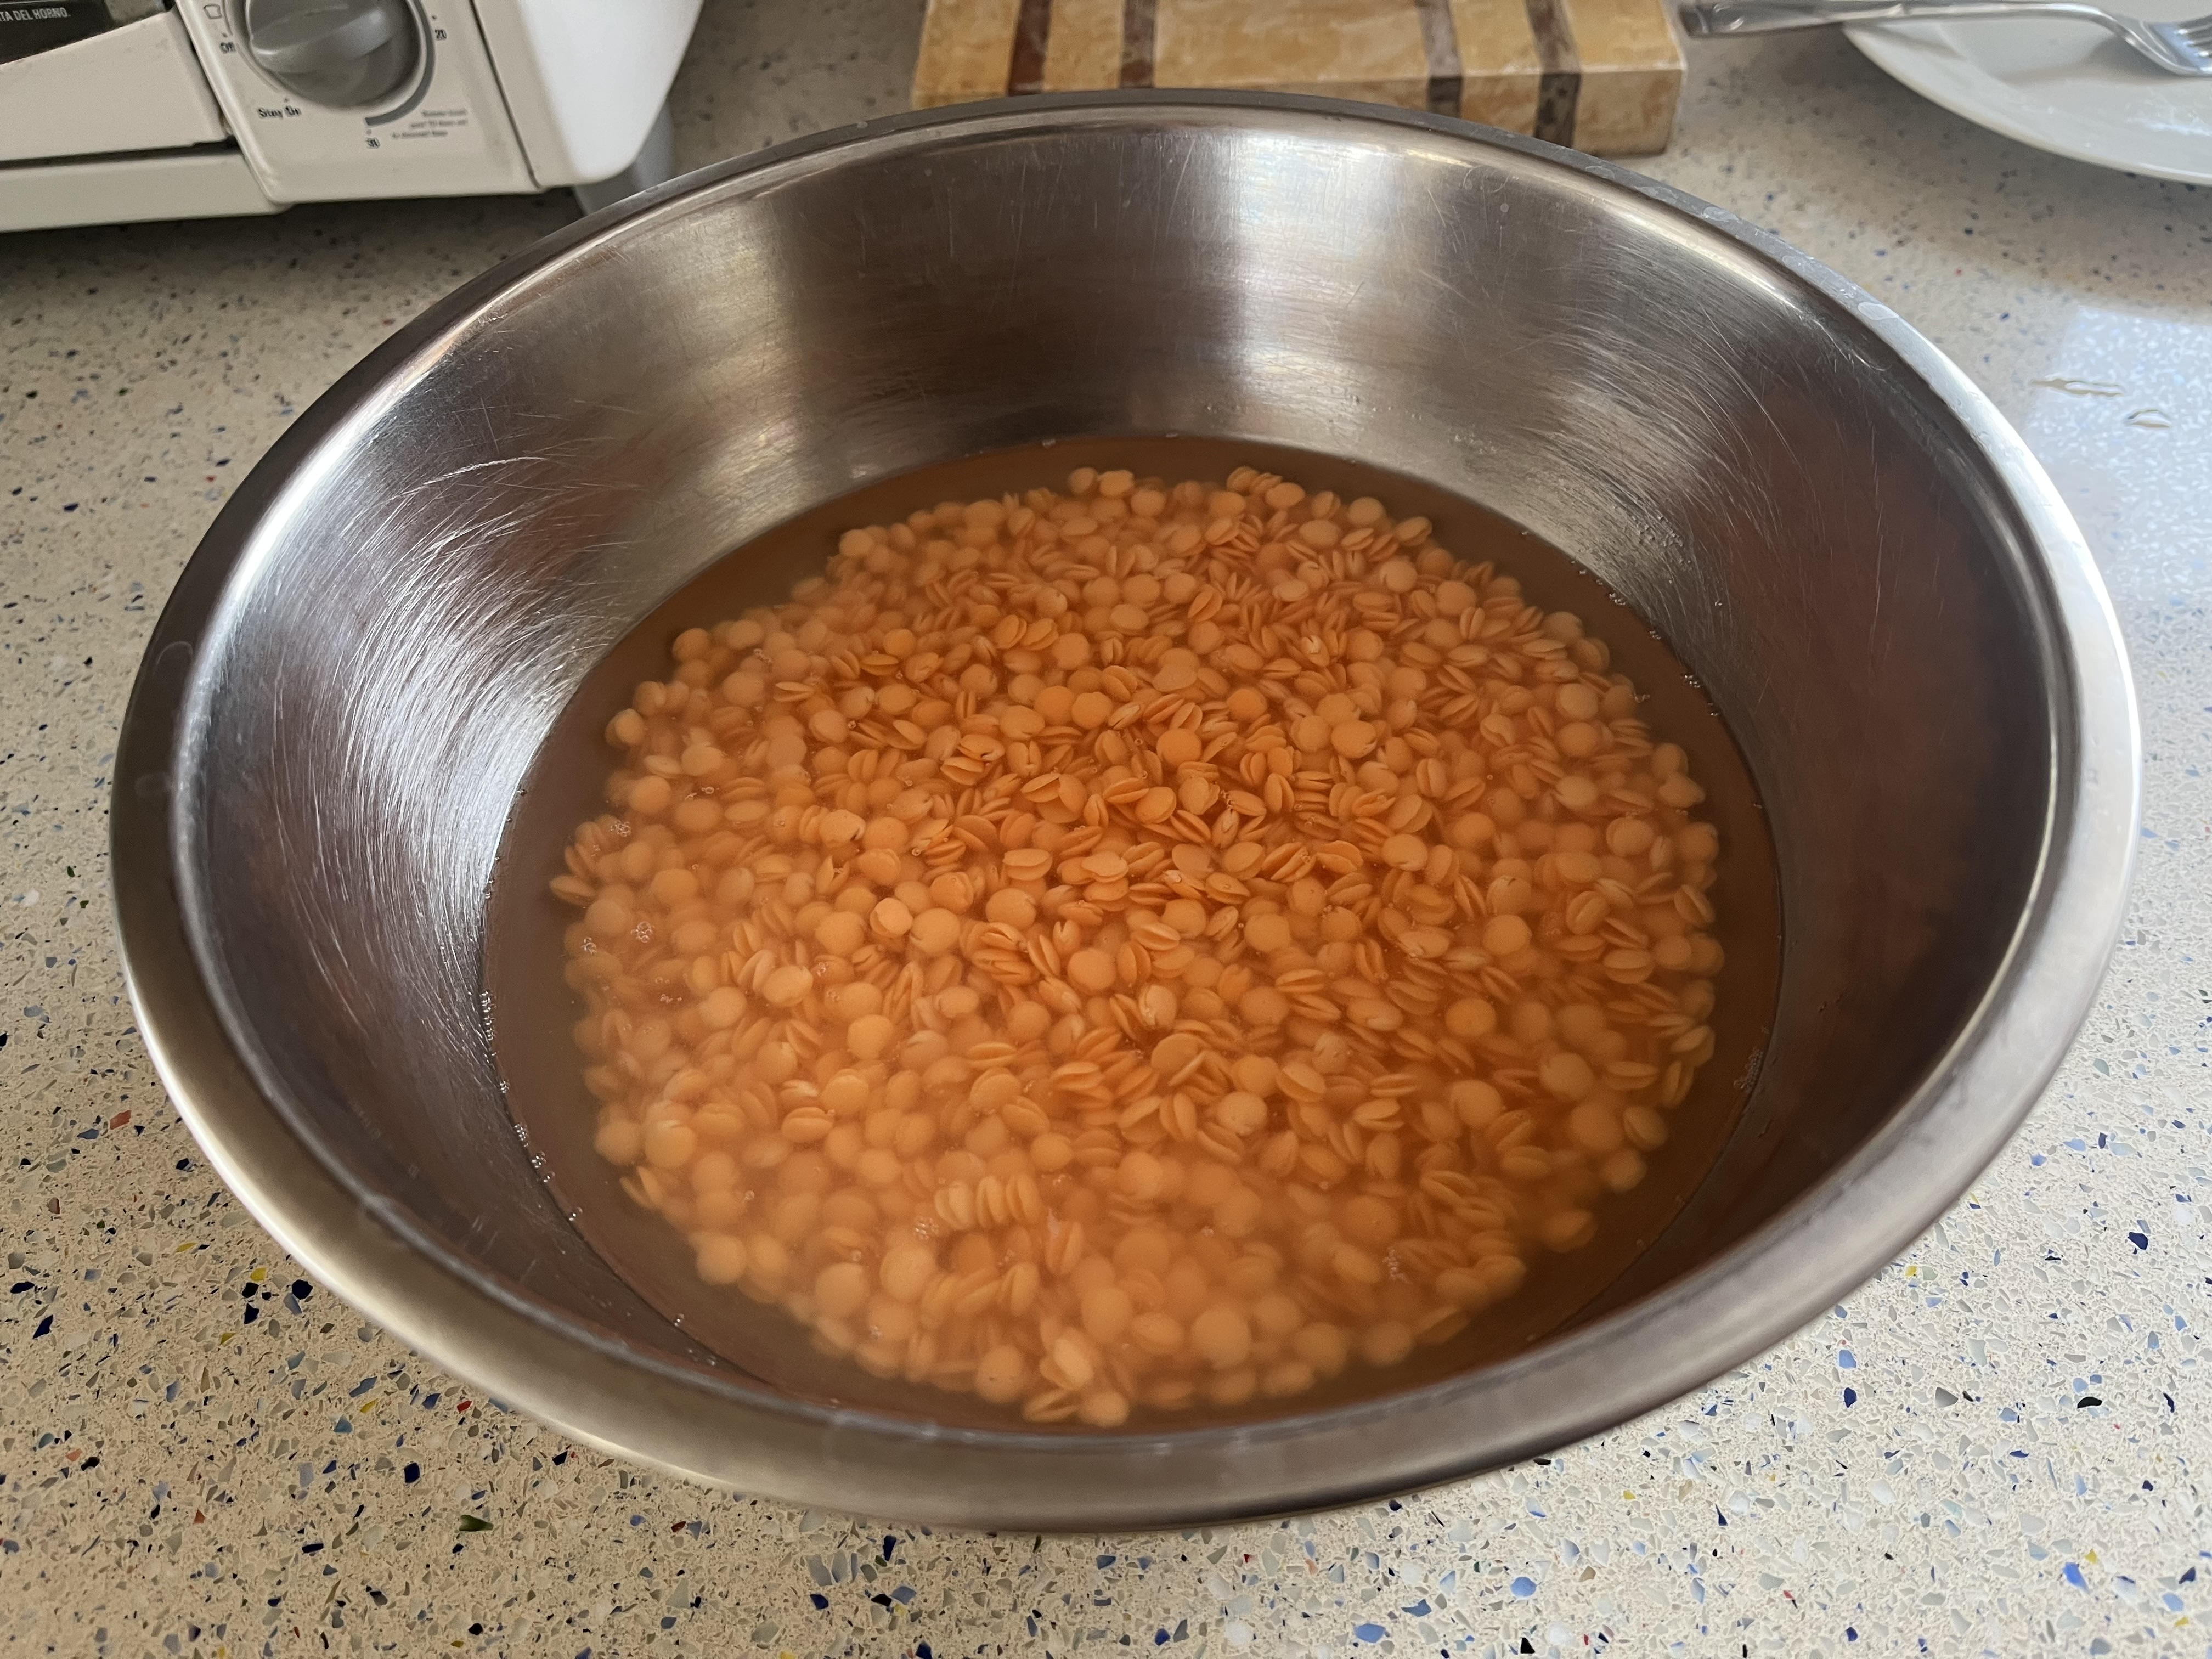
1.  Rinse lentils to remove the milling powder and soak in water to cover at room temperature for a minimum of six hours and up to 24.  I did about 10, and they processed well.

2.  Drain lentils.  Place in a good blender with the water, oil, and salt.  Process until smooth, which is going to take a few minutes.  Stop and scrape it down periodically.

3.  Preheat oven to 400º.  Prepare a loaf pan (or two minis, or even muffin cups) with pan spray.  Parchment will make removal easier.

4.  Transfer the purée to a bowl.  Stir in the cornstarch, flax, baking powder, and any seasonings.

5.  Pour batter into prepared pan and smooth it out until even.  Bake 30 minutes, then start checking for doneness.  As muffins, they should be done.  Loaves may take a bit longer.  The toothpick test works, as well as touching for spring.

6.  Cool a few minutes in the pan, then remove to a rack to cool completely.  Keeps up to two days at room temperature, a week in the fridge, or in the freezer for a month.

Difficulty rating  :)