Showing posts with label Pork. Show all posts

Friday, January 9, 2026

Sausage & Mincemeat Pie

Tasting History did a beef mincemeat pie during December.  Max wasn't all that impressed, but admitted he wasn't a huge fan of mincemeat.  I was planning to make mince pies and had a small jar of store-bought, all fruit mincemeat.  His post encouraged me to make it with added meat.  Since the only ground meat I had at the start of the Pantry Challenge was breakfast sausage, this turned into a breakfast pie.

Yes, it's kind of cheating to have only three ingredients, all of them store-bought conveniences, but it isn't simply a dump and go recipe.  What you end up with feels a lot more homemade than it is.

*1 prebaked 9" pie crust
*1 lb sausage of choice
*1 C prepared mincemeat (or to taste)

1.  Pre-bake crust according to package directions, but leave it light and barely done.

2.  In a skillet or saucepan, cook the sausage over medium-high heat.  Break it up as you go, and pour off the excess fat about halfway through cooking.  You need some fat to hold the pie together.

3.  Preheat the oven to 350º.  Stir the cooked sausage and mincemeat together.  If desired, add a pinch of salt and/or a splash of brandy to the mix.

4.  Pour sausage into pie shell and spread evenly.  Bake until browned on top and the crust is golden, about 20 minutes.  Allow to cool before slicing.

Serves 6-8

Difficulty rating  π

Monday, December 22, 2025

Sheet Pan Sausage and Vegetables

I haven't done a sheet pan meal in a while, and I've never done one with meat.  Thought I'd go with a basic sausage and root vegetables.  I served it over a cabbage colcannon, as another version of root vegetable, or you could do rice or pasta.  For low carb, serve it over greens.

It's easy to see why sheet pan recipes are so popular.  You can prep them ahead of time, throw everything in the oven, and come back in half an hour to a flavorful meal.  I didn't make a sauce for this, opting to sprinkle the finished dish with dried parsley instead.  One of the nights, I drizzled a little barbecue sauce on it, and it was nice.  Barbecue sauce makes everything taste good.  Gravy would also go well, or even a vinaigrette.  Depends what flavor profile you want out of your meal.

1 lb sweet or mild Italian sausage
1 lb carrots
1 large turnip
1 red onion
2 Tb olive oil
1/2 tsp dried rosemary
1/4 tsp dried thyme
salt and pepper to taste

1.  Preheat oven to 400º.  Line a rimmed baking sheet with parchment paper for easy cleanup.

2.  Slice the sausage into one- or two-bite pieces.  This will make everything on the sheet about the same size.  Distribute on the pan.

3.  Peel carrots and cut in coins about the same size as the sausage.  Peel and slice turnip.  Peel onion and quarter or cut in large French slices.  Put all the vegetables in a bowl and toss with the oil.  Add herbs, salt, and pepper and toss again to distribute.  Add to the baking sheet in a single layer.

4.  Roast for about 30 minutes, until sausages reach 165º and vegetables are tender.  All of the vegetables can be eaten raw, so you're only checking that the meat is done.

5.  Serve hot with potatoes, pasta, rice, cauliflower rice, or salad.  Garnish with herbs or any sauce you wish.

Difficulty rating  π

Tuesday, December 24, 2024

Colombian-Style Tamales

This is the real reason I was looking for masarepa.  Learning how to make arepas was a happy accident.  My Colombian Recipes has an excellent post that breaks the daunting task of tamales down into easy segments.

These aren't 100% Colombian the way I'm making them.  I'm using leftover grape leaves instead of banana leaves, which I've been trying to find off and on for years.  The advantage to that is they're edible wrappers.  I'm using canned shredded pork instead of making it from scratch with several cuts of meat, and just adding the marinade to the unseasoned shreds.  And I'm creating my own marinade instead of using the traditional one, which contains too many ingredients I can't eat.  Heads up on the Goya, it contains MSG.  I get weird headaches off the stuff that make it feel like my brain is imploding for a couple of minutes, so I mixed my own.

Oh yeah, and cutting it down from a whole party to my traditional four servings.  The recipe post has one of those cool slider widgets that does all the calculations for you.  The math on 1/3 shouldn't be as hard as it sometimes is.  It was the 5 cups of water that made me look for an easy out.

Marinade

*1/3 onion, roughly chopped
1 large or 2 small cloves garlic, peeled
1/2 each green and red bell peppers (which I skipped)
*1 green onion
1 Tb cumin (not a typo)
1 Tb sazon Goya: or a mix of paprika, ground coriander, granulated garlic, cumin, and turmeric for color
salt to taste
2/3 C water

1.  Place all ingredients in a blender or food processor.  Run until basically smooth.

2.  Place meat in a plastic baggie or glass dish, as the turmeric will stain plastic.  If starting with raw meat, cut into cubes so the marinade can permeate evenly.  Pour in marinade, reserving 2 Tb to flavor the masa later.  Since I was using pre-cooked meat, I poured it all in the bag.

3.  Refrigerate 4 hours, or overnight.

Filling

*1 lb raw pork shoulder or 2 C cooked and shredded
*1 small potato, peeled and cut in chunks, about half a can
*1/3 C carrots, peeled and sliced or large dice, frozen or canned ok
*1/3 C peas, fresh or frozen
banana leaves for wrapping, or a steamable alternative.  It won't taste the same.

1.  If cooking the meat, either roast or simmer pre-marinated pork until fork-tender, probably 2 hours.  Cook potatoes and carrots until about halfway done if using fresh.  Peas can go in straight from frozen.

2.  Have all filling ingredients ready when you start to prepare the masa.

Masa

1 C + 2 Tb masarepa
1-2/3 C warm water
salt to taste
2 Tb marinade
2 tsp Goya seasoning

1.  Stir salt, marinade, and seasoning into warm water.  Traditionally, you use your hands at this part to achieve an even batter.

2.  Gradually sprinkle in masarepa, stirring constantly, until you get a polenta-like texture.  Because that's basically what this is.  That last 2 tablespoons of masarepa will actually make a difference.  Let sit about 5 minutes to thicken.  Fill the tamales while the masa is still warm.

Assembly

1.  Set up a stockpot with a steamer or some kind of tray at the bottom.  Add one or two inches of water, whatever the basket can clear, and start warming it.

2.  Lay out two strips of cleaned banana leaves, overlapping in a cross pattern.  Or, in my case, two grape leaves with plenty on the side ready to go.

3.  At this point, how much you fill them is up to you.  The original recipe says 3/4 C of masa to start with, and I've seen some with entire chicken legs nestled between the pork.  I made mine small enough to total eight, or two per serving.  Also, because that was pushing the limits of the grape leaves.

4.  Once you spread the masa, arrange the meat, potato, carrot, and peas.  For a more pickle-y flavor, you can add capers or sliced green olives.  I don't like either and skipped them.

5.  Fold up the leaves to encase the filling.  Use kitchen twine to tie the tamales shut.  I haven't trussed anything in a while, and probably should have practiced first.  It would be easier with banana leaves.  I have also seen it done with parchment-lined foil.  Anything that won't disintegrate when steamed.

6.  Carefully arrange the tamales in the steamer.  Turn up the heat to a boil and steam them for 90 minutes.  Allow to cool for about 15 minutes, to firm up, before cutting the string and unwrapping.

Difficulty rating  :-0

Monday, December 9, 2024

Pulled Pork Biscuit Sliders

So, I canned eight pounds of pork butt.  Now what?  I thought of making some into breakfast biscuit and gravy, which eventually evolved into this.

I decided to make these BBQ and cilantro, but you can totally use different flavors.  I found recipes that toast the split biscuits with cheese on them.  Some have just seasoned pulled pork with no sauce.  I thought I was out of BBQ sauce at first and almost used the Bibigo Korean sauce.  I'm out of sauce now, and really needed a bit more, but it's probably good that it isn't dripping everywhere.  You can go wild, also with any veggies you put on it.

While I did make the biscuits from scratch, and will repost the recipe from an earlier post here, a lot of the recipes I found used Grands.  I'm also going to post how to make the pulled pork, minus the whole pressure canning part.  Go ahead and use an Instant Pot if you have one.  Or open a can or two of shredded meat.  This day was largely about making an easy pantry meal for me.

Buttermilk Biscuits

2 C flour
2 tsp baking powder
1/4 tsp baking soda
1 tsp salt
*1/4 C cold shortening
*3/4 C buttermilk

1.  Preheat oven to 450º.  Line a baking sheet with parchment or a Silpat.

2.  In a bowl, combine flour, baking powder, baking soda, and salt.  Cut in shortening until it makes pea-sized flakes.

3.  Stir in buttermilk until almost combined.  It will make a wet, shaggy dough.  Knead gently several strokes, until uniform.

4.  Pat out into a rectangle 1/2" thick on the baking sheet.  With a knife or bench scraper, score the biscuits all the way down to the bottom.  I actually made 12 so they would be smaller, then saved the four corners for other uses.

5.  Bake 12-15 minutes, until lightly browned and set.  Cool on a rack, then break apart along the scoring lines.

Pulled Pork

1 lb pork butt or pork loin
salt to taste

A.  For stovetop, place meat in a saucepan slightly larger than the piece.  Sprinkle with salt and add one inch of water.  Bring to a simmer, cover, and cook at least 2 hours, until meat is falling apart when pricked with a fork.  If the water level dips, add as needed.

B.  For the oven, place meat in an oven-safe casserole.  Sprinkle with salt.  Add 1" of water.  Cover, either with a lid or foil.  Cook at 250º until fork-tender, about 2 hours.  Check the water level after an hour.

C.  For the slow cooker, place meat in cooker with 1" of water and sprinkle with salt.  Cook on low 6 hours or high for 3.

D.  For all pressure cookers, see manufacturer's instructions.

Once cooked and slightly cooled, shred with a fork.  Should produce 2-3 cups of meat.

Assembly

8 biscuits
2-3 C shredded meat
*1/4 C barbecue sauce
*1/2 C chopped cilantro
sliced onions or other sandwich garnishes

1.  In a pot, reheat meat with barbecue sauce and cilantro.

2.  Split biscuits and place on serving plate.

3.  Add meat to the bottom halves of the biscuits.  Top with onions or other favorite toppings.  Place biscuit top on the fillings and serve.

Difficulty rating  :-0 from scratch or π with premade biscuits and meat

Tuesday, February 13, 2024

Cranberry Slow Cooker Pork

I haven't done a slow cooker recipe in a while.  Of course, this can also be done on the stove on the lowest setting or in the oven at 220º.

This was the last pound from the large pork roast I cut up.  I'm kind of running low on red meat in the freezer.  Might be time to call my friend and split another brisket.  There's plenty of chicken, but how much chicken can I really eat?

To be honest, this recipe is a lot like cranberry brisket.  Less onion and the addition of vinegar are the main changes.  I had a little cranberry ketchup left, so I used that instead of half the vinegar.  You should use an acid to cut the sweetness of the cranberry sauce.  The berry tartness isn't quite enough.

1/2 yellow onion, sliced
*1-1/2 lb pork butt roast
1 C cranberry sauce
2 Tb apple cider vinegar
1/2 tsp peppercorns
1 tsp kosher salt
water as needed

1.  If using, place liner in crock.  Arrange onions at bottom, then roast.  I had to cut mine in a couple of pieces to fit it in.

2.  In a bowl, mix together 1/2 C of the cranberry sauce, the vinegar, peppercorns, and salt.  Add 1 C water and mix until smooth.

3.  Pour sauce over roast.  The water should come up at least halfway.  If it doesn't, add a bit more.

4.  Cover crock and set on low for 8 hours or high for 4.

5.  Once the meat is fall-apart tender, remove from crock with tongs.  Serve with the onions from the bottom and remaining cranberry sauce.

Difficulty rating  π

Wednesday, October 25, 2023

Meal-Prepping Meatballs

I'm going to do a coupon brag.  I had an insanely good store offer for a 3 pound chub of ground turkey for 98¢ per pound, or $2.97.  What I forgot at checkout was that I also had a manufacturer coupon on the app, which stacked.  Net result, $1.88 for three pounds of ground turkey.

Next up was what to do with it.  I had originally planned to do some turkey sausage, but faced with that actual amount of meat, I decided to do another recipe, too.  I wanted to do something with the sweet and sour sauce I had just made, and thought meatballs would be great.

So, coupon brag #2, I had a pound of ground pork in the freezer that had been on clearance for 99¢.  I decided to cut the dryness of ground turkey by combining the meats.  Which is a thing, anyway.

What I did not want in my meatballs was any seasoning that tied them directly to a specific cuisine.  These were not going to be Italian, or Asian, or any other ethnic-leaning flavor.  I wanted them to be as at-home with the sweet and sour as with marinara, peanut sauce, mole, or curry.  Therefore, this recipe is very simply seasoned.

It also makes two pounds of meatballs, which is far more than my usual recipe.  The intention was to freeze half of them as pre-cooked meal prep.  Batch cooking just means making multiple recipes and preserving whatever you don't intend to use at the moment.  I can pull out the vacuum bag of meatballs whenever I want and use whatever sauce sounds good at the time.

*1 lb ground turkey
*1 lb lean ground pork
*1/4 C almond flour
*1/4 C matzoh meal or breadcrumbs
2 tsp kosher salt
1 tsp pepper
1/2 tsp paprika
1 tsp parsley flakes
1 egg
olive oil

1.  Line two baking sheets with foil or parchment.  Brush lightly with olive oil or use cooking spray.  Preheat oven to 375º.

2.  In a large bowl, combine turkey, pork, almond flour, matzoh meal, and spices until evenly distributed.  Lightly beat egg and add to the mix until everything is gooey.

3.  Make meatballs about 1-1/2" across, or a heaping tablespoon.  I used the smallest cookie scoop, which got me just short of 4 dozen meatballs.  With poultry, you don't want a huge meatball.  There isn't enough fat in them to avoid becoming solid rocks.  Arrange on prepared baking sheets.

4.  Brush tops of meatballs lightly with more olive oil.  Because, lean meats.  Bake until centers reach 165º, about 20-25 minutes.  Serve hot with sauce and go-with of choice, or freeze for up to 3 months.


Makes about 4 dozen, 6-8 servings

Difficulty rating  :)

Friday, October 13, 2023

Pork Enchiladas with Salsa Verde


This was one of my do-ahead freezer meals when family was visiting.  Then we didn't eat at home except for one dinner of leftover takeout.  Does not negate the fact that you can prep this, freeze it, and thaw to bake at a later date.

I didn't have quite enough tomatillo salsa left to pull this off and canned a triple batch while I was at it.  That was a good way to multitask my time while the pork was slow cooking.  Once everything was done and the ingredients were laid out, this took less than five minutes to assemble.  There was far more meat on the bone than I needed, so the rest is now in the freezer, along with the one jar of salsa that didn't seal and the rest of the pack of tortillas.  I can easily make this again.

*1 lb pork butt or stew meat
1 tsp salt
1/2 tsp pepper
2 C tomatillo salsa or salsa verde
8 corn tortillas
1 C shredded mozzarella cheese

1.  Place the meat in a saucepan or soup pot with water to come up at least halfway.  Add salt and pepper.  If desired, add other broth-making flavorings like onion, celery, and spices.  Bring to a low boil.  Lower heat, cover, and simmer until meat falls apart, about 2-3 hours.  Drain.  Once cool enough to handle, shred with a fork and discard any fat or bones.  You can do this the day before, or even weeks before and freeze it.

2.  Pour 1 C of the salsa in the bottom of a 9x13 casserole.  Ignore my 8x8; it was too small, but I didn't want to get another pan dirty.  Soften tortillas by microwaving for 20 seconds.

3.  To assemble, spoon a strip of meat at the center of each tortilla.  Roll and place, seam-side down, in casserole.  Once all are in the pan, cover with remaining sauce.  Sprinkle evenly with the cheese, then cover with foil.  At this point, you have your do-ahead.  You can refrigerate to bake later in the day, or freeze for up to a month.

4.  Preheat oven to 375º.  Bake, covered, until hot and bubbly, about 25 minutes.  Remove foil and allow cheese to toast, about another 5 minutes.  Remove from oven and let sit 10 minutes before serving.

Difficulty rating  π

Tuesday, August 30, 2022

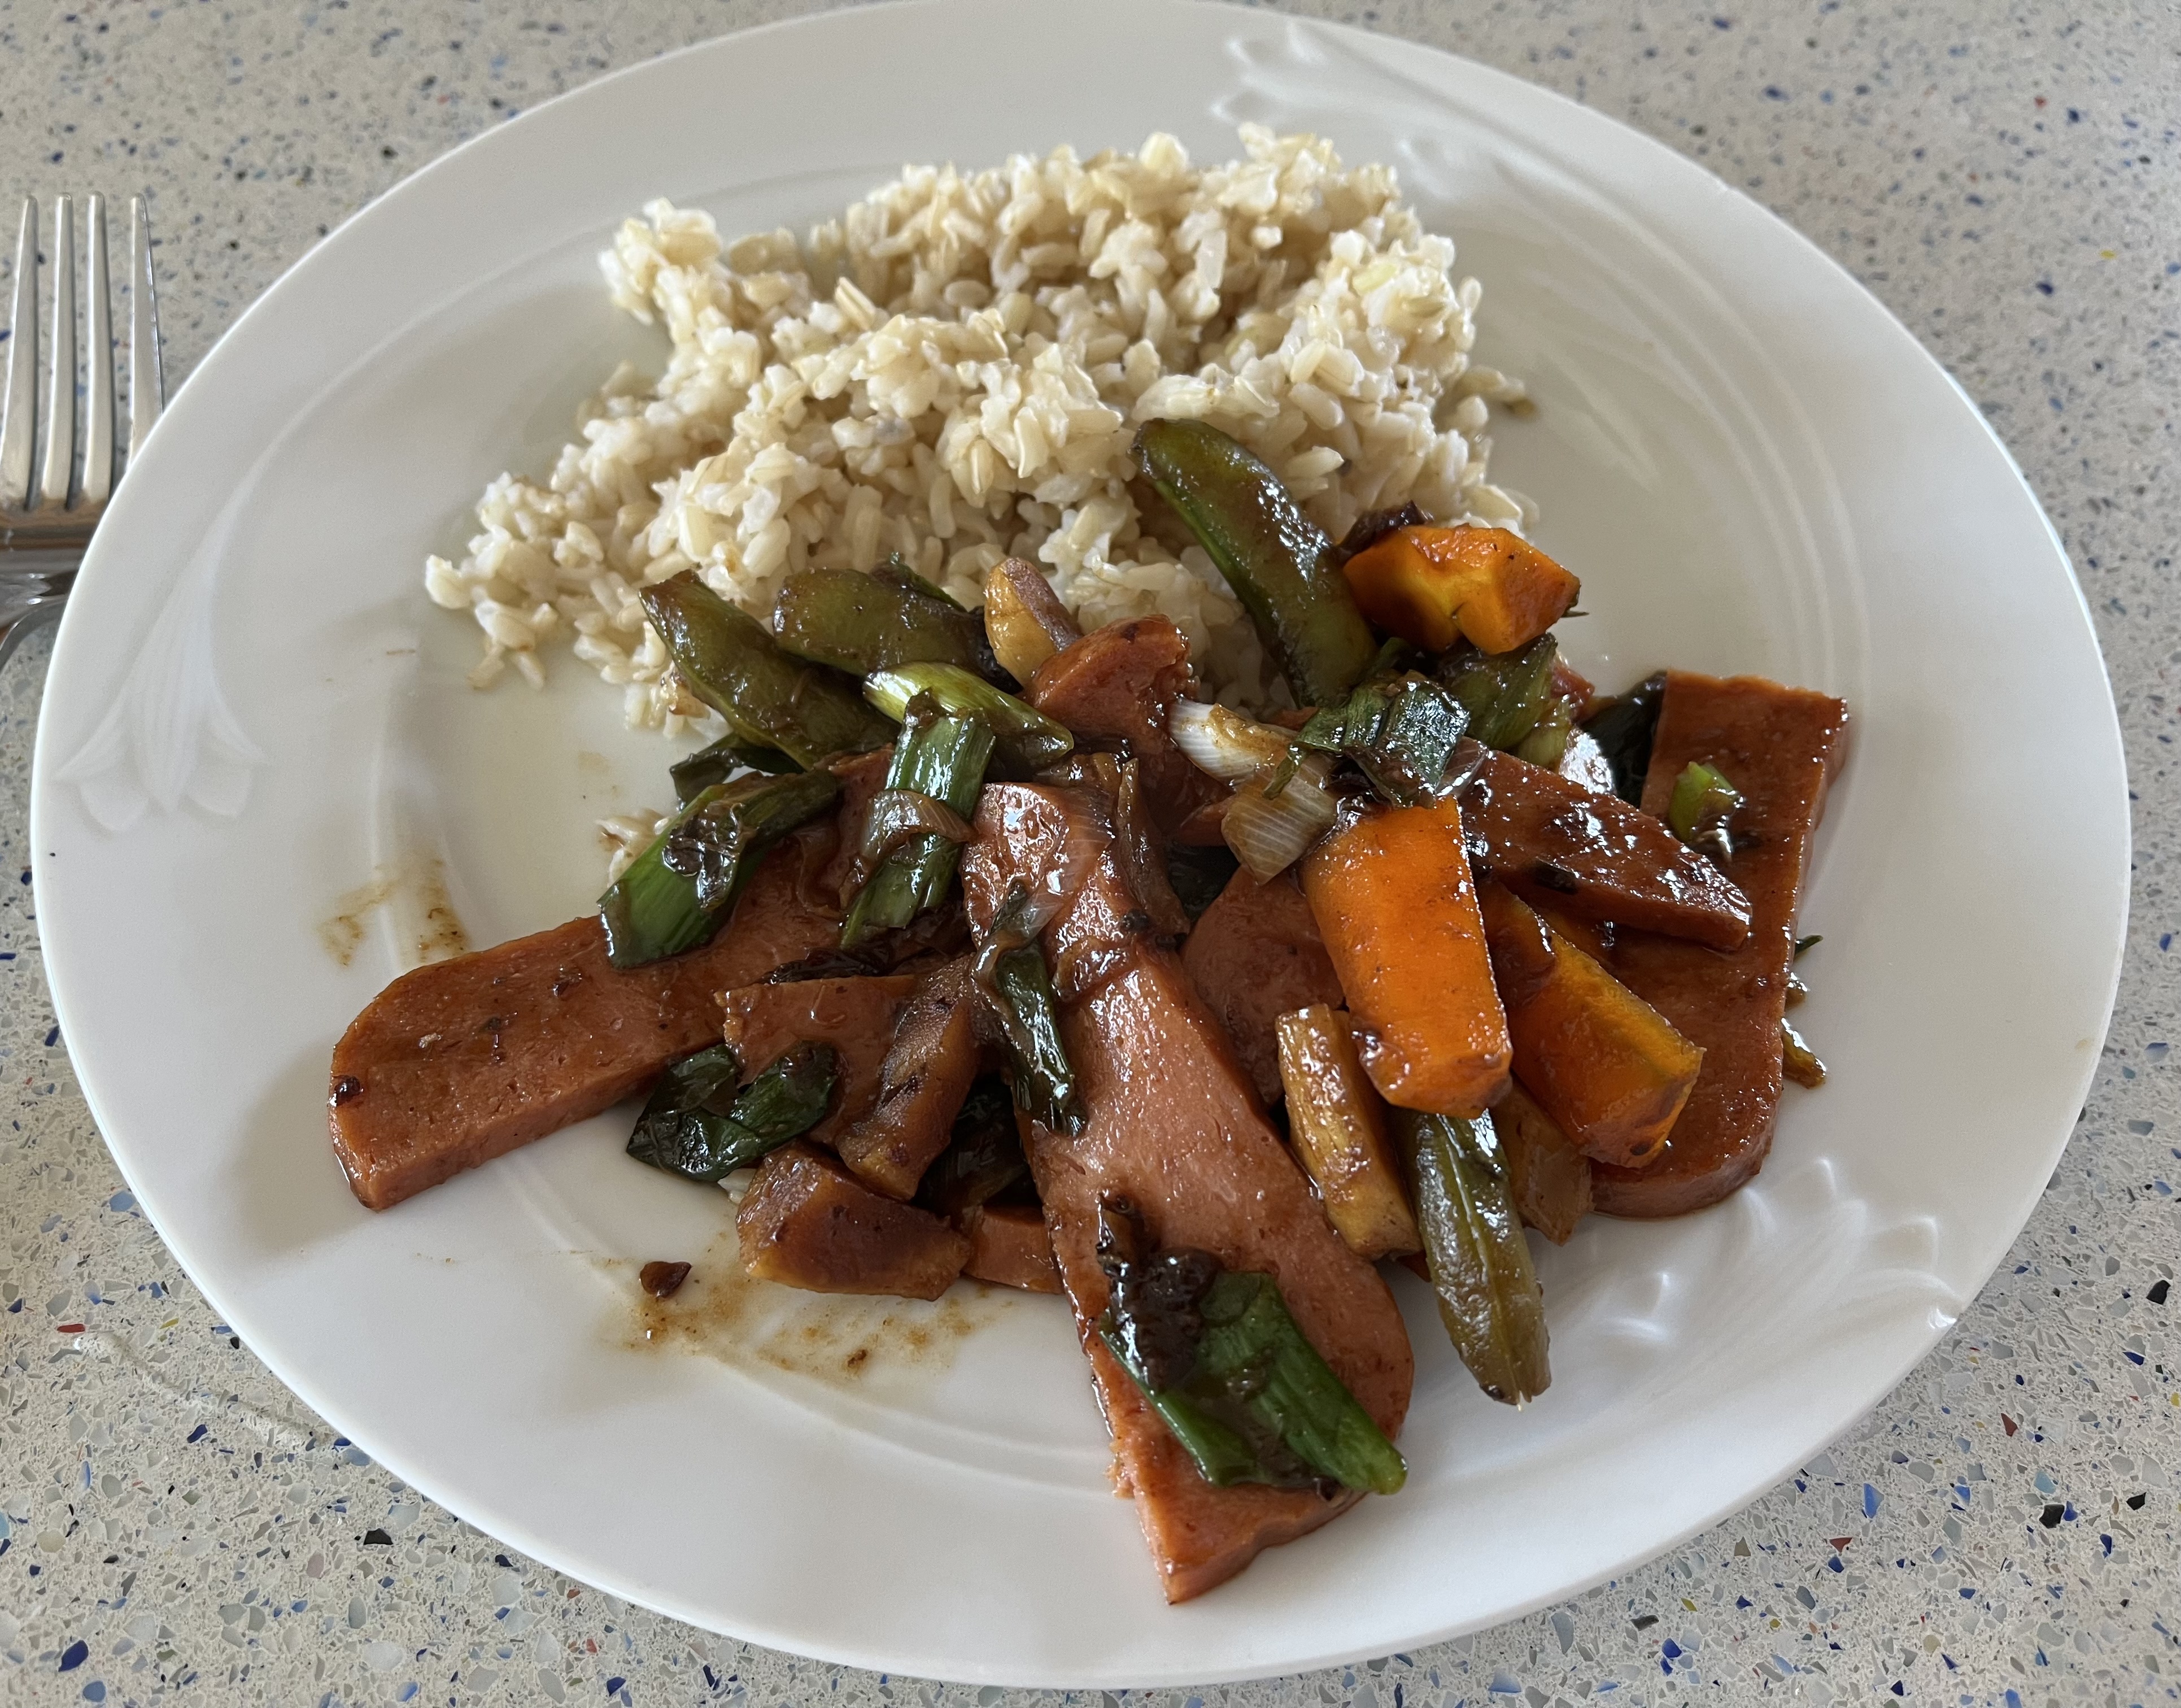
Stir-Fry with Teriyaki SPAM

I wasn't going to post this, since it's basically "fry up everything and serve over rice".  But I thought I'd turn it into a product review.

SPAM comes in flavors.  Who knew?  (Everyone who likes SPAM)  I had planned to pick up a can to use as breakfast ham when they were out of my turkey sausages, then saw a whole array of flavors.  For the heck of it, I picked teriyaki and came up with something else for breakfast.

The vegetables I'm using here are pretty basic for stir-fry, but they were also what I had on hand in the freezer and in the garden.  I'm almost out of home-grown green onion.  It's been at least six months since I've bought any.  Hoping the one I let flower produces viable seeds.  That would be super cool, if a $1 purchase could self-seed and produce onions in perpetuity.

Would I buy this product again?  Probably not.  I'm particular about my teriyaki, and this wasn't what I had in mind.  I could have added sugar to the pan to compensate.  I'll stick to a more conventional recipe in the future.

1 Tb vegetable oil
*3 green onions, sliced in 2" pieces
*2 carrots, cut in 2" sticks
*1 C sugar snap pea pods
*2 Tb black bean garlic paste
*1 tsp grated ginger
*2 Tb soy sauce
*1 tin Teriyaki SPAM
*rice for serving

I also used celery root, not in the recipe
1.  Heat oil in large skillet over medium high heat.  Add onions, carrots, and peas and cook until the onions and carrots soften, about 10 minutes, stirring frequently.

2.  Slice the SPAM thinly and cut into strips.  Add to the skillet with the black bean paste, soy, and ginger. Continue to cook until everything is heated through and sauce is evenly distributed.

3.  Serve hot over rice.

Difficulty rating  π

Sunday, June 6, 2021

Chocolate Pork Chops

I need more room for my canned foods, so I'm cooking with the contents of the liquor cabinet more often.  I think the only thing in there that I bought is the sherry and creme de menthe.  Ten years, and I have not made much of a dent in the inventory.


So I got an idea to marinate pork chops in something and went rooting around.  There are two bottles of Sabra in there, which is chocolate-orange liqueur.  That could make a molé-adjacent sauce.  It did not escape me that I was going to be putting the national liqueur of Israel on pork.  The stuff is even kosher for Passover.  I think my parents bought it on their trip to Israel, some 20 years ago. It's a really neat bottle, but I'm not partial to the flavor of chocolate/orange.  The Danish cherry wine hiding behind it, however, is quite nice.

I'm loosely basing this on Paula Deen's chocolate spiced pork chops, but doing it as a marinade instead of a rub.  It was too cold to fire up the grill (which hasn't been cleaned in a year, but that's my own fault), so I pan-grilled it and finished in the oven, like Paula's recipe.  The remaining marinade was brought to a low boil to make it safe and thickened with cornstarch to make the sauce.

*1/2 C Sabra, creme de cacao, or other chocolate liqueur
2 Tb brown sugar
2 Tb vegetable oil, plus more for the pan
1/2 tsp Italian seasoning
*1 tsp onion flakes
1/2 tsp garlic powder
1/2 tsp paprika
1 tsp chili powder
1/2 tsp kosher salt
1/4 tsp pepper
1 to 1-1/2 lb pork chops (4)
1 Tb cornstarch, dissolved in 1/4 C water

1.  Whisk together first 10 ingredients (through pepper).  Place pork chops in a shallow dish and pour marinade over.  Cover and refrigerate 4 hours, turning over halfway through.

2.  Drizzle about 1 Tb oil in an oven-proof skillet large enough for all the pork chops.  It should lightly cover the bottom.  If you have cast iron, great.  Preheat oven to 350º, and heat the pan over medium.

3.  Add pork chops to the skillet, letting excess marinade fall back into the pan first.  Fry on each side until they start to crisp, about 3 minutes.  Place skillet in oven until center of the chops reaches 155º, about another 3-7 minutes, depending on thickness.

4.  While the meat is in the oven, heat the remaining marinade in a small saucepan until it comes to a low boil.  If necessary, add water to bring it to 1/2 C of liquid.  Cook for 2 minutes.  Add cornstarch slurry to thicken the marinade into a sauce.

5.  Serve pork chops hot, drizzled with the chocolate sauce.

Difficulty rating  π

Thursday, February 18, 2021

Corned Pork

Pretty much everyone has heard of corned beef.  What I didn't know until recently is that any meat can be corned.  It's just a method of food preservation.  Corned lamb is a thing in several cultures.

Lamb was expensive the day I went shopping, but pork loin was slightly less expensive than beef brisket and other beef roasts that work well with corning.  Honestly, I don't know if I've ever bought one of those packaged pork tenderloins before, because they tend to run twice the size of what I normally use.  For the time involved in this recipe, you might as well do a lot and freeze the leftovers.

So what does it taste like?  Frankly, a lot like corned beef.  The texture is more delicate, possibly because I chose a tenderloin.  You can serve it as you would corned beef, in sandwiches or as hash.  I had it with some fig mustard, which was divine and cut the saltiness a bit.  Oh, there were vegetables too.

The process and most of the seasonings are the same as corned beef.  I just changed up a little for my own personal tastes and to complement the pork.  Halfway through the spice mix, I realized that I can make the corned lamb KLP by omitting mustard seed.  We'll keep that in mind for next month.

I still have a mostly-full jar of Prague Powder #1.  Theoretically, it expires this week.  My guess is the chemicals and salts are good pretty much forever as long as the contents stay sealed and dry.  Just the same, I'll make the effort to do more cured meats and offer some to anyone who wants to try it for themselves.  1/4 tsp per pound of meat, for someone who is making an effort to reduce their meat consumption, is going to last decades.  This recipe, and any corned meat recipe, works without it.  You just won't get the pink tint that's the hallmark of a corned meat.

1 quart water
1/2 C kosher salt
1/4 C brown sugar
*1/2 cinnamon stick, broken in pieces
1/2 tsp mustard seeds
1/2 tsp whole peppercorns
*8 whole cloves
4 whole allspice
4 juniper berries
*1 bay leaf, crumbled
*1 star anise
*1/2 tsp Prague Powder #1 (optional)
2 lb boneless pork loin or roast


1.  In a large saucepan, combine all ingredients down to the Prague Powder.  Bring to a low boil and stir to dissolve sugar and salt.  Simmer about 5 minutes, then remove from heat.

2.  Allow brine to cool for 1 hour, then stir in about a pound of ice to bring the temperature down to 40ºF.

3.  Place pork in a large zipper bag, at least 1 gallon.  Place in a casserole or plastic storage container deep enough to contain the brine if the bag fails.

4.  Add brine to the plastic bag.  Squeeze out as much air as possible and seal the bag.  Refrigerate 7-10 days, turning daily and checking the seal.

5.  Once brining time is finished, drain bag and rinse meat.  If you want a slightly less salty product, soak for 3 hours in plain water and drain again.  Place pork in a large saucepan with water or broth to cover.  Add 2 C mirepoix (onion, carrot, and celery trimmings) and simmer 2-3 hours, until very tender.  These tenderloins were simmered a bit less than 2 hours.  A pork butt or shoulder roast should go longer, being a tougher cut.  Slice thinly against the grain, which is easiest when the meat is slightly warm but not hot, and serve hot or cold.

Serves 6-8

Difficulty rating  π (but plan ahead 10 days)

Saturday, September 12, 2020

Monte Cristo Sandwich

I had some Swiss left over from the quiche Lorraine and went in search of something interesting to do with it.  I haven't had a Monte Cristo in ages, mainly because they're hard to find in diners and I never think to make them at home.

A cousin of the croque monsieur, it's basically a ham and Swiss melt inside French toast.  You can use deli turkey if you're not a fan of ham.  Great for brunches, they only need a side salad to be a complete meal.  I opened the last jar of daikon and carrot pickles for the occasion.

Strawberry jam is a common condiment for these sandwiches, but I still haven't made this year's batch.  I used the last of the spiced plum jam, and it was an excellent combination.  What that told me was that the jam would make a nice sauce with a holiday ham, maybe mixed together with a brown mustard.

I'm not a fan of putting mayo on sandwiches, but it serves a real purpose here.  It insulates the bread so the egg custard doesn't soak all the way through.  You don't want egg mixed with the fillings because it won't get hot enough to cook to a safe temperature.  If you're like me and don't like mayo, just put on a thin coat, enough to seal the holes on the insides of the slices.

*8 slices white or wheat sandwich bread
*4 slices Swiss cheese
12 oz thinly sliced deli ham
*approx 1/4 C mayonnaise
*1 Tb-ish mustard of choice
*3 eggs
*1/4 C milk
2 Tb butter
powdered sugar and jam for serving

1.  Spread mayo on the insides of all 8 slices of bread.  Add a slice of cheese to 4 pieces of bread.  Top with a drizzle of mustard, then 3 oz of ham.  Top with an un-cheesed slice of bread.  Press down lightly to push all the ingredients together.  Cut off the crusts to "seal" the edges.
2.  In a shallow bowl, whisk together eggs and milk to make a thick custard.  Melt butter in a large skillet or pancake griddle over medium-low heat.  Dip the sandwiches in the egg custard to coat both sides and the edges.  You don't have to let it soak all the way in.
3.  Fry sandwiches on the griddle until underside is browned, 5-8 minutes.  You're going for a slow cook to make sure all of the egg is done.  Flip and cook the other side another 5 minutes.  Cut in half, plate, and sprinkle with powdered sugar.  Serve with strawberry jam on the side for dipping.

Difficulty rating  π