Friday, May 31, 2024

Black Bean Falafel

I went through a lot of ideas for "black beans" on the meal calendar before settling on this.  The meal even changed after I went grocery shopping.  All this waffling is one of the reasons I have a meal plan in the first place.

Once again, I found myself on a kosher website simply because the recipe sounded good.  I shouldn't be all that surprised.  After all, Israel and many diaspora countries are on the Mediterranean, and that's still how I'm trying to eat.  What Jew Wanna Eat seems like a nice recipe site.  I probably won't go looking there all the time, but this one was what I had in mind.

Unfortunately, this recipe had a few problems when I actually went to make it.  The instructions weren't detailed enough for my liking, there wasn't any paprika in it, and the whole mixture was too soft.  Black beans are way softer than chickpeas and the first round ended up with the texture of ground beef rather than patties.  I put in a lot more flour and got it to hold its shape a little better, so that's what we're going with today.

2 C cooked black beans
*1 C diced onion
1 C parsley, chopped
* 3 cloves garlic, chopped
2 Tb lemon juice
1 tsp cumin
1 tsp paprika
1 tsp kosher salt
1/4 tsp black pepper
1/4 C flour
Grapeseed or other neutral oil for frying

1.  Rinse black beans and get them as dry as you can.  If using canned beans with regular sodium, cut amount of added salt to 1/2 tsp.

2.  Everybody except the oil and flour into the food processor.  Run into a thick and chunky mixture.  Sprinkle in flour and run again to distribute.  Chill 15 minutes while you prepare the pan.

3.  Heat a large skillet over medium-high and pour in enough oil to generously coat the bottom.  One of the mistakes I made with the first round was putting in too much.  You want the oil to get to around 375º, so it drops to 350º when you add the falafel.

4.  Scoop bean mixture into the pan.  I used the 1 oz cookie scoop, but a spoon works just as well.  Fry until the bottom is crispy, about 3-5 minutes, then carefully flip and cook another 3-5.  Remove to a paper-towel lined plate, add more oil to the pan, and repeat as necessary until all the batter is fried.  Serve hot, either on its own, in a pita, or as part of a salad.

Difficulty rating  :)

Tuesday, May 28, 2024

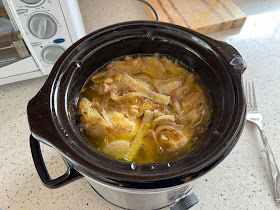
Slow Cooker Chicken and Fennel

Things are starting to bolt all over the yard.  Good for peas and artichokes, not so good for things you don't want going to seed.  I decided to dig up the volunteer fennel before it did bad things.

When I googled "slow cooker chicken and fennel", the first thing that came up was from Kosher.com.  We're well past the week I make the effort to eat kosher, but the recipe looked good and didn't need much tweaking.

Every time I make something in the Crockpot, it reminds me that I should use it more often.  It does require planning ahead, but then all you do in the morning is get the crock out of the fridge and turn on the base.

My actual photos will show half a recipe.  It's the small slow cooker, and I was only cooking for two days.  I almost bought a bigger one at an estate sale, but it was from before they started making the crock a removable insert.  I don't trust myself to wash an electric appliance like that without getting the wiring wet.  Maybe I'll break down at some point and get the 6-quart.

8 pieces chicken, or 4 leg quarters
*2 large fennel bulbs, thinly sliced into half-moons
*6 celery ribs, thinly sliced
1 large onion, sliced
*3 cloves garlic, minced
*2 bay leaves
1 tablespoon olive oil
1 tsp turmeric
*1/2 tsp fennel seeds
1/2 tsp ground mustard
1/4 tsp allspice
1 C chicken or vegetable stock, possibly more

1.  Line crock or use pan spray for easy cleanup.  Turmeric can get a bit messy.  When slicing the fennel, I recommend washing it a second time after slicing.  Dirt hides in the layers.

2.  Arrange fennel and celery slices at the bottom of the crock.  Lay the chicken on top.

3.  Drizzle the oil on the chicken.  Sprinkle with turmeric, fennel, mustard, and allspice.  I was using low sodium chicken broth, so I added half a teaspoon of salt.

4.  Cover with bay leaves and onion slices.  At this point, you can refrigerate overnight as a do-ahead.  When ready to cook, add chicken stock.  Depending on the size of your crock, you may need to add up to two cups.   The chicken will cook down, so you don't need to cover it, but there should be a solid 2" of liquid in the bottom to allow for evaporation.  I didn't have plans to use more in the next week and put in the whole 14oz can, which was definitely more than I needed for the 2 quart crock.

5.  Cover and cook on low for 8-10 hours or high for 3-4.  Serve with fennel, celery, and onion spooned on top.

Difficulty rating  π

Saturday, May 25, 2024

Preserving Cilantro

My cilantro started to bolt as soon as the nights got above 50º.  It isn't fair.  The thyme was flowering, too, but I have at least a year's worth and didn't care about digging it up.

After reading up on different preservation methods, I found this video from The Purposeful Pantry.  Ok, I'm never going to preserve enough of anything to need a freeze dryer, but the other two methods looked doable.

The first step before preserving any herb is to wash it well.  That goes equally for home-grown and store-bought.  I rinsed it twice in the sink.  If you have a salad spinner to dry it, great.  Otherwise, shake it to dry, then roll gently in a towel for a minute or so.  Open the towel and let the leaves air dry for half an hour, then you may proceed.

I don't have a dehydrator, and I asked Darcy at The Purposeful Pantry if the 110º setting on my convection oven was close enough to the recommended 95º.  She said the herbs would lose too much flavor and I'd be better off air-drying them if I lived somewhere with low humidity.  I do, so that's what I did with most of it.

I did have to take down some mint I had hanging in order to put up the cilantro.  I pretty much always seem to have something hanging from that cabinet.  Once the cilantro is done, I'm going to give Steve (the stevia) its first trim and hang that.

To hang herbs for drying, get a piece of yarn, trussing line, or twine and tie the stems together.  Loop it over wherever you have and let them dry until crispy.  This could be a week or a month, depending where you live and the season.  Then crumble them into a bowl, remove the stems, and stick them in a container to maintain freshness.  That's as hard as that method gets.

Now, for all those leaves that fell off, or the stems that I couldn't tie into the bundle, the next method I used was freezing in oil.  You can't freeze herbs in water, but you can do it in oil, like with pesto.  I crammed leaves into an ice cube tray, then added just barely enough olive oil to hold them together.  They're kind of hard to get out of the tray.  To use in recipes, drop one in straight and account for the teaspoon or so of oil that comes with it.

Ideally, you want to use all your herbs before they spoil and not have to deal with preserving them.  These ideas are for when you don't have that option, or want to have fresh herbs out of season without paying those prices.


Wednesday, May 22, 2024

Veggie Quesadillas and Pintos Verde


My Cinco de Mayo menu changed a few times after I bought the ingredients.  That's the beauty of basic Tex-Mex food: it's all based on about ten ingredients, and why Taco Bell is able to stay relatively cheap.

One thing I found when I rearranged the pantry was that I'm out of canned pintos.  I wasn't going back to the store for one thing and got out the jar of dried.  At some point, it sounded good to make a side of them with salsa verde, and make quesadillas instead of the planned burritos.

This meal may sound a little too simple to be a "recipe", but it's all in the presentation.  And it was very good, which is why I'm bothering to post something I kind of threw together.

4 8" flour tortillas
butter or margarine as needed
*2 C shredded cheese of choice
*2 green onions, finely chopped
1 Roma tomato, diced
1 large or 2 small avocados, diced
1 can pinto beans or 2 C cooked
1 C tomatillo salsa or salsa verde of choice

1.  Butter one side of each tortilla.  Preheat a large skillet over medium-low heat.

2.  Place one tortilla butter-side down in the skillet.  Sprinkle with 1/2 C cheese, then one quarter of the onion, tomato, and avocado.  Allow to cook until the cheese is well-melted, about 5 minutes.  Fold over into a semi-circle, and continue to cook each side until as crispy as you like it.  Keep warm in a low oven while you repeat with the remaining ingredients.

3.  While the quesadillas are cooking, make the beans.  Drain and rinse the can of pintos or drain the cooked ones.  In a small saucepan, heat beans and salsa over medium until just boiling.

4.  Cut quesadillas into wedges when ready to serve.  Serve beans on the side, maybe in a small cup.

Difficulty rating  π

Sunday, May 19, 2024

My New Pond Project

Ten-plus years ago, when I decided to turn the water feature in the back yard into a vegetable bed, I should have gotten rid of the thousands of pebbles all over the rim.  I took out a lot from the bottom, along with most of the large rocks, before adding dirt, but never dealt with the ones above the original water line.  Over the years, rain, wind, and gravity have brought a lot of them onto the soil, to the point that I can't use the Pond for root crops like carrots.

I finally got tired of it, and now I'm trying to clean it up.  It's a lot of pebbles.  I started by scooping the upper ones into one of the wire baskets I bought at Dollar Tree and moving them into the front yard's planter, which has gradually lost most of its weed-suppression pebbles over the years.  The baskets were originally for protecting seedlings from caterpillar-laying butterflies and moths.  You invert them over the plant until it's healthy enough to fight off predators on its own.  I was realistic that I would not be able to get every single pebble, and called it at about 90%, or all that could be removed with a utility brush.  Everything looks much tidier, and it only took about an hour.

Step two, which is going to take much longer, is to sift the dirt in the Pond through the basket and hopefully catch all the rocks and most of the weeds.  I'm working around any remaining winter plants, which are currently celery, two green onions, and lacinato kale.  Round One of the cleanout produced about 2 gallons of pebbles and showed me that I'm not watering the Pond enough.  It is also much shallower than I thought, maybe 8 inches at the deepest.  I'm working on it once a week, before a deep watering.

Once the sifting project is done, or at least reduces the pebbles to a livable amount, the soil will be aerated and ready for conditioning for this summer's crops.  I'm getting to this very late, so I'm going to have to buy starts.  I'm not even sure what I want to grow yet.  That's going to have to wait about a week after I buy more soil, so it can settle into its new surroundings.  I'm also working on clearing the overgrowth around the rim, so seeds stop falling into the vegetable bed.

I'm trying to remember that gardening is an active hobby, not a passive one.  You don't plant seeds or starts and come back in a few months to a garden.  Half an hour of attention every few days is generally enough to grow food or landscaping, and it's good exercise.  You get sun and fresh air, and it's good for your emotional health.  That's at least as much a benefit as any produce you can grow.

Thursday, May 16, 2024

Carrot and Cabbage Kugel

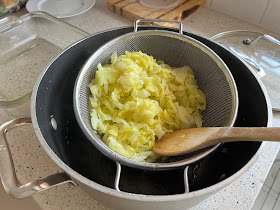
Here's another recipe inspired by We Cook Vegan that wasn't vegan by the time I got done with it.  I had the inner half of a cabbage left over from the cabbage rolls and about a pound of carrots.  Originally, they were going to be just a stewed side to have with some corned beef, but I had a little time to make something more interesting.  This time, I didn't have to get out the food processor, but the stand mixer made it easier.  It's largely mashed carrots mixed with wilted cabbage.  There are some seasonings, an egg, and a bit of starch to thicken it up.  Bake to set it, and you're good to go.

For those not in the loop, kugel is basically Yiddish for casserole.  It's often mashed something and contains egg and starch.  That starch might be potato, noodles, bread, rice, you name it.  A kugel can be sweet or savory, and is often spooned rather than sliced.  It's a casserole.

If I had broken down and used two pots, this would have taken half the time.  First I made the carrots, rinsed out the pot, then did the cabbage.  It would have been a lot quicker to just wash the second pot.  The recipe will reflect that.

*1 lb carrots
*1 lb cabbage
kosher salt as needed
*1/4 tsp white pepper
1/2 tsp granulated onion
*1 tsp dried tarragon
1 Tb margarine
*1/4 C milk (or coconut milk for pareve)
1 egg
*1/4 C potato or corn starch (potato for Passover)

1.  Peel carrots and cut into small-ish chunks.  Place in a saucepan with water to cover and a pinch of salt.  Bring to a boil, cover, and lower heat to a low boil until carrots are easily pierced by a fork, about 20 minutes.

2.  Thinly slice cabbage and remove the core.  Place in a large pot with about one inch of water and 1/2 tsp of salt.  Bring to a boil, cover, and cook at a low boil until thoroughly wilted, 15-20 minutes.

3.  Preheat oven to 350º and grease an 8x8 pan with oil or pan spray.

4.  Drain carrots and place in a stand mixer with the paddle.  Reuse the strainer on the cabbage and let them hang out for a bit.

5.  Beat the carrots with the paddle until broken up.  Add margarine, milk, 1/2 tsp salt, white pepper, granulated onion, and tarragon and beat until combined.  Add egg and starch and beat again.

6.  Stir carrot mixture into the cabbage, then pour into casserole and spread evenly. Bake 30 minutes, until set.  Allow to sit 10 minutes before serving


Difficulty rating  :)

Monday, May 13, 2024

Ricotta Biscuits

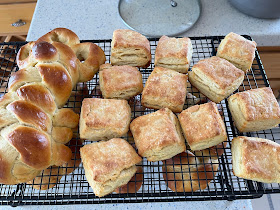
I bought a tub of KLP ricotta cheese for matzoh lasagna, which only uses half of it.  That stuff is not cheap when you get the store brand, much less KLP at the kosher market.  I needed to use the rest on something, anything, to justify the expense.  Making these the day after Passover fit that need.

They're basically a cream cheese biscuit, but using ricotta instead.  It means they're going to be a little heavier and fattier than buttermilk ones, but not overwhelmingly so.  I decided to add rosemary to them.  You can add any herb or spice that goes with your meal, or leave them plain.

I decided to follow this recipe from Apt. 2B Baking Co.  In the future, I'll probably cut down to 6 Tb of butter from the 8 that she puts in it.  The result was very flaky, but a touch on the oily side; you don't need to add butter at serving.  For the last turn of the layering, I cut the dough in half instead of folding it, to reduce the folded edge.  I also made 12 out of my little rectangle, as that was the size I wanted.

1-1/2 C flour, plus more for dusting
2 tsp baking powder
1 tsp kosher salt
1 tsp dried herb of choice, if desired
4 oz (1 stick) unsalted butter, cut in 1/2" cubes
1 C ricotta
1 egg
cream for brushing (optional)

1.  Preheat oven to 425º and line a baking sheet with parchment or a silpat.

2.  In a medium bowl, sift together flour, baking powder, salt, and any herbs.  In a separate bowl, combine ricotta and egg.

3.  Work the butter into the flour with your fingers.  Squish the cubes into flakes about the size of a thumb nail, considerably larger than you normally would for biscuits.

4.  Make a well in the middle of the flour and add the ricotta.  Stir until flour is mostly wet.  You're going to be working this more.

5.  Knead lightly, until most of the flour in the bowl sticks to the mass, then turn out onto a lightly floured surface.  Dust with a bit more flour and shape into a rectangle 3/4" thick.

6.  Fold rectangle in half, give it a quarter turn, and press back out to 3/4".  Do this two more times.  After the last turn, cut the rectangle in half and place one on top of the other.  Press out to its final dimensions, still 3/4" thick.

7.  Cut rectangle into squares or bars and transfer to baking sheet.  If desired, brush tops with cream for shine and a darker color.  Bake 15 minutes, until lightly browned, well-risen, and set.  Cool on a rack for at least 2 minutes, then serve.

Yes, this was also schlissel challah baking day

Makes 8 to 12, depending on size

Difficulty rating  :)

Friday, May 10, 2024

New Pantry Configuration

After at least ten years, I finally decided to move the small appliances out of the main pantry and only store food in it.  I actually decided it a few months ago, but waited until after Passover to do it, since I'm rearranging a whole lot of stuff then anyway.

The first step was clearing a shelf in the laundry room cabinet, which is next to the chest freezer, on the backside of the fridge wall.  It isn't a trek to go in there every couple of weeks for the food processor or FoodSaver.  (It was drama when that was my kitchen sink for a week during the whole clogged drain debacle.) This part of the project involved moving a few cleaning products to the garage, which is a longer walk, but it's stuff I don't use often or the big containers to refill spray bottles.  And the cabinet was overdue for a complete cleaning anyway.  I temporarily stored canned goods on the designated shelf, knowing half of them would be gone by the time I moved everything.

Last week was the big day.  Everything came off the bottom shelf of the pantry.  After a good wipe-down, the canned goods went in their new home and the ice cream maker, food processor, FoodSaver, and several other small items I hardly use went into the cabinet.  Took all of an hour.  I'm leaving my home-canned goods on the shelf above alone, plus the oatmeal I picked up when The 99¢ Store was going out of business.  Only place where oats were still a dollar a pound.  I go through about a pound a month, so that isn't as excessive as it looks.

While most of the products I moved are just canned backups, I can now see what I have on a daily basis.  I'm less likely to buy duplicates, and more likely to incorporate them into meal planning.  Nothing in there was a surprise or getting near its best-by date, but now it's more on my mind.  What I really need to do is get used to cooking with canned vegetables.  They're really there for power outages, like after a major earthquake.  The only time we ever ate canned veggies growing up was while camping, so it isn't part of my repertoire.  I should definitely use them more in stews and casseroles.

Tuesday, May 7, 2024

Greek Salad with Mustard-Yogurt Dressing

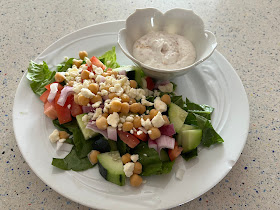
I'm cracking into the Dijon.  The meal plan calendar said "chickpea", and this happened.

This is really just a basic Greek salad with a new dressing.  Coarsely chopped veggies and vegetarian proteins.  I skipped the kalamatas because I'm kind of olived-out at the moment, but they are absolutely an appropriate garnish.  This is healthy and filling, even if you skip the pita side.

1 small head Romaine lettuce, or half a large one
1 lb Roma tomatoes (2-4 depending on size), large dice
1 cucumber, peeled and cut in chunks
1/2 red onion, sliced and cut in smaller chunks
1 can chickpeas, drained (or *2/3 C dry, soaked and simmered)
*1-1/2 C plain Greek yogurt
*1/2 C Dijon or grainy mustard
Olive oil for drizzling
*feta and/or olives for garnish, and pita wedges for serving

1.  Thoroughly wash Romaine and chop into manageable pieces.  Toss in a large bowl with tomatoes, onion, cucumber, and chickpeas.  Drizzle lightly with olive oil, toss again, and chill until ready to serve.

2.  For the dressing, combine mustard and yogurt until evenly mixed.  If desired, thin with milk.  Chill.

3.  To serve, portion salad into bowls.  Top with feta and olives.  Dressing can be drizzled on top if you thinned it, or served on the side as a dipping sauce.  Place a few wedges of pita bread on the side, if using.

Difficulty rating  π

Saturday, May 4, 2024

Red Lentil Galette

Here's another We Cook Vegan-inspired post.  It's close to the lentil crepes, but thick like a socca.  And I made an avocado-yogurt sauce for it, so it's no longer vegan.  Also, there's milk in this because I don't have any non-dairy milk in the house at the moment.  The original version was with sweet potato, but I've been having a lot of those and wanted to change it up.

I wasn't expecting as much flavor out of this as there was.  For not a ton of spices, they really came through.  I did almost burn the underside, which probably brought extra char yumminess to the dish.

This is going to take you a while because of soaking the lentils.  It isn't a spur of the moment thing.  I also got a lot of use out of the food processor.  As long as it was going to be used for the lentils, I ran the carrots through it and later the sauce.  If it's getting dirty, might as well make it worth it.

My artichokes are coming in!  I barely finished off last year's.  I don't expect nearly as many, even though there has been plenty of rain this year again.  I can't believe I grew a year's worth.  This meal was the ones I eat fresh.  After this, I'll probably freeze or marinate and can the rest.  We'll see.

3/4 C dry red lentils
olive oil as needed
*1/2 C diced onion
1/2 lb carrots, grated
1/2 tsp kosher salt
1/2 tsp turmeric
1/2 tsp chili powder
1/2 tsp garlic powder
1 green onion, finely chopped
1/2 tsp baking powder
1/4 C flour
3/4 C milk (can be non-dairy)

1.  Early in the day, rinse lentils thoroughly to remove milling dust.  Soak in water at least 3 hours, and up to 24.  Drain and rinse.

2.  In a 10" skillet with a lid, heat 1 Tb oil over medium heat.  Add diced onion and cook until softened.  Add grated carrots and spices and cook until carrots are softened, about 5 minutes.  Add green onions and cook one more minute.  Remove from heat and set aside.

3.  In food processor, purée lentils, baking powder, and flour.  Add milk and pulse again to combine.  The result will be a thick batter.

4.  Stir together batter and carrots until uniform in a medium bowl.  Wipe out skillet and add enough oil to coat the bottom, about 2 Tb.  Return to medium heat.

5.  Pour out mixture into skillet and spread to the edges.  Cover and cook 5-7 minutes, until the bottom is lightly browned.

6.  Completely loosen bottom of the galette from the skillet.  Set a plate on top and invert.  Lightly re-oil the pan with a Tb or so of oil.  I did not know about the re-oiling part, and the galette warped when I took it out at the end.  Slide uncooked side off the plate and back into the skillet.  Cover and cook another 5 minutes.

7.  Slide galette out of pan and onto a serving plate or cutting board.  Cut into wedges and serve with sauce of choice.

Difficulty rating  :)


Wednesday, May 1, 2024

Springtime Abundance

I haven't done a gardening post in a while, and stuff has been growing.

The artichokes did me a favor and didn't all bloom at the same time.  I had enough of the same-sized buds for Seder, which I always try for but had not previously achieved.  The super-late date contributed.

I had started my peas very late because the nights were cold well into February.  They finally started to climb the trellis, after which they went a bit bonkers, with yummy results.


My regrown green onions started to grow their scapes sooner than I was expecting, so I put my last eggplant seedling in with them.  I'm keeping three for seed, which means I can now use the rest and give Eggy more room to grow.  There are also some from-seed onions growing in another pot with a couple of garlic.

I'm still growing more celery than one person needs, but I did use a lot during Passover.  There are three lacinato kale, which allowed me to use some in a matzoh lasagna instead of spinach.

I now have at least a full year's worth of dried thyme, probably more, so those are going to come out of the lettuce patch soon.  They have gone to flower, and the faintly lilac-colored buds are very pretty, but that means they don't taste right anymore.  I might sow some more cilantro, since I used a lot of it for Seder, and you can never have too much cilantro anyway.  I have almost two months before it gets too warm for it.

My new attempt is stevia.  Since I have enough basil for a while, I put a rather expensive stevia start in that pot, which was instantly named Steve.  You can't use it exactly the way the granulated stuff works, but you can drop a leaf in brewing coffee or tea instead of sugar.  That may be as much as I get out of it anyway.  It is notoriously hard to grow.